3DPrinting
3DPrinting is a place where makers of all skill levels and walks of life can learn about and discuss 3D printing and development of 3D printed parts and devices.
The r/functionalprint community is now located at: or [email protected]
There are CAD communities available at: [email protected] or [email protected]
Rules
-
No bigotry - including racism, sexism, ableism, homophobia, transphobia, or xenophobia. Code of Conduct.
-
Be respectful, especially when disagreeing. Everyone should feel welcome here.
-
No porn (NSFW prints are acceptable but must be marked NSFW)
-
No Ads / Spamming / Guerrilla Marketing
-
Do not create links to reddit
-
If you see an issue please flag it
-
No guns
-
No injury gore posts
If you need an easy way to host pictures, https://catbox.moe may be an option. Be ethical about what you post and donate if you are able or use this a lot. It is just an individual hosting content, not a company. The image embedding syntax for Lemmy is 
Moderation policy: Light, mostly invisible
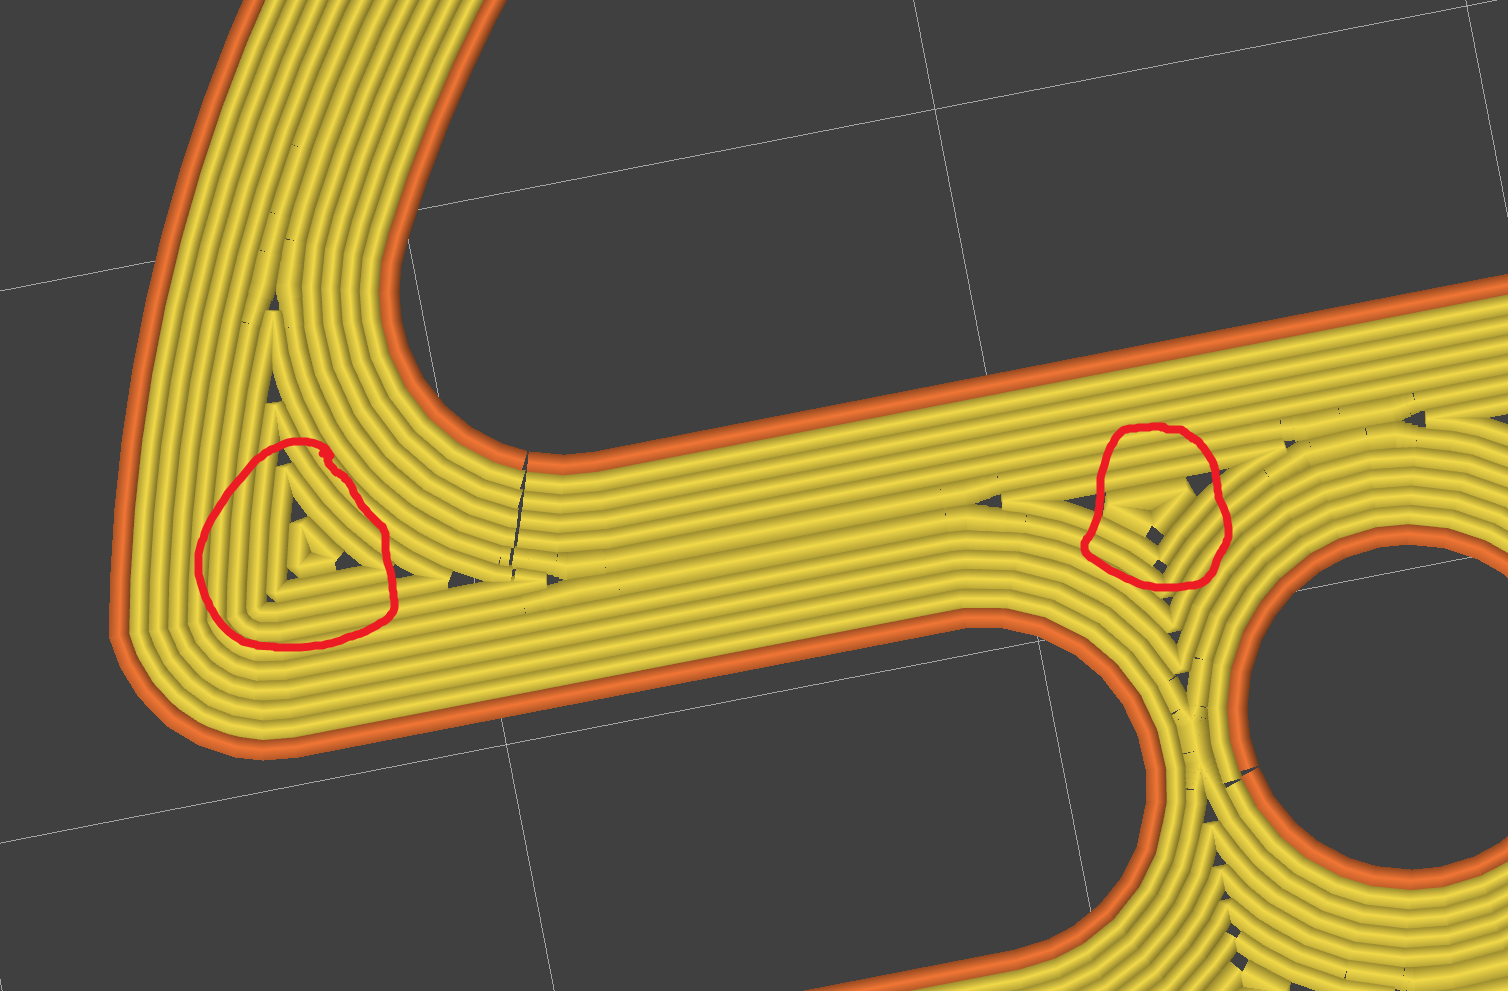
Why do you want to remove them?
They dramatically increase print times and increase blemishes. It's such a small surface area, that it just ends up creating blobs and shakes the printer.
If you’re finding you’re printer is shaking too much, consider adjusting the acceleration/jerk settings
it’ll slow prints down- the maximum axcel/jerk will limit the top speed for the very short moves, longer moves remain mostly unaffected- but it will improve print quality.
I probably should adjust the acceleration settings. In this instance, Im just trying to optimize the print to cut down on print time. There's about 15 or so of these needlessly small sections per layer, so culling them would cut down the print time a bit.
The triangles are a result of the print "wall" changing thickness. Look at the corner on the left. All 10 perimeter lines go all the way round. If 10 go in and 10 come out, we need extra perimeter lines in the corner to fill the extra width. That's why there are triangles.
I imagine you could fix this by making the walls the same thickness at all points, but without trying I can't be sure.
Can't you make the infill concentric? That should help.
Isn't that possible only for top/bottom layer?
Set top and bottom solid layers to 1. Set infill to concentric and then set infill percentage to 100%.
It should get rid of most triangles.
Unfortunately that has the same issue as well. These triangles are due to the 3 closest perimeter lines meeting, thus concentric ends up with the same issue.
Then I am afraid you can't eliminate all triangles. If you had an extruder with variable extrusion width, then it might have worked. Why are you trying to eliminate the triangles anyway?
Yellow is perimeter lines, the goal is to not use infill at all, and to just use multiple perimeter passes.
Why?
Direction specific force loading. In this particular instance, Having it run the infill along the perimeter of the part would improve it.
If this is a one off, you could try manually removing the lines of gcode for those traces. Though this would get tiresome if you wanted to do this a lot.
