this post was submitted on 20 May 2024
88 points (92.3% liked)

3DPrinting

14768 readers
61 users here now

3DPrinting is a place where makers of all skill levels and walks of life can learn about and discuss 3D printing and development of 3D printed parts and devices.

The r/functionalprint community is now located at: [email protected] or [email protected]

There are CAD communities available at: [email protected] or [email protected]

Rules

If you need an easy way to host pictures, https://catbox.moe may be an option. Be ethical about what you post and donate if you are able or use this a lot. It is just an individual hosting content, not a company. The image embedding syntax for Lemmy is ![](URL)

Moderation policy: Light, mostly invisible

founded 1 year ago
MODERATORS
 

At least so far. The first go round had the nozzle crash into the tree support, resulting in a layer shift. The good news is that the print stayed very firmly stuck to the bed.

I've reset, lowered my extrusion multiplier a smidge, switched to a more traditional support pattern, and am going for it again. Wish me luck!

top 29 comments
sorted by: hot top controversial new old
[–] [email protected] 36 points 1 month ago (1 children)

That's a fire hazard (in case you weren't already considering it)

[–] IMALlama 4 points 1 month ago (1 children)

The printer is a a Voron 2.4 running klipper with a chamber thermistor, controlled bed fans, and an exhaust fan so it will do a decent job regulating it's temperature. The electronics are outside the chamber and there are acrylic panels under the blanket and hoodies. Should it come to it, klipper has thermal runaway protection. There's also a smoke alarm right next to the printer. I suspect this will be a pretty uneventful print.

I let the printer heat soak for an hour and a half before giving it a go and barely cracked 60 °C, so all should be well. This is a Voron, so the electronics are out of the chamber, have a cooling fan, etc.

Other than looking somewhat janky, this isn't that different than the insulated panels I'll be swapping on to replace the current acrylic panels.

[–] pixxelkick 26 points 1 month ago* (last edited 1 month ago) (1 children)

None of this stops the risk of fire.

Once a fire starts, the printer turning off won't magically stop the fire from continuing to grow.

Printers can fail in all manner of ways.

Also, you should have a venting solution of printing ASA.

It's pretty cheap to get a proper fire resistant heat cover for a printer.

Just get an emergency "space blanket", they're often only a couple bucks and quite good, but very fire resistant.

[–] IMALlama 3 points 1 month ago (1 children)

I guess I'm not clear what the source of ignition would be? The chamber is fairly well temperature controlled, so it's not likely that something inside will overheat. The cloth that's draped over outside of the printer can't come into contact with any hot bits thanks to acrylic panels. The chamber itself is currently sitting at 59 C after the print has been going for 10 hours (plus 1.5 hours of preheat before that).

Agree on venting, I need to duct my exhaust fan to the outside.

A space blanket is a good idea. I have a few lying around and will add one. Bonus points for being a radiant barrier (eg should help get things warmer again). I'm surprised that mylar will help prevent the spread of fires.

[–] pixxelkick 15 points 1 month ago* (last edited 1 month ago) (2 children)

All the electronics inside are very much capable of combustion.

Your power supply inside the printer body for example can very much fail and burst into flames.

And tbh it's not that uncommon for that to happen with 3d printers. They're often made with very cheap parts and prone to cheap work on the inside bits.

Add on how much of a high wattage load they meed to handle for extended periods of time and yeah, sometimes the inner wiring bursts into flames and the whole thing goes up.

I always recommend keeping a cheap lil smoke alarm directly overhead any 3d printer, seriously. Those fuckers can very much spontaneously burst into flames lol

[–] IMALlama 3 points 1 month ago (1 children)

The electronics are housed in a (reasonably) sealed airspace below the print bed and have two fans blowing across them. Here's a link to CAD/STLs/some pictures: https://vorondesign.com/voron2.4. If you want to poke around GitHub, you can do so here: https://github.com/VoronDesign/Voron-2. No printer is perfect, but Vorons are fairly well thought out and I didn't skimp out on components when I was sourcing parts. All wiring inside the enclosure is either PTFE or silicone insulated.

Here's what it looks like underneath:

I always recommend keeping a cheap lil smoke alarm directly overhead any 3d printer, seriously

Totally covered.

[–] papalonian 1 points 1 month ago* (last edited 1 month ago) (1 children)

I do get where you are coming from with outlining all of the precautions you have taken, and I agree that the print is 99% likely to go just as fine as all your other ones, but there's no amount of planning or prepping you can do that will change the fact that putting a pile of flammable articles over a massive source of thermal energy is indeed a fire hazard.

This is coming from someone with a very not ideal setup that does not have great fire safety precautions. (It's inside a wooden hutch with a curtain draped over it for heat retention... 😬) I understand that my setup is dangerous, and I accept those risks. You aren't making yourself any safer in denying your own.

EVGA had PSUs that blew up. Samsung is still too afraid to put ultra fast charging in their phones because they were blowing up. AMD GPUs were starting fires like 10 years ago. Just because you bought nice parts, doesn't mean you aren't dumping a ton of power through very delicate and fragile components that at any second could decide to kill themselves and everyone around them.

Not trying to say you shouldn't do this because it's your setup and you know it better than people online, just that you should keep in consideration when making these decisions that none of the things you've explained will matter if a large capacitor goes pop, and if it's under a pile of sweaters you'll probably have a much bigger problem to deal with than you would have otherwise.

[–] IMALlama 1 points 1 month ago (1 children)

Ultimately, if the printer is going to go up in flames the source of those flames won't originate at the cloth draped over the acrylic enclosure. The chamber barely cracked 60 °C, which is well below what smaller Vorons, especially V0s, will hit with only acrylic panels. Yay lots of surface area I guess.

It will be very interesting to see how everyone reacts (or doesn't) to some "better looking" insulation. The sources of ignition won't be any different, but I bet that people will be much more comfortable looking at insulated ACM panels that were built for purpose.

[–] papalonian 2 points 1 month ago

We aren't saying that the clothes are going to cause the printer to catch fire.

If the printer did catch fire, those clothes are going to make it a million times worse. You're correct when you say most of the printer is not flammable. If your printer caught fire normally, it might run out of fuel before the fire was able to spread anywhere else in your house. If there's the tiniest flame now, those sweaters are going to create a ball of inferno. It's the exact same reason why every space heater says not to dry clothes on them, 99% of the time nothing bad will happen but if something bad does happen that 1% you don't want to literally add fuel to the fire.

People are going to be fine with the "better looking" insulation because as you said insulation is made for this purpose and is usually fire retardant.

It's a dangerous setup man. No if ands or buts about it. I'll say the same thing again, I'm not here to tell you to change anything because mine is dangerous too, but if you're going to do stuff like that it's really important that you understand what you're doing (and why it's dangerous). I get that people online tend to try to find issues with everything, but sometimes people aren't just complaining because something "looks bad", and in communities like this it pays to look into stuff before assuming you know better than everyone trying to tell you the same thing.

[–] [email protected] 2 points 1 month ago

Well, you've just decommissioned my printer until I've changed the smoke detectors batteries

[–] Pacmanlives 23 points 1 month ago
[–] [email protected] 6 points 1 month ago (1 children)

Do you have an exhaust fan somewhere?

[–] IMALlama 2 points 1 month ago

Yup! The bedfans are also in a control loop.

[–] Pacmanlives 6 points 1 month ago

It’s called the ADHD mod

[–] [email protected] 4 points 1 month ago (1 children)

I made a sleeve of aluminum foil bubble insulation for mine. I taped it together with aluminum HVAC tape. It makes the enclosure heat up quicker, but I have to run the enclosure fan on longer prints to keep it from getting too hot.

[–] IMALlama 1 points 1 month ago (1 children)

This is basically what I'm planning on doing to make this look a bir nicer in the future. Do you change your bedfan speed via macro or do you only rely on your exhaust fan to regulate the temp?

[–] [email protected] 2 points 1 month ago

I just use the exhaust fan for temperature control.

[–] [email protected] 4 points 1 month ago (2 children)
[–] [email protected] 1 points 1 month ago

Here is an alternative Piped link(s):

https://piped.video/wmin5WkOuPw?si=Jvj6NQtgyfdJ97VT

Piped is a privacy-respecting open-source alternative frontend to YouTube.

I'm open-source; check me out at GitHub.

[–] IMALlama 0 points 1 month ago

I loled. This should be pretty safe though, check my other replies in the tread.

[–] [email protected] 2 points 1 month ago (1 children)

What's your chamber temp with bed fans like? I just mounted a chamber thermistor (on the floor, I don't feel like running cables through the drag chain right now) that I need to connect but the little thermometer module on my gantry was reading like 58 ish at 100 c bed temp, dropped to 56 ish overnight, was getting 40s before moving them to the front and actually setting up the automation macro for them.

For impromptu insulation, Cardboard works well too, I stick my filament dryer in a box during the winter so it can actually hit the target temps, otherwise it runs forever.

[–] IMALlama 2 points 1 month ago (1 children)

I struggled to hit 60 °C after an hour and a half of heat soak using the filter and two extra bedfans on full blast. This was measured from the toolhead over the center of bed and the nozzle 75mm off the bed. Without the insulation I was in the low 40s.

I don't have enough cardboard to make a cardboard sleeve, but I do have ACM panels I've been meaning to install, along with some of that foil bubble radiant insulation.

[–] [email protected] 2 points 1 month ago (1 children)

I have ACM on mine, definitely recommend, did need to print thicker panel mounts for them though. Those definitely sound like some decent chamber temps, I've had decent enough results in the 40s, I'd be interested to see where ACM + bubble insulation goes.

[–] IMALlama 2 points 1 month ago (1 children)

I've had a number of bigger prints warp with just acrylic panels :( now that I've finally figured out how to consistently nail my first layer the last print lifted the build plate. I was impressed, lol.

I need to figure out what I'm going to do for my door. Thinking about going clicky-clack so I can still eyeball the first layer out of habit.

[–] [email protected] 2 points 1 month ago* (last edited 1 month ago) (1 children)

I have 2 doors with the 270 deg hinges with latches, but I'm honestly super interested in something like the clicky-clack for sealing, theres a slight gap between mine and I've not got around to making something to fill it without getting in the way. I have little tiny windows on mine 
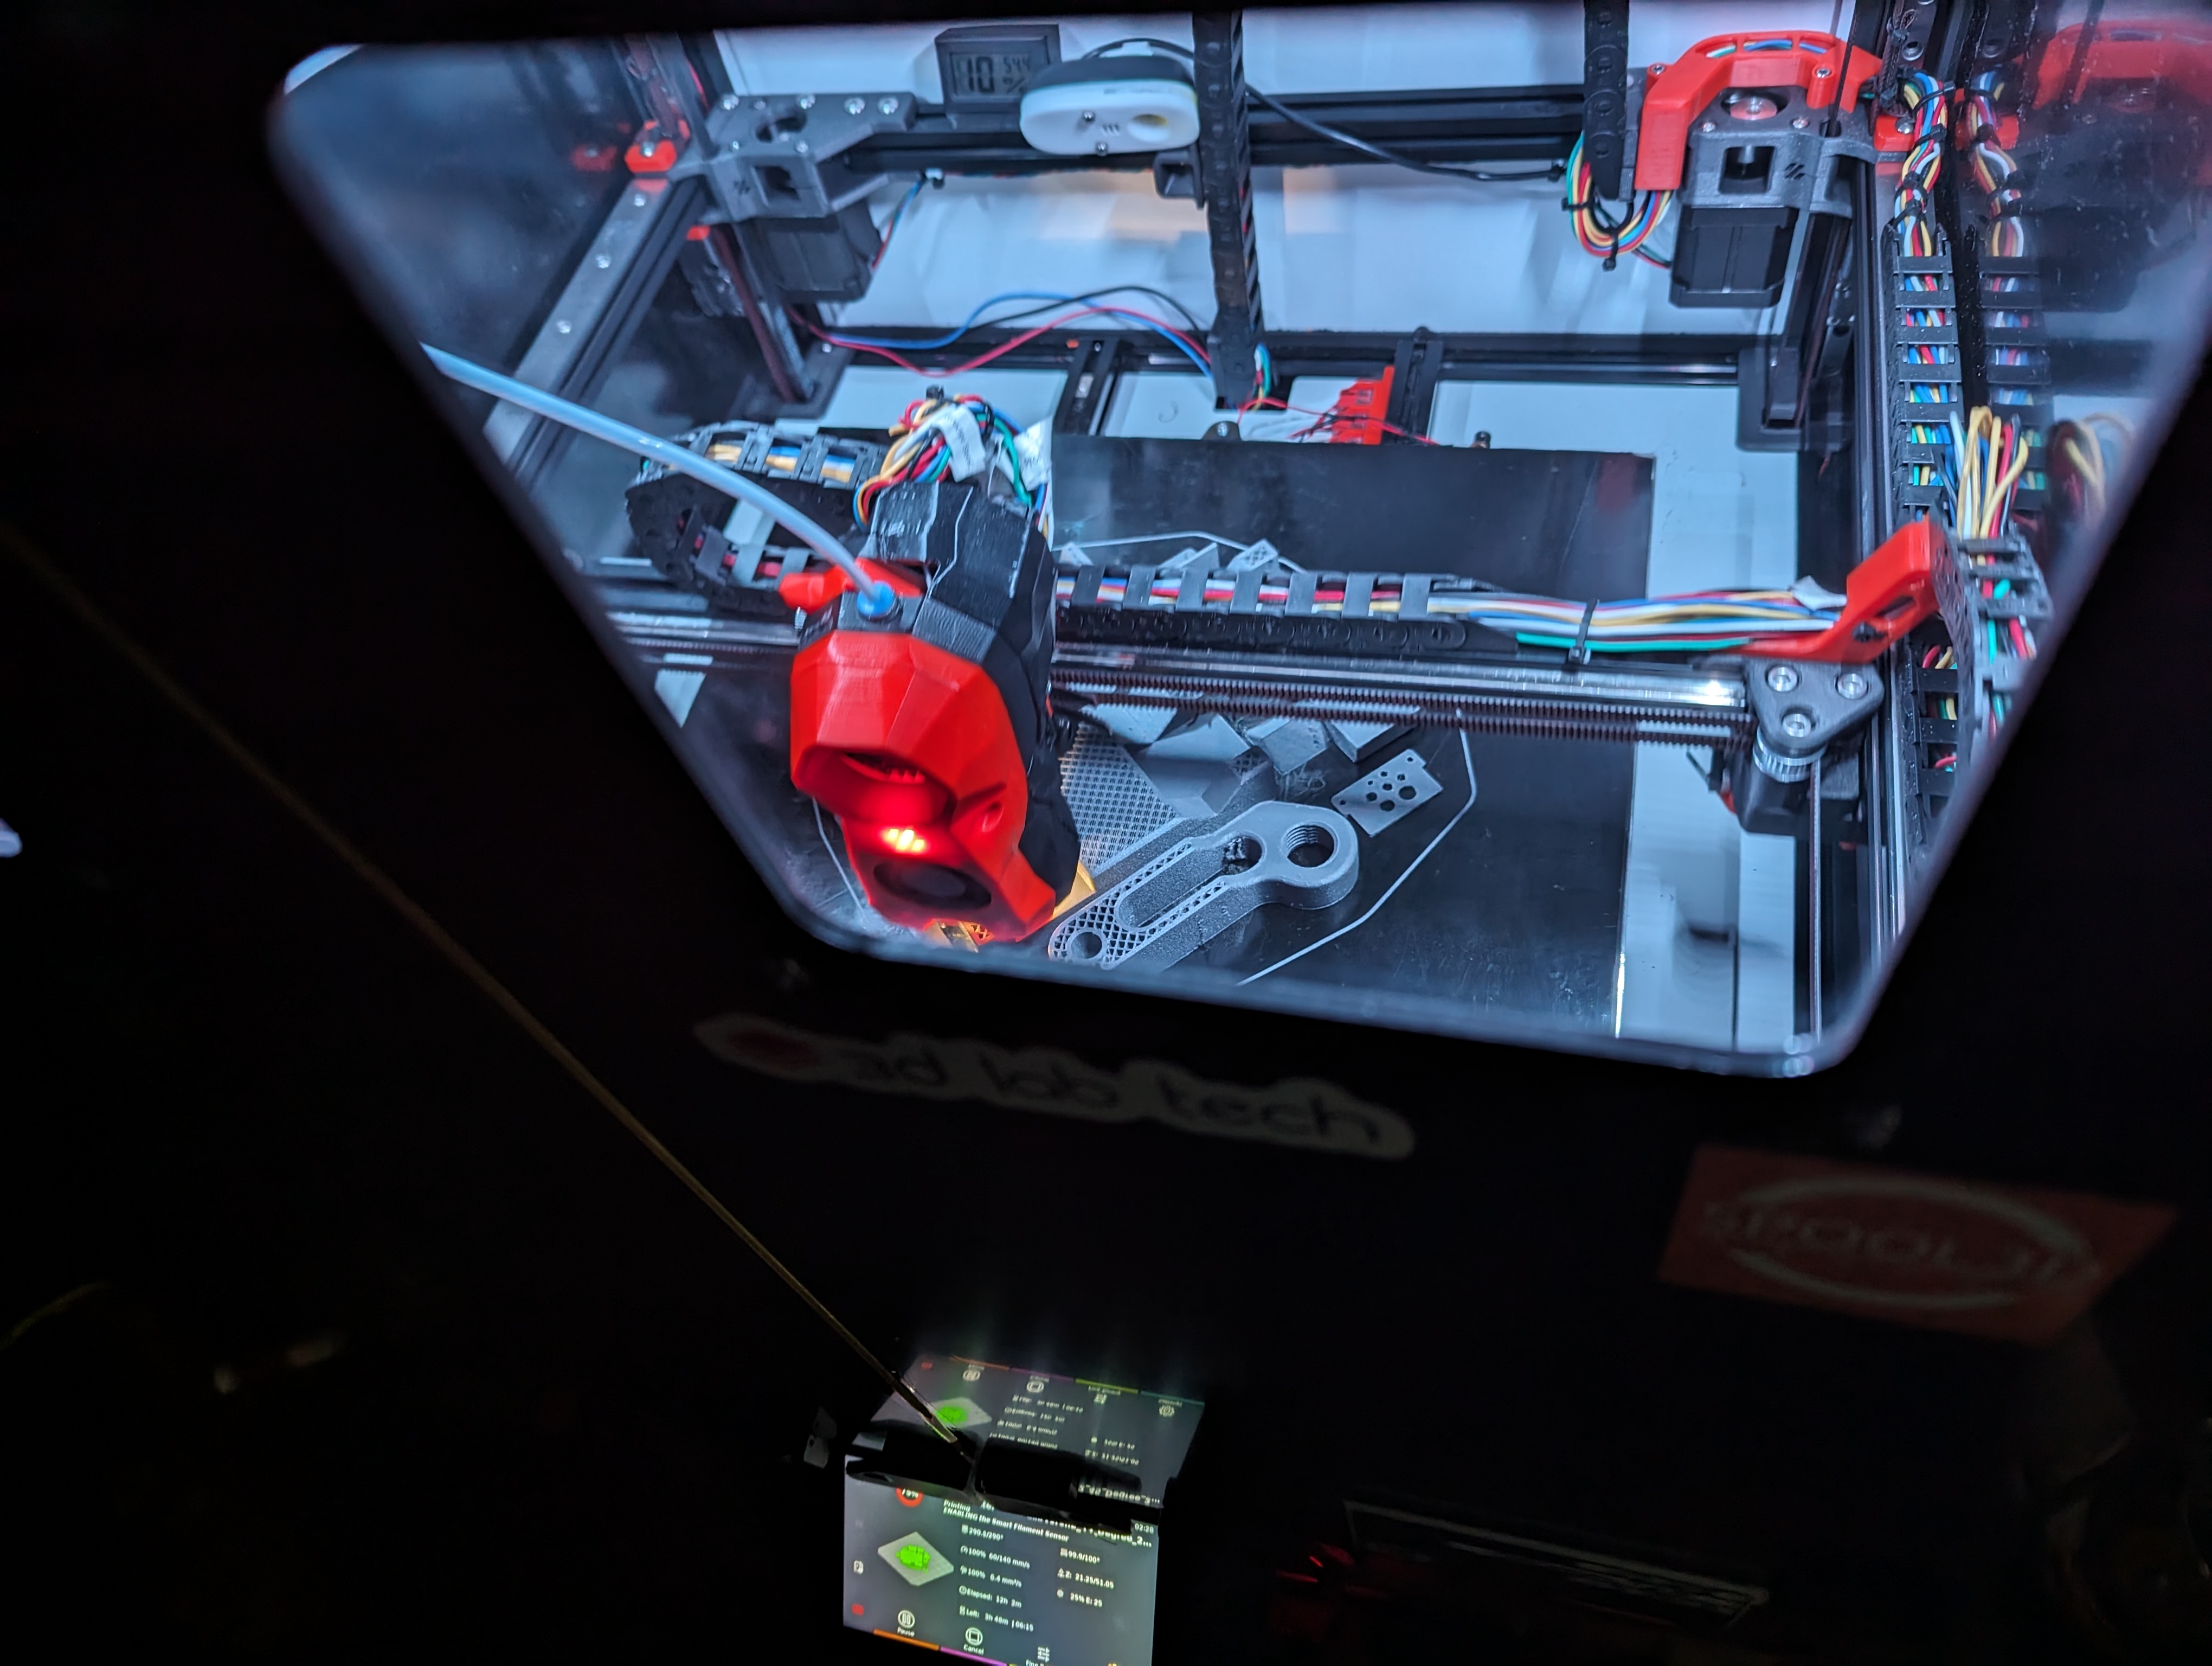
(excuse the loose cable, hadn't printed slot covers for the lights yet, just put the covers on today) you can kinda sorta see what's going on but Yeah, definitely relying on known good profiles and stores offsets for each of my surfaces. Tap kinda sorta makes swapping nozzles less of an issue but I still like having different offsets, textured is a bit closer and nylon is just a bit further away.

Super impressive it stayed adhered honestly, I had that happen with buildtak but not with a standard pei surface.

[–] IMALlama 2 points 1 month ago (1 children)

No adhesion helpers either, I was pretty pleased! This macro seems a bit daunting to set up and get running, but it should solve most of your challenges: https://github.com/protoloft/klipper_z_calibration

[–] [email protected] 2 points 1 month ago

I'll look at it for sure thanks! I think I was going to try it a while back but never got around to it as I figured the tap probe would handle it, found it most important to keep the nozzle clean (shocking I know considering it's my z probe!), I had a cleaning macro before I installed the kinematic bed, might set that up again when I get around to it, need to make some height adjustments to the models as the bed itself sits higher than stock.

[–] [email protected] 2 points 1 month ago (1 children)

I'm looking into printing with ASA eventually - have you tried skirts on an ASA print? (Not sure what other slicers call it - it's a wall that is printed around the print to shield drafts)

I don't have an enclosure on my delta so was considering that as an alternative.

[–] IMALlama 2 points 1 month ago

Yes, I've done skirts. At a certain print size/aspect ratio it doesn't really matter though - the parts are going to want to warp without a warm enclosure. If you have great first layer adhesion it will just take your build plate with it. You'll find a picture of that happening on this printer if you look through my post history.

Smaller parts in x/y and round corners will help prevent warping.

I printed all the parts for my Voron using an i3 clone under a cardboard box. I doubt that "chamber" got very warm, but it was enough for success.