3DPrinting

16529 readers
331 users here now

3DPrinting is a place where makers of all skill levels and walks of life can learn about and discuss 3D printing and development of 3D printed parts and devices.

The r/functionalprint community is now located at: or [email protected]

There are CAD communities available at: [email protected] or [email protected]

Rules

If you need an easy way to host pictures, https://catbox.moe may be an option. Be ethical about what you post and donate if you are able or use this a lot. It is just an individual hosting content, not a company. The image embedding syntax for Lemmy is ![](URL)

Moderation policy: Light, mostly invisible

founded 2 years ago
MODERATORS
701
59
submitted 1 year ago* (last edited 1 year ago) by [email protected] to c/3dprinting


I really liked the coin model and my kiddo wanted something to hold rings and guitar picks, so I made it thinner and touched up the central detail.

https://www.printables.com/model/718364-mario-coin-tray

702


Hi! I have an old CR10-s, I don't have money to buy a new, and more performant printer, so I just used and spare OrangePi PC that I had to use klipper, and I love it! It was so satisfying. Now I want to change the fan inside the awful control box but then? I read about stepper dumper are useful? I want to install a BLtouch, TL smoother and a ADXL345 for input shaping. but do you think it's worth? I also tried to find info about new and more silent stepper driver, but for what I understood I can't install them on my stock board, is that correct? I should move to a Bigtreetech?

All of this will cost me like maybe 60$ + maybe sth if I want to put a noctua on the extruder and a magnetic plate...

To sum up: does this planned updates worth? do I need to move to a new board for the stepper driver? it's better to throw away the printer? (I'm joking). I want to achieve a more reliable print, lower noise and a little more speed.

(see the anycubic viper is so damn fast)

Thank you a lot in advance

703


Hi all, I have a quick question about my z screw coupler (as i understand it, the metal cylinder at the bottom you can manually move your z axis up and down with).

When I manually raise the z axis (with steppers disabled) by rotating the coupler clockwise, after I let it go, it reverses it's rotation on it's own and sinks back down. This is frustrating because it takes forever to actually move it any distance. Am i doing anything wrong? Should you only ever move the z axis with software, and if so, is there a way to fix the issue of it going back down? I don't know how to adjust the tightness of this part, I'm still pretty new.

704


When I came into my office this morning, I found that my boss moved his resin printer into my office and the setup reeks of solvent (it smells like a hundred uncapped expos). Are these fumes fine? Or am I gonna end up with half a melted brain by the end of the week?

705
84
submitted 1 year ago* (last edited 1 year ago) by [email protected] to c/3dprinting


Why are 3D printers still stuck on stepper motors? Why haven't we transitioned to servo motors with encoder feedback for positioning?

Is it just too cost prohibitive for the consumer-level? We would be able to print a lot faster and more accurately if we had position feedback on the axes. Instead we just rely blindly on the stepper not skipping any steps when we tell it to move, hoping for the best.

706


I'm reconfiguring my printing closet (~6'x6') for a new printer and thought about enclosing the printer in a moderate sized cabinet (~2'x3'x6' - one "shelf" of the closet) for thermal control. Since there will be inevitable opening and closing, as well as just normal infiltration of the ambient air (usu ~65F between 40-75% RH) it would seem like a good application for a Peltier dehumidifier to keep the RH in the chamber low and reduce my need to re-dry filament which has been on the machine during (inevitable) multi-day or -week downtime between projects.

707


Hello! I'd like to print food safe objects to use in the kitchen, like spoons and glasses and so on. Looking on the web it seems that the problem with 3d printed objects is that the space between layers is like bacteria's heaven, so after one use you have to throw them away. The only way I found on the web is "coat with resin", but I don't like this very much, as scratches can remove the coating. also "print a negative and use it like a stamp" seems like too much work for a simple spoon.
so the question is, what if I use a filament that can go into the dishwasher, so I can clean it with boiling water? the web didn't help me much on this, as I found different opinions on the matter: some people said that PETG could go in the dishwasher, some said no.

what is the real answer? can I 3d print PETG objects, use them, put them in the dishwasher, and then safely reuse them?

708
 
 
709
84
Tie-Fighters Follow Up (files.catbox.moe)
submitted 1 year ago by OZFive to c/3dprinting


I am pleased to follow up to this post with an update that the Tie-Fighters now all have engines and am halfway done with the solar collectors frames.

710
20
submitted 1 year ago* (last edited 1 year ago) by seasick to c/3dprinting


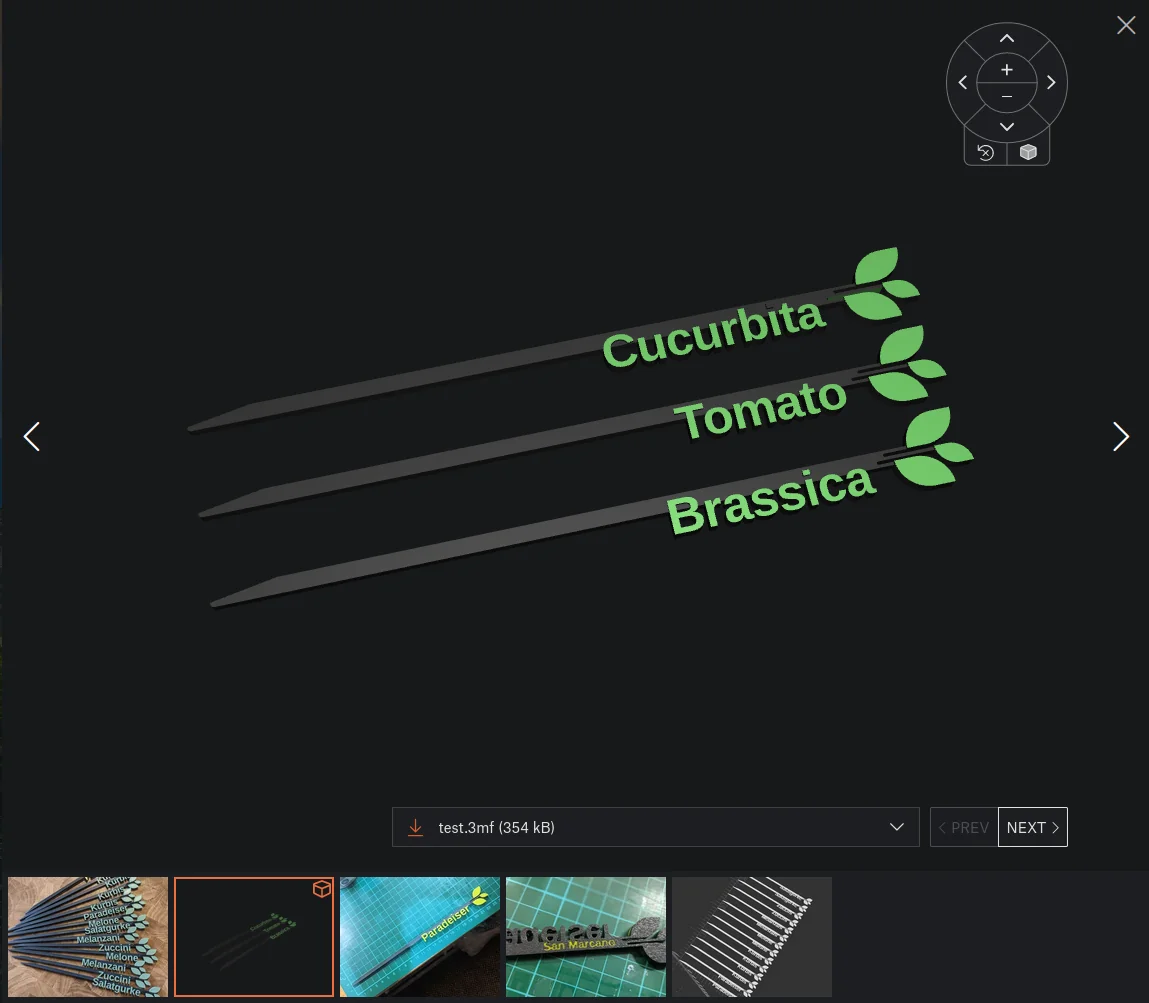
I've seen a model on Printables.com (Ninja Pot by @Wilko) which didn't show the standard orange color for the whole model. This works because the 3MF file format supports colors. Afaik some slicers even support that information for multi color prints, but I'm not sure about that. There are a few solutions how to do that (a plugin for blender, another one for OpenSCAD, afaik Netfabb), but I decided to write my own. Hopefully there isn't a totally obvious solution available that I overlooked ^^

It is hosted on Github, you can access and use it through your browser.

You can "upload" (it never leaves your browser) an 3MF file and change the color of the whole model, or you can change only some parts of it.

It has three tools:

  • Mesh painting tool to paint whole objects
  • Triangle painting tool to paint single triangles/faces of the model
  • Triangle Neighbor painting tool which allows to paint all triangles which have the same orientation/plane

After painting you can export it a 3MF file again, and upload it to Printables. You can see an example here.

I'd love to hear some feedback from you.

There is still some work to do (Performance and I'm sure the 3MF export won't work for all models), but I'm already happy how this turned out.

Screenshot of one of my models before exporting

Uploaded to Printable

711
82
submitted 1 year ago* (last edited 1 year ago) by overzeetop to c/3dprinting


<- gallery of parts

https://imgur.com/a/dkILl03

I've been wanting to try and make a mount for space gaming to go with my office chair - a Steelcase Leap. The organic-ish arms didn't make an easy way to create a clamp system, but in fooling around with it recently I noticed I could remove the armrest pads and they had a nice 4-bolt pattern. Since this is my office chair I need to be able to swap in or out of gaming setup easily.

I added a 30mm tall adapter that lets me slide a 6mm x 30mm (actually, 1/4x1-1/4) bar in and secure at the back, with a plate adapter to mount my old HOTAS4 to the bar, and a pin at at the rear for quick release.

The plates and adapters are eSun PLA+ which is fairly stiff but has some durability/ductility to it. The bar was supposed to be 6061-T6 aluminum but I was lazy and didn't feel like making a mess in the shop, ripping down some surplus plate I have, and I was too cheap to go out and buy 1/4x1-1/4 steel bar stock so I decided to print the bars from PAHT-CF (high temp nylon with carbon fiber). The 385mm bars just barely fit diagonally on my CR-10s.

712
20
submitted 1 year ago* (last edited 1 year ago) by [email protected] to c/3dprinting


I have run in to a strange issue where the X and Y axes don't move to the specified coordinate beyond a certain range.

The steps/unit are calibrated, when i tell an axis to move to position 100mm (using G0 or G1 command manually), it moves to position 100mm, this goes for both X and Y axis...but it seems like it hits a software-stop when i tell it to move beyond 225mm on both of them, which is weird since build plate is 230mmx230mm, and nozzle wipe-pad and Z-offset calibration are located at Y position 240mm-245mm.

The stepper just stops at 225mm even if i tell it to move beyond this point, and if i tell it to move back to 0mm, it positions itself correctly at the starting point. It doesn't sound like any skipping on the belt or the stepper itself is happening, it's completely silent but just stops. I can easily move the bed and print-head beyond this point by hand, and i can't feel any noticeable increased resistance in the movement.

The odd thing is, that this worked just fine a week ago, i haven't changed anything on the config of the printer. It's an anycubic Kobra 2 bedslinger.

EDIT: i can trick it to move beyond the 225mm point by changing the steps/unit, but that messes with the general print size accuracy.

EDIT 2: It seems a FW update enabled SW end-stops, a simple "M211 S0" command from the terminal disabled them again and now it works just fine.

713


So, after nearly 10 years of faithful service, my shitty ol' Wanhao i3 Plus is finally ready for retirement. Steppers are buzzing, occasional collisions with the bed, and the heat block just doesn't... heat as quickly as it used to.

Talking to a mate who does a lot more printing than I, it seems I can't pass up the Ender 3 V2. The right price for what I typically do, and is backed by a mature community.

I've ordered the auto-level kit with it, but nothing else. My i3 already sits in a Lack Rack I made, and it should comfortably take the new printer.

I have a couple of functional print projects on the backburner that were waiting for me to make a move, but wanted to get some advice on mods and upgrades first, that might make the first experience with the Ender even better.

So, asking the more experienced Ender owners out there: are there any essential upgrades, preferably 3D printed, you think I should look at first?

Cheers in advance!

714
26
Stepper not moving (self.3dprinting)
submitted 1 year ago by callcc to c/3dprinting


I just got an old Ender 3 for cheap and wanted to replace the crappy extruder with a nicer bowden extruder of my (now) direct drive Kobra Max. When I connect the new stepper, nothing moves. It's a longer stepper and a different manufacturer. Is the wiring different or VREF wrong or are there other reasons why it wouldn't move? The driver is good, since the old stepper is still working.

Thanks for any help!

715


I mocked this up the other day from Michelangelo’s Brutus bust.

716


Hi folks,

I've used Cura as my main slicer with my Flashforge Creator Pro for several years with no major issues. It was a while since I had upgraded (4.12) and I decided to try out the latest version (5.6).

My printer and slicing profiles seemed to transfer over automatically, but when I tried to slice and print, I encountered a strange issue: It no longer heats the extruders or the bed.

It just starts "printing" immediately with stone-cold extruders and bed. The temperature settings in my slicing profiles seem unchanged from 4.12, so I'm a bit at a loss as to what is happening.

I can verify that this is not a hardware issue with the printer, as I can run print jobs generated in Cura 4.12, and the heaters work just fine.

Anyone else encounter this or a similar issue? Any known fixes or recommended troubleshooting advice?

Thanks in advance!

717
 
 
718
40
Prusa MK4 vs Bambu P1S (self.3dprinting)
submitted 1 year ago* (last edited 1 year ago) by root to c/3dprinting


I'm looking to buy an intermediate level printer to upgrade from a MK2, and I'm deciding between a P1S vs a MK4.

I have never considered getting anything other than a Prusa, since I've had such good experiences using mine, however I heard that recently they've switched away from their open source model(?)

That and being made in the EU was the main differentiating factor for me, however I do hear really good things about Bambu printers.

Does anyone have experience with either?

Edit: Found a lot of the information I was looking for here: https://lemmy.world/post/9500502

719
72
submitted 1 year ago by OZFive to c/3dprinting


... for my daughter and the neighbor kids. All scaled to 200%.

printables.com/model/563813-t..

Going to throw on some fun colors for the canopies and solar collectors.

Overture Black Sovol White Overture Space Grey Overture Dual Color Silk Red/Gold

720


This is a Prusa MINI+ that has worked flawlessly for 3 months. Suddenly the prints won't stick to the bed, the first layer is all messy and I cancel the print before anything worse happens.

  • The printer has auto bed leveling so I would rule that out.
  • The plate is cleaned with 70% IPA, so it's not dirty either.
  • I have tried to adjust the "Live Z Adjust" while printing that first layer, but no setting works well.
  • Each filament is printed at recommended temps (+/- 215C) and bed is at 60C.
  • Out of my 5 spools, only 1 works well: RepRapper 3-color PLA. Even the Prusament PLA fails to stick well, and also eSun PLA+, and eSun matte PLA, and Tinmorry TPU.

https://i.imgur.com/MEpK37W.png

Update:

  • Thank you all for your kind input.
  • I washed the plate, and cleaned the nozzle (have no spare nozzle).
  • I also did a fresh Z-test (with this object) using Prusament galaxy silver PLA.
  • That was successful and showed that my height was already very close to perfect.
  • Z-test result shows that -1.425 is best. I was off by only 0.025. Image
  • Started printing an object with eSun matte black PLA but the result was same as in my original photo.
  • Changed back to the Prusament galaxy silver PLA and the result is perfect. (image)

So it looks like my filament storage is not up to snuff! Good thing that I only have a few spools, so not much is lost.

721


I still have no idea what I'm doing really. Just too determined to give up I guess, and it's been such fun. Anyway I made a guitar pedal light switch cover. Still a lot of work to do, and every time I look at FreeCAD the wrong way, the model breaks, but it's been a fun experience nonetheless.

On a side note, anybody have any idea why the face of the model is rough textured, while the foot switch on the lower half is flawless?

722


I've had an Ender 3 v2 for a few years now and have had mostly no issues. I've upgraded the hot end to a microswiss direct drive and a dual z setup (twin z steppers on a shared cable).

Recently started having issues with the 4.2.2 board and replaced it with a BTT mini SKR 3 v3.

Since I've put the new board in, I am having troubles getting the bed to level and stay level.

The height profile of the bed is now showing a dip in the centre (which was not there before). When I run a print it seems to be overcompensating for the dip. If I level the bed with the corner screws and don't use the bed mesh then it prints fairly good, but after a few prints the bed goes out of level again.

I can't seem to make any adjustments that help the issue. Yesterday tightened up all the screws (silicon spacers instead of springs). Releveled the bed and had a small dip in the middle and an overall height difference of 0.170 across the bed (normal prior to this was 0.310). Sent a print with bed mesh and mostly came out good.

Went to fire up a new print today and the bed height is showing 0.830 overall difference.

I'm not sure if it is a BL touch issue (the BL touch is a v3.1 and is original with a single 5 wire connector plugged into mini SKR) dual z issue (disconnected 1 in an attempt to level and didn't see much difference, the BTT has two connectors for dual z but run off one stepper driver as I understand it, I am using the y cable for only one stepper motor, while the other motor has its own cable).

I use klipper with a RPi zero 2 w.

I just can't seem to figure out that has been causing the issue since the board swap.

Anyone have some ideas as where to point me?

723


I created a web app which allows you to "upload" ^[1]^ 3MF files and change the color of its meshes.

I solely created this, so I can color my models on printables.com in its 3d model viewer. Maybe it work on other platforms too :shrug:

Why? I just didn't find a simple solution to my problem.

  • Afaik color support is broken for Fusion360 3MF export,
  • there is a plugin for Blender, which is a whole other beast (one of you fellow printers mentioned it in the last few days)
  • For openscad, there is https://github.com/jschobben/colorscad

I'm currently working on vertex coloring and improving the UI. I'd be happy to hear some feedback from you guys.

There are still some things to figure out and fix (normals are often wrong). If any Threejs devs read this: I'd be happy to hear what I can improve, I've no clue what I did.

[1] No data is uploaded to a server, it all stays and is processed within the browser.

Sourcecode

724


I bought the Milwaukee Packout Low Profile Organizer, and loved everything about it - except the rectangular bin. The fact that it was divided into three sections bothered me, and the fact that it couldn't be divided along the long axis also bothered me, so I modeled it and duplicated it. I wanted my model to be indistinguishable from the original, so instead of just making something that would work, but look out of place, I tried to make something that just blended in and disappeared.

So, I duplicated the rectangular bin, but also moved the separator slots around so that it could be divided into four sections along the short axis, and also be divided in half along the long axis. That meant that it could be divided in a bunch of crazy ways as well, so I modeled a bunch of different dividers for it.

I also modeled the square bin as well, just in case I wanted "spares" that could hold additional stuff that could be swapped out without having to dump stuff from one bin to another. My bin is completely compatible with the Milwaukee bins. They stack on each other, the separator I made fits in the Milwaukee bin, and the Milwaukee separator fits in my bin.

725


Good morning friends! I'm still fairly new to 3D printing, although I'm learning a lot more to be dangerous now. I'm printing this part, and I have cleaned and leveled the bed, as I do before every print, and usually have very few issues. This time, my first layer went down almost perfect, with the exception of the bottom right corner being a little bit tight, but as you can see in the picture, every once in a while, I get exactly one line of it not adhering on the first layer. Subsequent layers all seem to lay down perfectly fine, so I'm suspecting bed adhesion, it's just weird that it's only in one single line. Anyone ever experienced issues like this, and seen a remedy?

view more: ‹ prev next ›