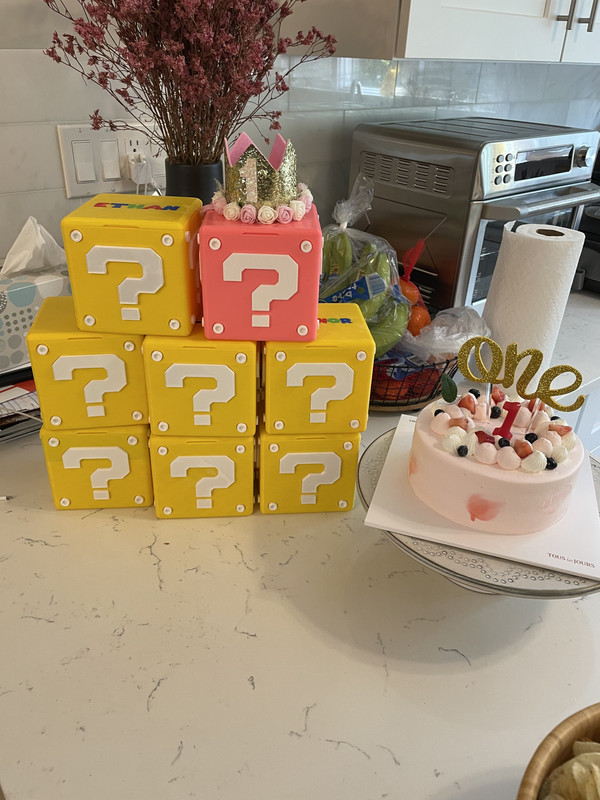
Those look pretty large, how long did it take you to print all of them?
What printer did you use?
3DPrinting
3DPrinting is a place where makers of all skill levels and walks of life can learn about and discuss 3D printing and development of 3D printed parts and devices.
The r/functionalprint community is now located at: or [email protected]
There are CAD communities available at: [email protected] or [email protected]
Rules
-
No bigotry - including racism, sexism, ableism, homophobia, transphobia, or xenophobia. Code of Conduct.
-
Be respectful, especially when disagreeing. Everyone should feel welcome here.
-
No porn (NSFW prints are acceptable but must be marked NSFW)
-
No Ads / Spamming / Guerrilla Marketing
-
Do not create links to reddit
-
If you see an issue please flag it
-
No guns
-
No injury gore posts
If you need an easy way to host pictures, https://catbox.moe may be an option. Be ethical about what you post and donate if you are able or use this a lot. It is just an individual hosting content, not a company. The image embedding syntax for Lemmy is 
Moderation policy: Light, mostly invisible
They’re 125x125x125. I was able to personalize the boxes with the x1c with AMS.
I think they took around 4-5 hrs each. About another hour for the personalized covers.
What software did you use to create the covers?
I've been printing a ton lately, but I haven't gotten into inlaying different colors or custom text.
I can research it myself, but it would be helpful to have a software recommendation to get started.
These are wonderful! What a lovely gift. What did you put in them? Or did you leave them empty?
Just typical party favors. Stickers, bubble wands, spinning toy watch, etc.
This is so cool!! I don't think I was ever as excited for a gift as I'm sure those kids were! Beyond thoughtful to personalize them with names. I would keep mine forever. You're going to make your daughter very popular, I'm sure hahah.
Those are great! Nicely done. It's little things like that that they can really appreciate sometimes.
Now I want to get an MMU for my prusa 🤦♂️
howd you get multiple colors to print like that? im finally getting mine going after initially losing my patience with it. that looks awesome.
The white parts are printed separately and glued on. The personalized names on the covers, I used tinkercad. I imported a “Mario” font and then made it protrude slightly. It should be less than the layer height, but deep enough to provide solid color.
Then in bambu studio, color the protruding letters. When sliced, it’s just a smooth surface.
I learned the technique from a post in bambulab but can’t seem to find it anymore.
Most slicers should be able to do this, I’ve added a color change in PrusaSlicer to do similar. Having it protruding (top layer) makes it easier.
I loved those. Do you have any guide on how to design 2D text to print for cake toppers like this?
we bought the cake topper from Amazon. Only the question marks are printed
Ah, I see. Thank you for your answer
