IMALlama

joined 1 year ago
[–] IMALlama 9 points 1 month ago

IMO there's little need to buy new in the computer world unless you want to do something silly like have a snapdragon x laptop or have the disposable funds to go the gaming rig route.

My desktop is a retired business workstation, a HP Z420. I bought it for $250, installed a smaller SSD ($100 new) for the OS + apps, upgeaded to the "best" Xenon that fit the socket ($150 used), upgraded to 64 GB RAM ($107 used, yay ECC memory being dirt cheap on the used market), and a 1070TI ($225 used, purchased just before covid).

It's more than fast enough for my needs still.

This was all about 4-5 years ago, so you could probably do even better with more modern hardware.

[–] IMALlama 2 points 1 month ago (2 children)

Do you live in a warmer climate and/or have radiator heat? From what I've read, carneverous plants like higher humidity and Midwest winters + forced air make for a pretty dry house.

Also, be careful with bottled water. They all have some level of minerals in them to get their flavor profile. That said, if you've been doing this for any period of time carry on!

[–] IMALlama 2 points 1 month ago

That looks like under-extrusion to me.

Here's the quick "tune your extruder" arc:

  1. E-steps. Mark your filament about 125mm from a known reference point, extrude 100mm, measure again. What percentage of 100 did you get to? Adjust your e-steps accordingly and try again. You should never have to mess with this number ever again unless you physically change parts in your extruder. More detailed guide
  2. Temperature. Print a temp tower. Choose the temp that looks the best and offers good layer adhesion. Your filament will extrude differently based on your extruder temp
  3. Flow rate / extrusion multiplier. This will require more typing from me, but there are a number of ways you can generate test prints for this, so check the linked guide. More detailed EM multiplier guide.

After you get #1, never touch it again unless you change things like your extruder gears. #2/#3 are a good idea whenever you start a new roll of filament, although I personally don't bother unless I'm trying a new material, brand, or color.

[–] IMALlama 10 points 1 month ago (4 children)

If you're "squashing" the camera on the hot shoe and base plate, you're probably fine. Especially given that your backpack probably won't be able to fit that much stuff besides the camera cube and your laptop.

Just keep weight off the lens/lens mount. It will be a lever and you don't want to tweak anything.

[–] IMALlama 1 points 1 month ago

The PWM signal once it starts getting jittery is basically only 0 or 100% and corresponds pretty well to the swings in temperature.

I've moved the head hot and cold by hand and haven't gotten any weird behavior. Normally when I have a wire break there's a very specific location that will reliably fail. That's not the case this time.

[–] IMALlama 1 points 1 month ago (2 children)

I wouldn't think so, the printer never did this previously. I need to put together some g-code to make the print head move around at a pretty high rate, but without actually extruding anything.

[–] IMALlama 1 points 1 month ago (4 children)

That's the thing, I would say that the OM-1 is capable of delivering very sharp and low noise photos. Potentially even sharper than the A9II, due to either the OM-1 having a less strong AA filter than the A9II or my choice of glass on both bodies (first party 'pro' on the OM-1, third party and cheap first party on the A9II). You can see this in things like the shirts my kid wear - the stitching around the collars and seams, and even the weave of the shirts tends, to pop a bit more in the OM-1 photos.

The really frustrating thing with the OM-1 is that I know it can deliver very sharp photos. And yet it doesn't do so fairly often because its focus system holds it back. Some of this might be due to brand philosophy. Set the A9II to focus priority and it will drop its burst rate to ensure every shot is in focus. Do the same on the OM-1 and the burst rate stays pretty high, resulting in more total shots but also more shots out of focus. I've done some sleuthing by wiring my phone up to the OM-1's HDMI output and recording it focusing, and it seems like the AF algorithm will falsely claim focus. The thing behind the green focus box isn't in focus and the camera's green focus dot claims that focus has been achieved. This is something I do not see happen very often on either the A7III or A9II. Those two cameras very reliably indicate what they're focusing on. If the green focus indicator isn't where you want it, simply reacquire focus. On the OM-1, you have to judge both the focus indicator, as well as whether or not your intended subject is actually in focus.

I suspect I could work harder on the OM-1 to get better focus more consistently, but the A9II, and the A7III, are just so easy that I'm spoiled.

If you're pushing ISO, the FF gear will obviously come out ahead. Thankfully, I rarely need to push ISO.

As for croppability, I've done some decent crops with the OM-1. If you look over in [email protected] you'll see a lot of cropped OM-1 bee photos that I've posted. Crop and pixel peep? On a high resolution display without exceeding 100% zoom, sure. On a lower resolution screen, maybe not so much. Prints shouldn't be an issue unless you're going to do a heavy crop and then print large.

As for weight, if you're taking photos in the 'normal' focal length range and want shallower depth of field FF really is pretty competitive these days. Especially if you like primes. M43s do have very compact glass, but their FF equivalent f-stops are pretty high so I've found myself gravitating to fast M43 glass. It's the telephoto end that M43 wins on. I could happily hand hold my D5300 + 70-300 (FF glass, but only 745 grams - half the weight of my 150-500) for hours on end. With the A9II and the 150-500, I find myself squatting/sitting and bracing my left arm against my leg, especially when I'm shooting baseball and my kid's team is batting - I'm just sitting at the end of the fence bursting every time a pitch comes to try to get a good photo of each kid making ball contact. Lots of 'ready position'.

If I were approaching the age where weight was really an issue, and I was mostly focused on wildlife with longer glass, I would go the monopod route. I've been avoiding one at my kid's sports events due to wanting to keep a (somewhat) low profile. The 150-500 is still a pretty beefy lens though and now that my oldest is in coach pitch some of the kids are taking more notice. One even asked me if they were going to be in the news, lol. Sony's 200-600 would probably be easier to handle, thanks to its super easy zoom action, but that lens is big. At least with the 150-500 I can walk past the stands fully zoomed out and locked in place.

Final thought: the best camera in the world is the one you're carrying. If you're not hesitating to grab the A91 then keep rocking it. If you're hesitating, maybe consider going the M43 route. As for me? I continue to waffle. For daily use in the normal range, it's the A9II with a prime hands down. I am tempted to sit on the OM-1 until this summer and rent/buy a used Panasonic 100-400 to see how it does. I'll be using it mostly in the 100-250mm range, so it should be plenty sharp. But do I really want to have the $$ tied up in two bodies...

[–] IMALlama 2 points 1 month ago (1 children)

OP, your directions were a bit unclear as to what specifically we should be guessing about. That's what prompted my other reply, but I was hoping someone else would chime in for the bird. Or that you yourself would say something like, "I meant the bird".

Here's a reply on the bird itself as a non-birder who has a pair of large bird feeders off their front porch.

My initial guess was an American Robin due to the belly coloring and grayish body, but I was able to recognize that the head coloring/patterns were off.

It looks like the correct answer is the Eurasian Nuthatch, which is something I don't think I would have seen before given that I live well outside their range.

[–] IMALlama 3 points 1 month ago

My phone is in bedtime mode (black and white) and the painting looks a lot more photorealistic to me. It's quite the collection of kids, activities, and expressions.

[–] IMALlama 9 points 1 month ago

Clearly the nut the bird is eating is a black oil sunflower seed. Case closed ;)

[–] IMALlama 2 points 1 month ago

I suspect it's motion/jiggling around related. I guess I could whip up some g-code to see what happens when the printer is still vs when it's moving rapidly.

Thanks for the nudge, will follow up.

[–] IMALlama 2 points 1 month ago

That's a very nice looking area. Your Roe of Sharon is much better pruned than ours - we more or less let it to wild and trim the sides if it's getting unruley. I also suspect yours is more mature based on the size of the trunk towards the top. Ours is still flexible enough that I can grab an offshoot and pull the whole branch it's connected to down.

Looking at yours, and thinking about our 3' tall one we grew from seed, I think our original plant is really a collection of a bunch of individual plants that were grown in a common pot.

40
submitted 9 months ago* (last edited 9 months ago) by IMALlama to c/photography
 

I am easing back into the photography world after taking a hiatus due to kids. I've found myself carrying dedicated camera a lot more frequently than I have in the past (even before kids), which has resulted in me spending some time thinking about what the right camera for me is. I've "short-term-rented", via lensrentals.com, and "long-term-rented", via buying and selling used equipment, a number of bodies and lenses over the past 1.5 years to try to find what clicks with me. So far, I've spent the longest amount of time with Sony's A7III. I just started a long term rental on an OM-1.

The goal of this exercise is to help me understand how I'm using my gear empirically, to help guide my lens selection and body needs. The intent is to ignore feel and quality of life (for now).

To make this possible, I cobbled together a quick and dirty application that uses MetadataExtractor to aggregate EXIF data into a flat file that I fed into Power BI.

My only two lenses for the A7III are Sigma's 35mm f/1.4 DG HSM and Sony's 50mm FE f/1.8. Looking only at these two, the first insight is that I tend to grab the smaller and lighter lens. This is despite the fact that I like the way the Sigma 35mm f/1.4 DG HSM renders images. It's also despite my enjoyment of the 35mm focal length. I know 35mm isn't super popular, but I've found it works well with my kids. I'm usually "the right" distance away from them for the 35, and often have to back up for the 50. Backing up also isn't always possible - especially when we're visiting places like indoor museums.

That said, the Sigma 35mm is a fairly hefty lens at 755 grams. Sony's 50mm FE f/1.8 is 186 grams in comparison. The results speak for themselves.

takeaway: maybe I should grab a more compact 35 (or maybe the 40mm G f/2.5) to use when we're not going to be somewhere with very dim lighting

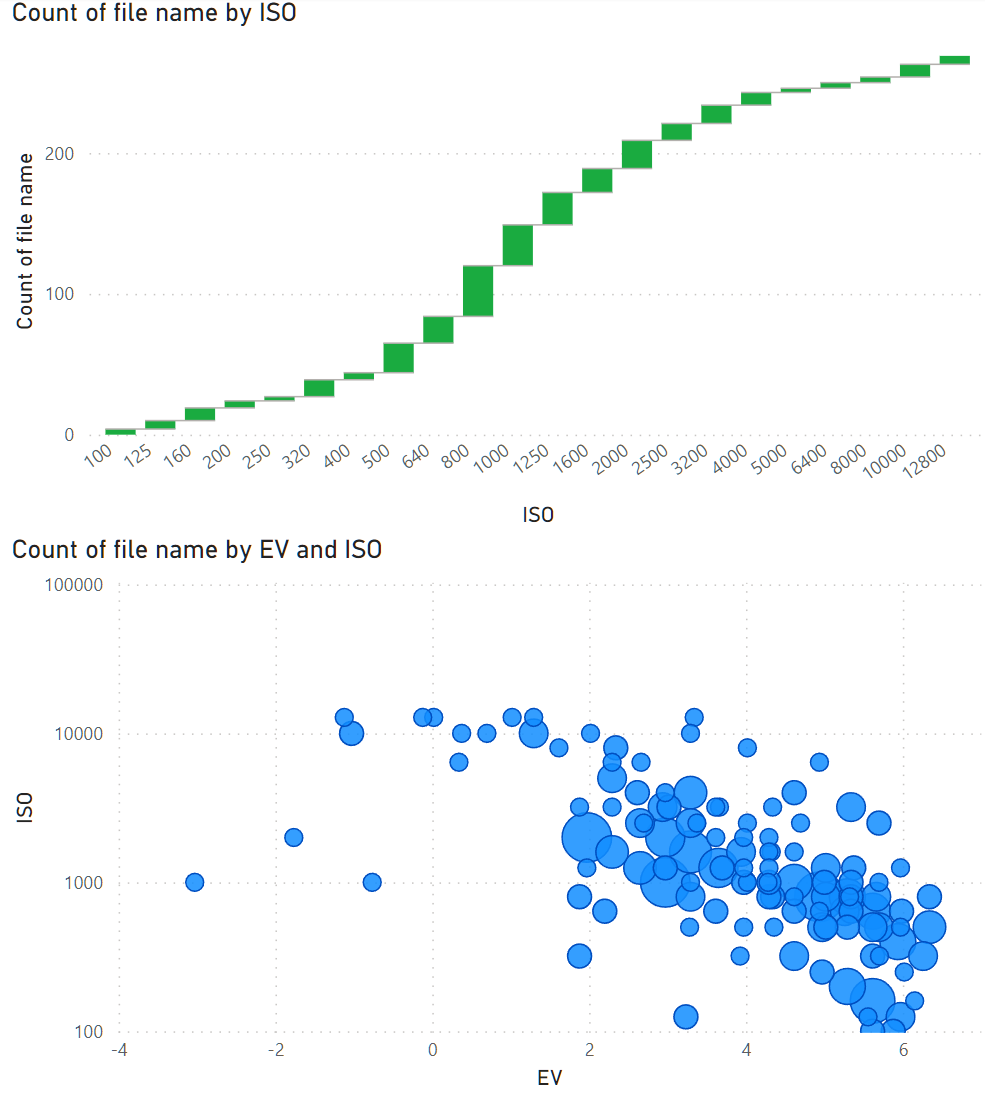
Next up is another obvious one, but one that's worth saying anyway: I've shifted from shooting mostly outdoors in decent weather, before kids, to a more mixed environment in terms of lighting. This is clearly visible by calculating the exposure value from all my photographs and then looking pre-post 2022.
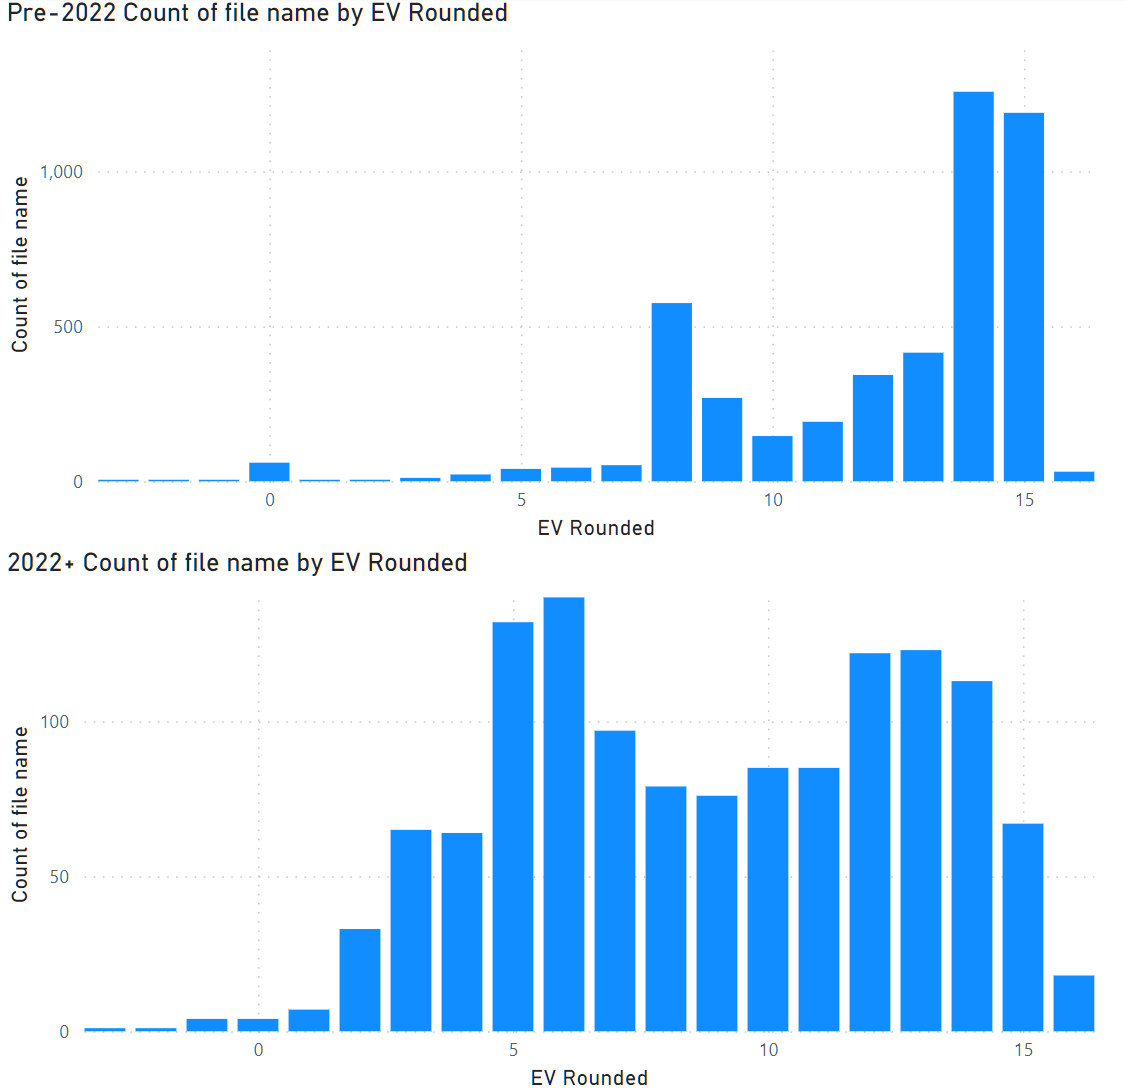
There are two stories to be told for the photographs taken in low light, but to get there let's look at the aperture I used for low lighting levels (say under 6.0 EV, which is a brightly lit home interior)
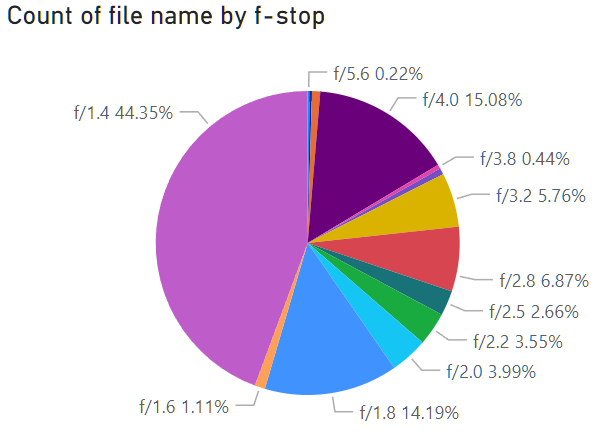
Let's then carve this into two groups: one that was shot (nearly) wide open (f/1.4, f/1.6, f/1.8) and everything else.

For the wide open group, it's amazing what a fast lens can do for you in terms of keeping ISO down with low light. Of the 269 photos I've kept over the past year that were wide open in under 6 EV, ISO was at or below 3,200 on all but 35 of them.

takeaway: fast lenses are good for low light, but also maybe I don't really need a FF camera for low light... at least with my current shutter speeds

A quick note on the scatter chart - the y axis is logarithmic.
For the second group, the majority were stepped down for increased depth of field. The photo below isn't super interesting, but shows this. It was shot on the FE 50mm @ f/4.5 and 1/125 s shutter. The resulting ISO was 4000.

If I had shot this on say micro four thirds, I could have used a 25mm lens at f/2.2 for the same field of view and depth of field, knocking the ISO down to 1000. This sure sounds a lot better than ISO 4000, but when you consider that something like an OM-1 is 1 2/3 stops behind my A7III in terms of dynamic range the difference isn't as large as it sounds. At ISO 1000, the OM-1 will return a dynamic range of 7.73 where as the A7III returns 7.15 at ISO 4000.

takeaway: darn you FF for your shallow depth of field, but maybe the advantages of a smaller sensor aren't that big on overall image quality when you step the FF body down

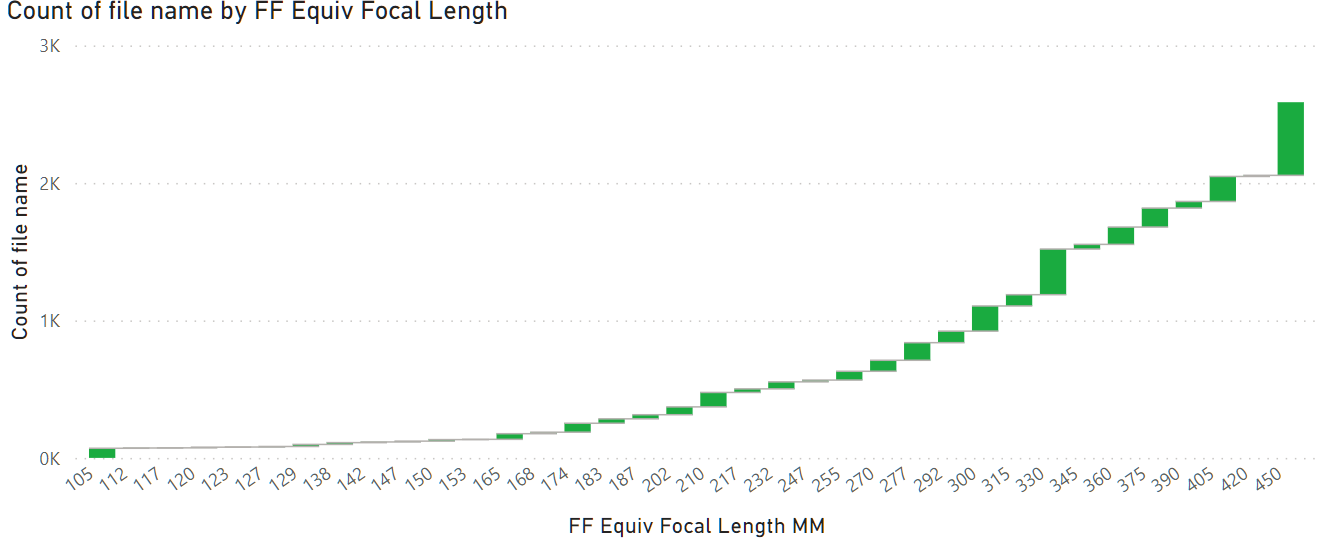
As a final thought, I used to do a spend a decent amount of time taking photos of cars going by with my D5300 and the excellent VR Zoom Nikkor 70-300mm f/4.5-5.6G IF-ED.

takeaway: I could have probably used a longer lens for a number of these photos. A 100-400 with a teleconverter, or a 200-600 (or 200-800 in the case of the Oly 100-400) would cover 88% of these shots.
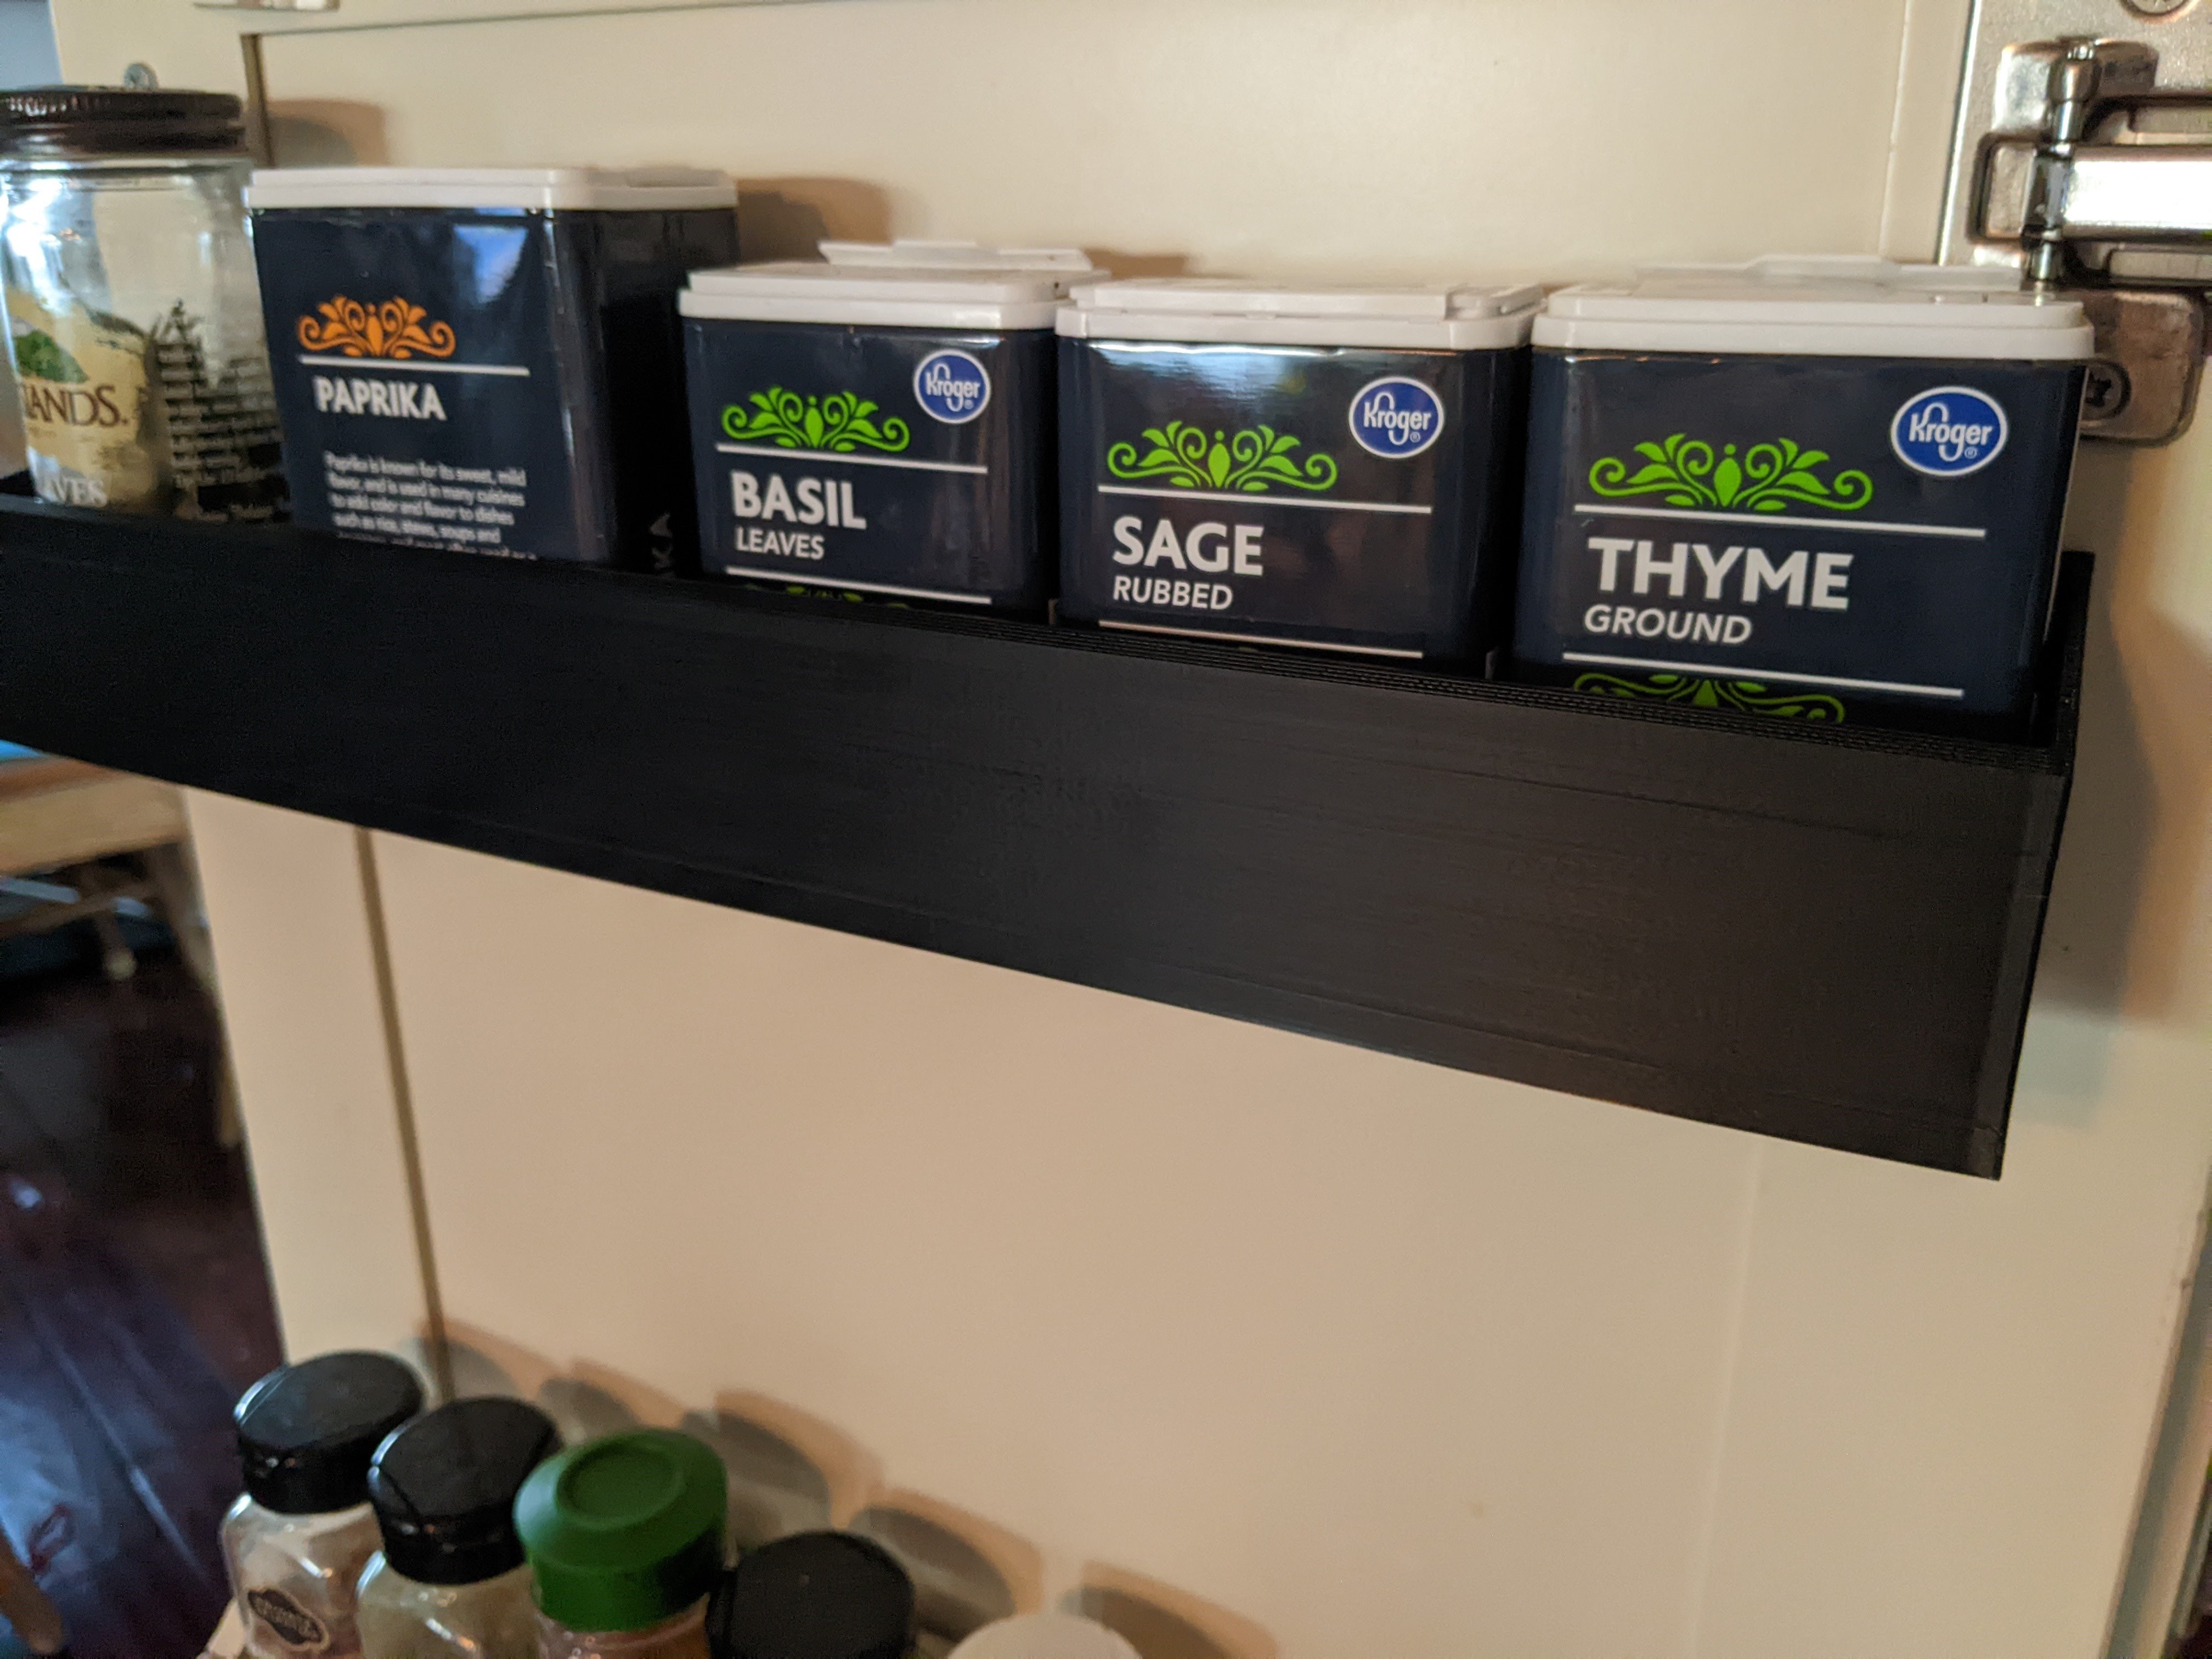
 

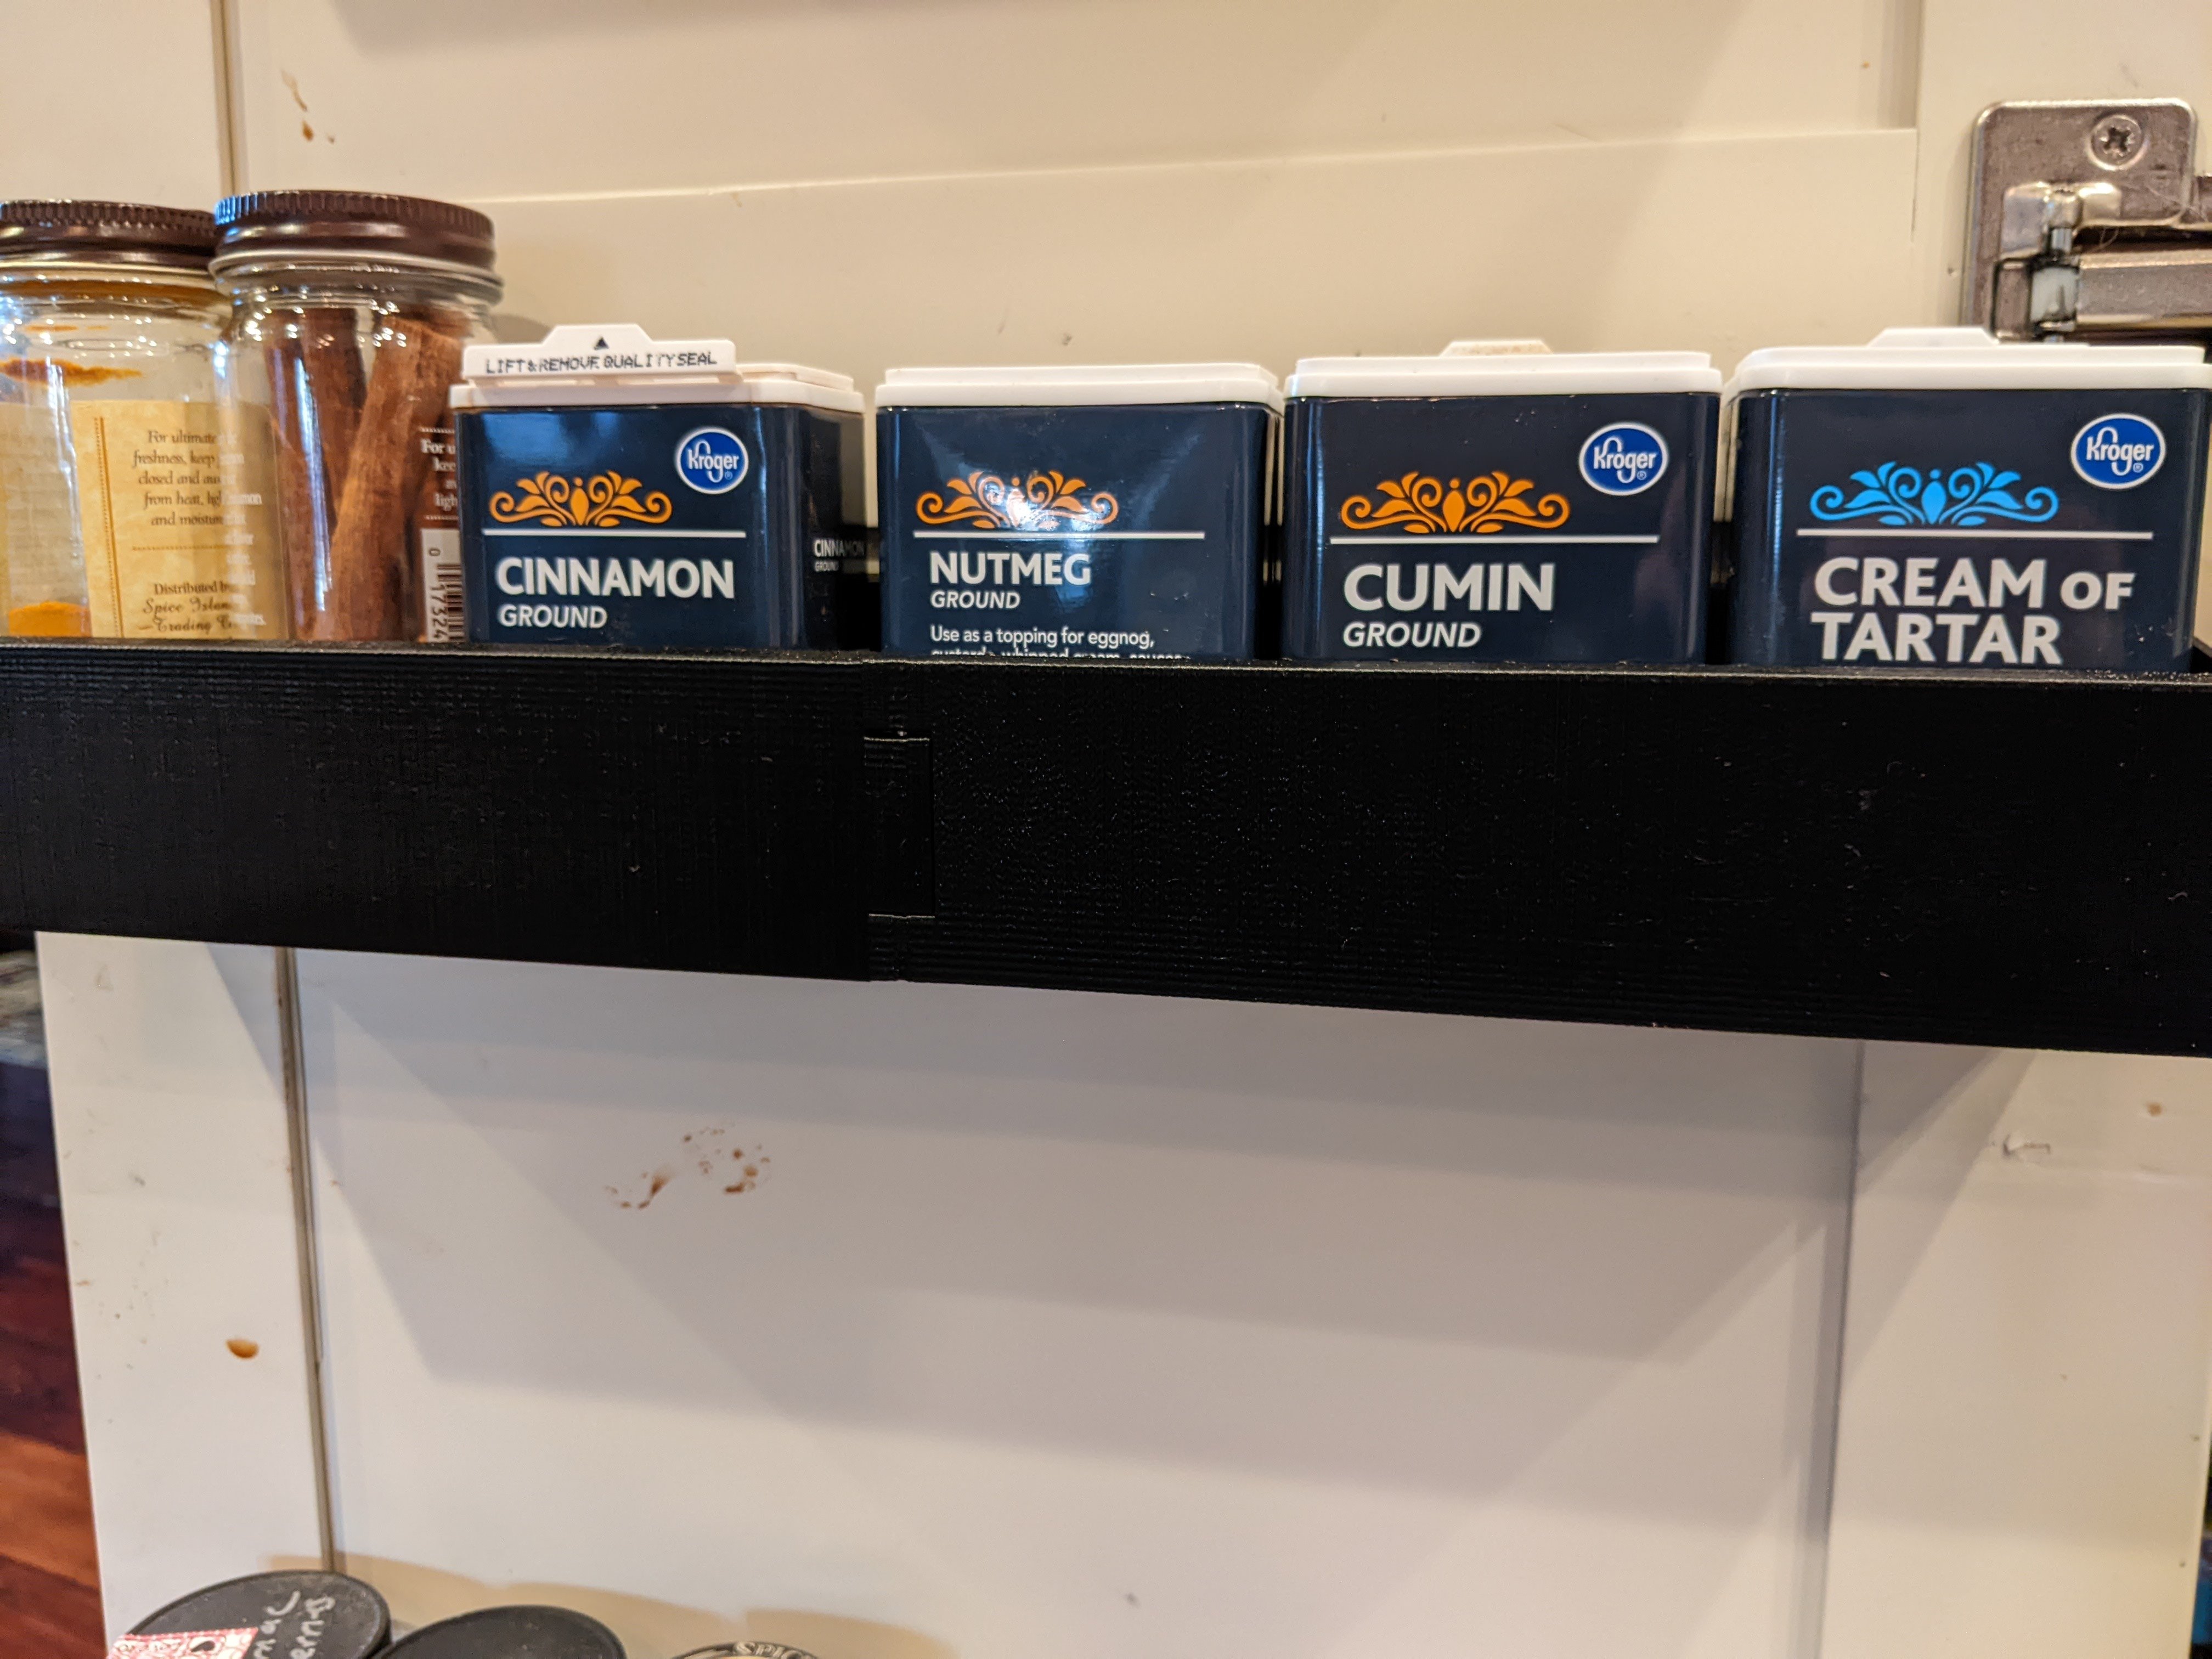
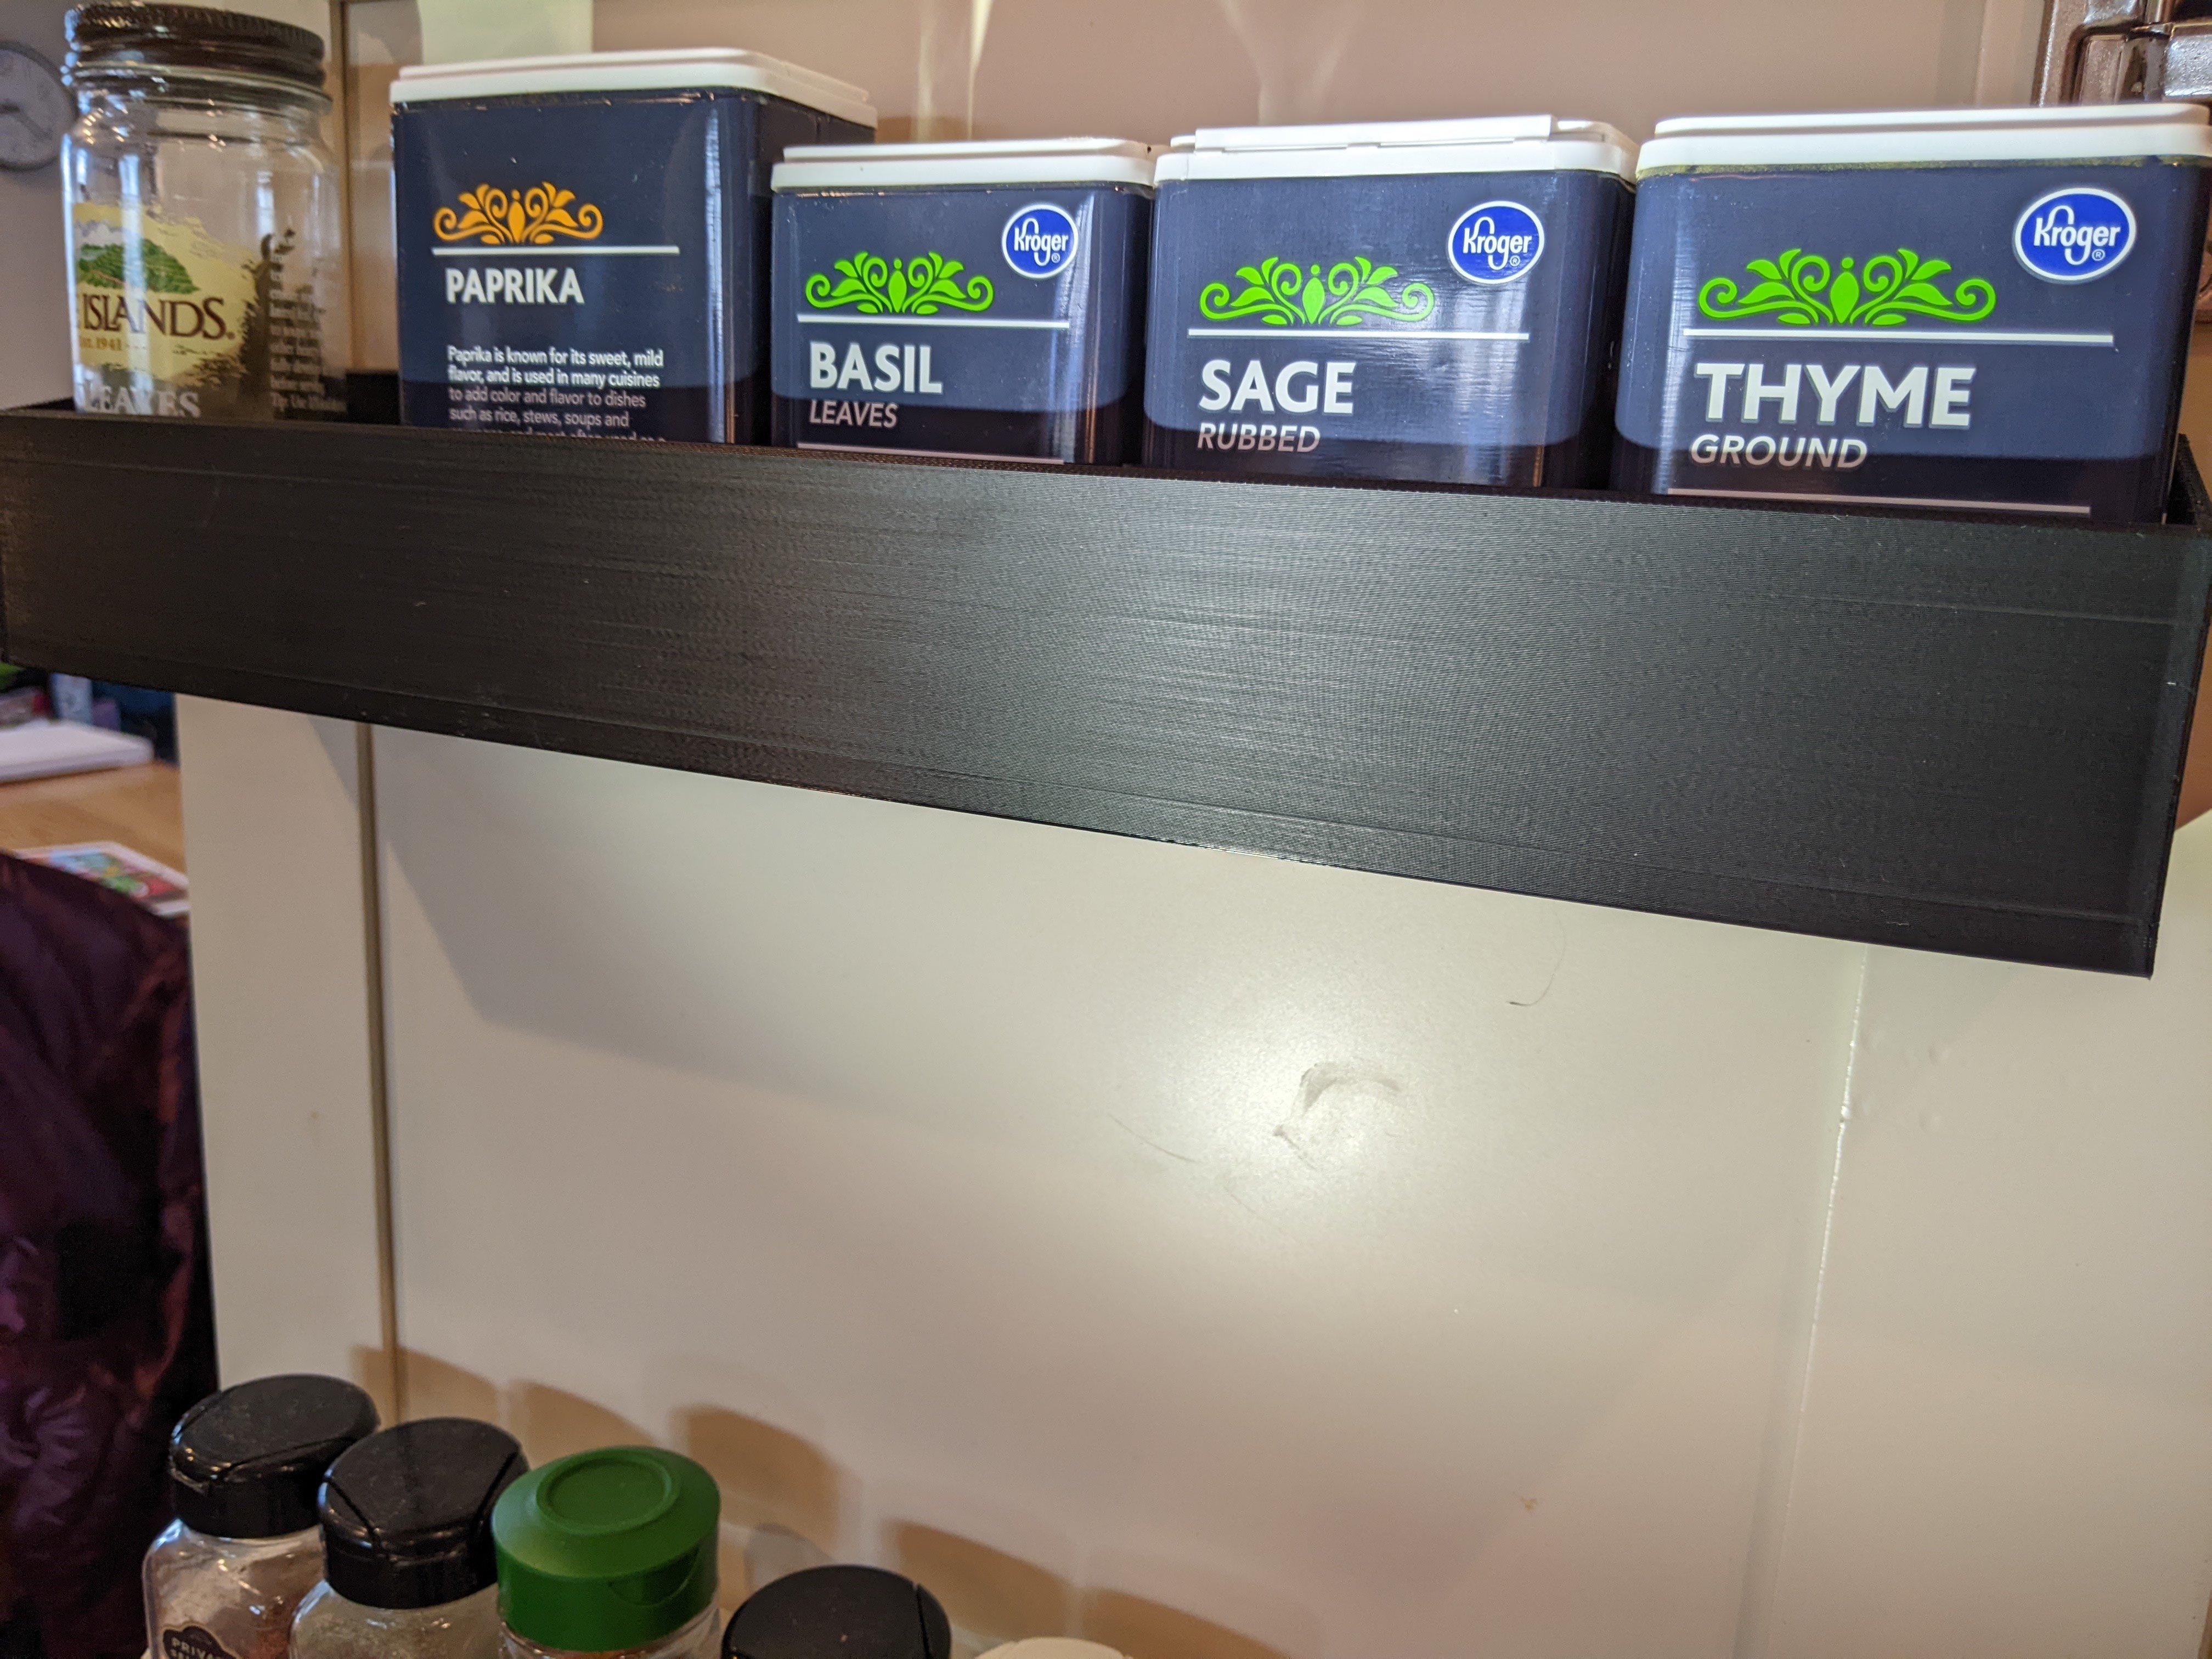
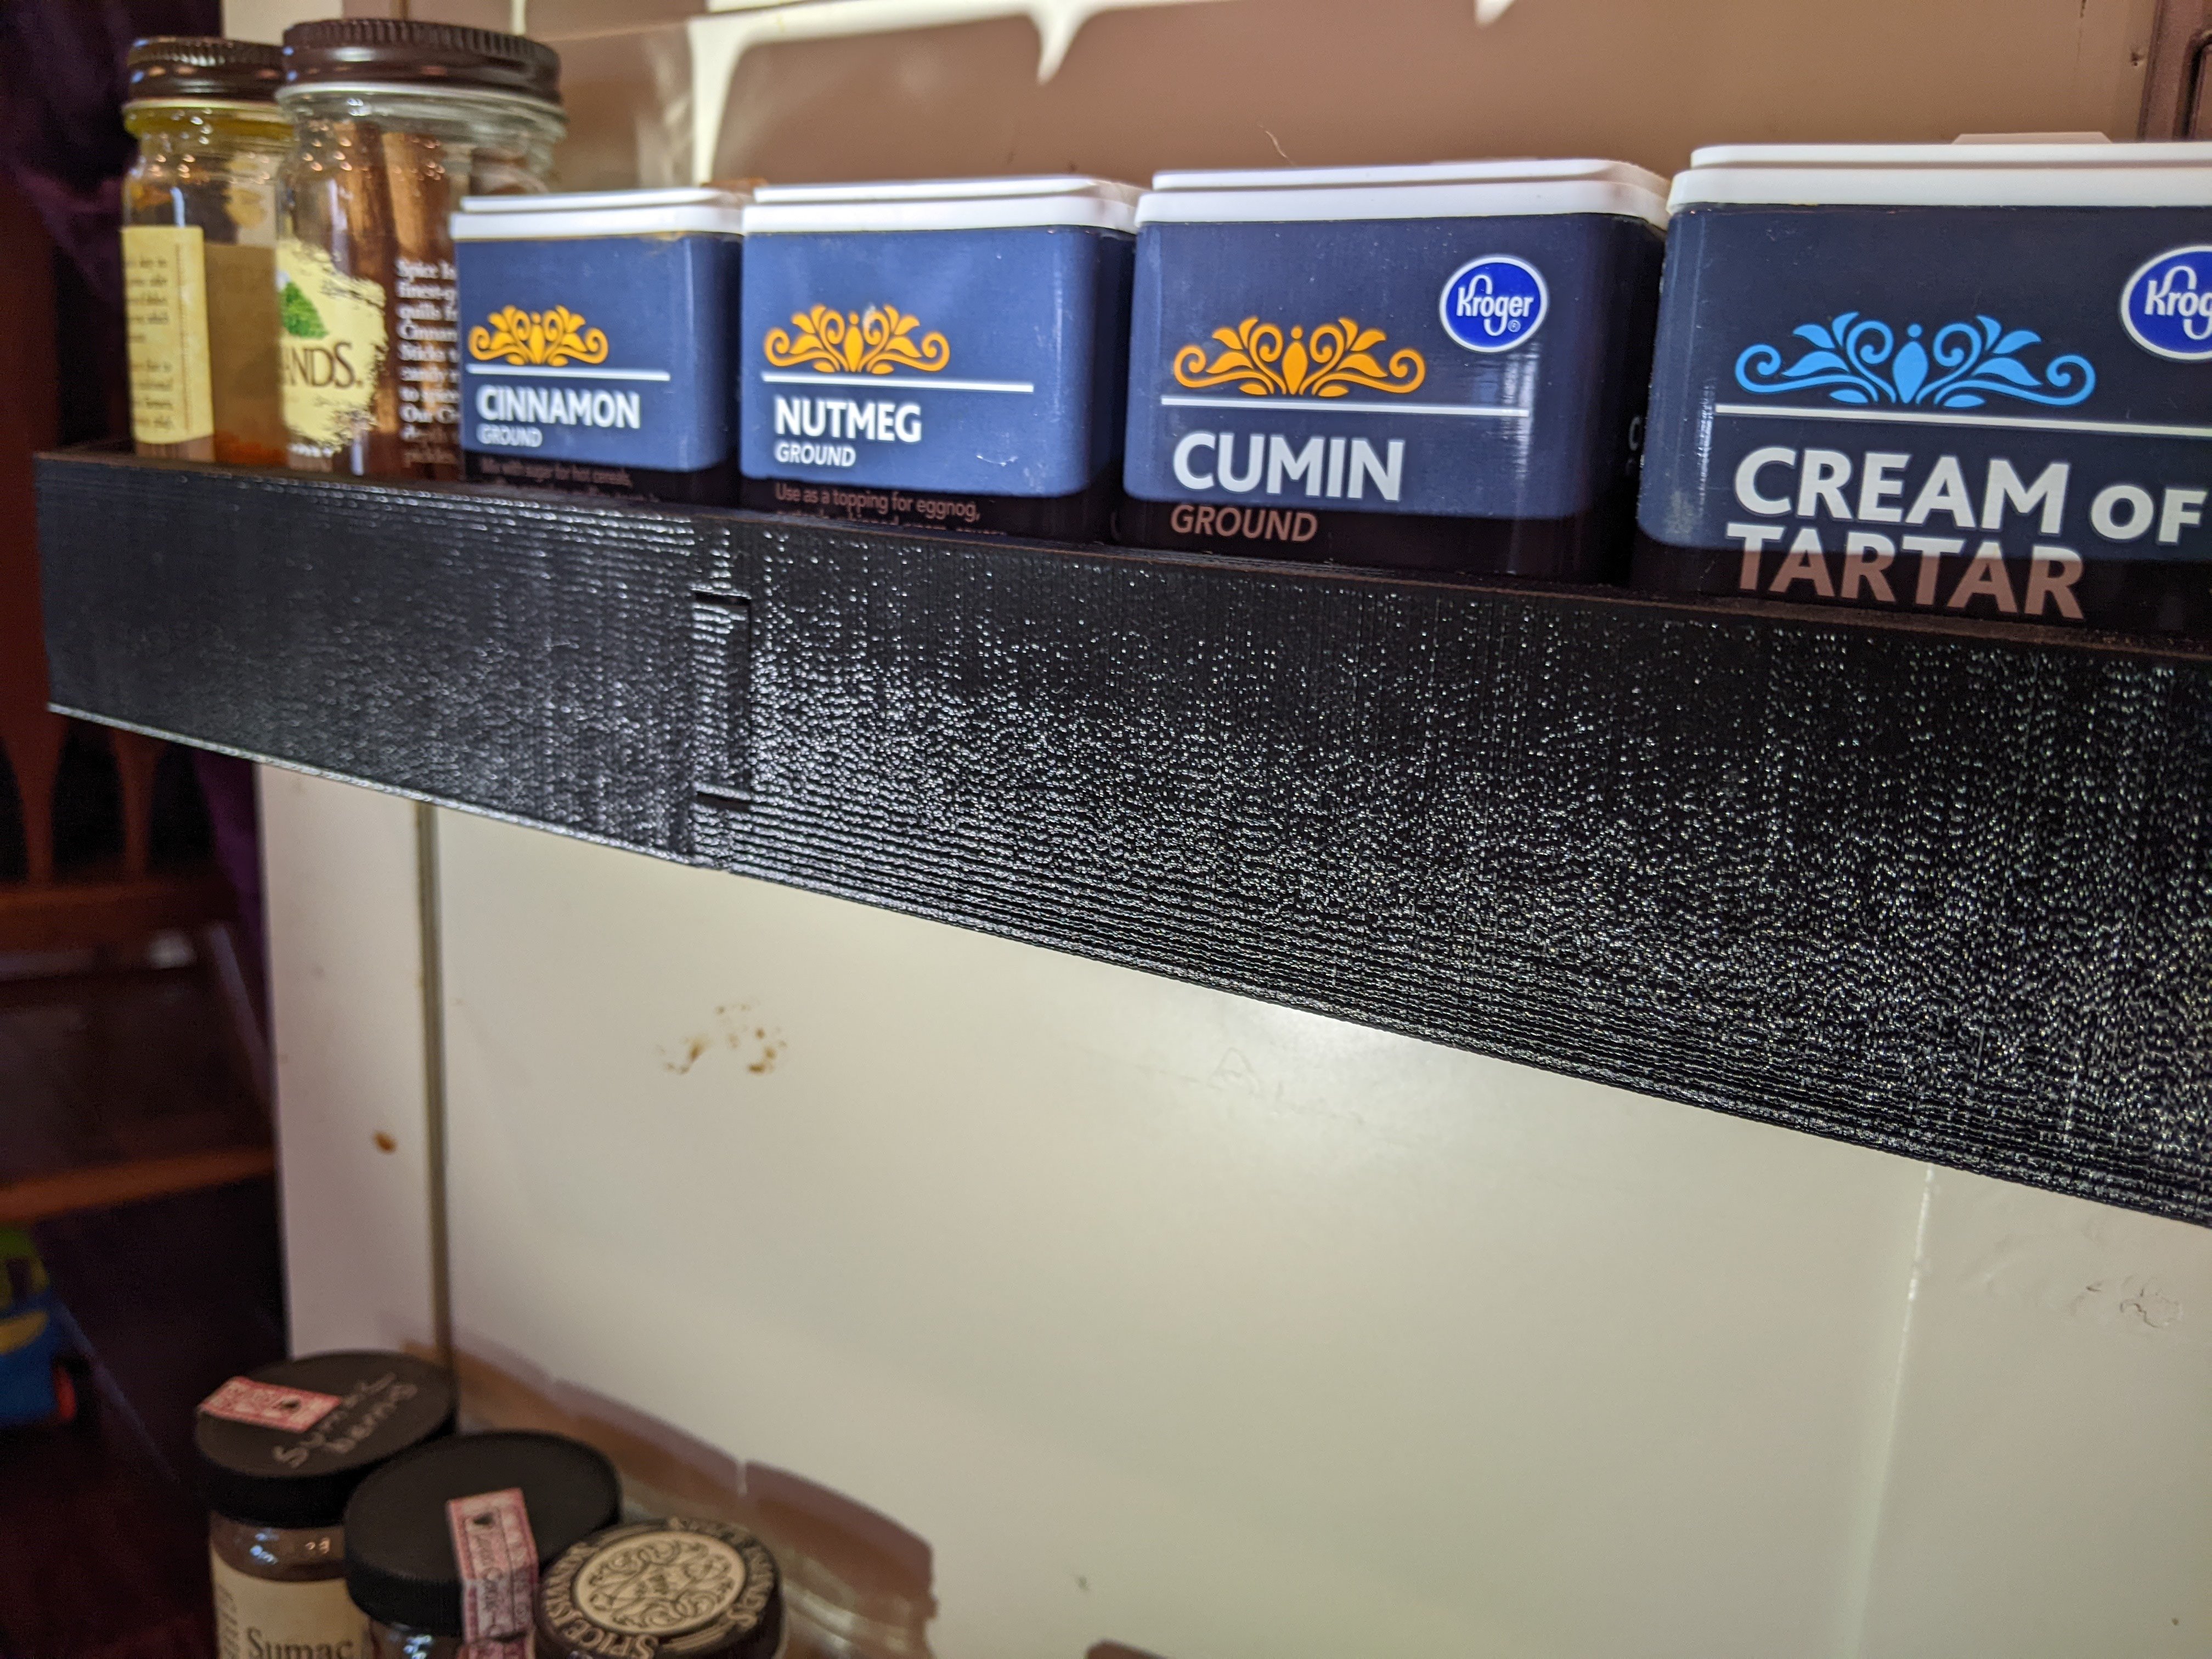
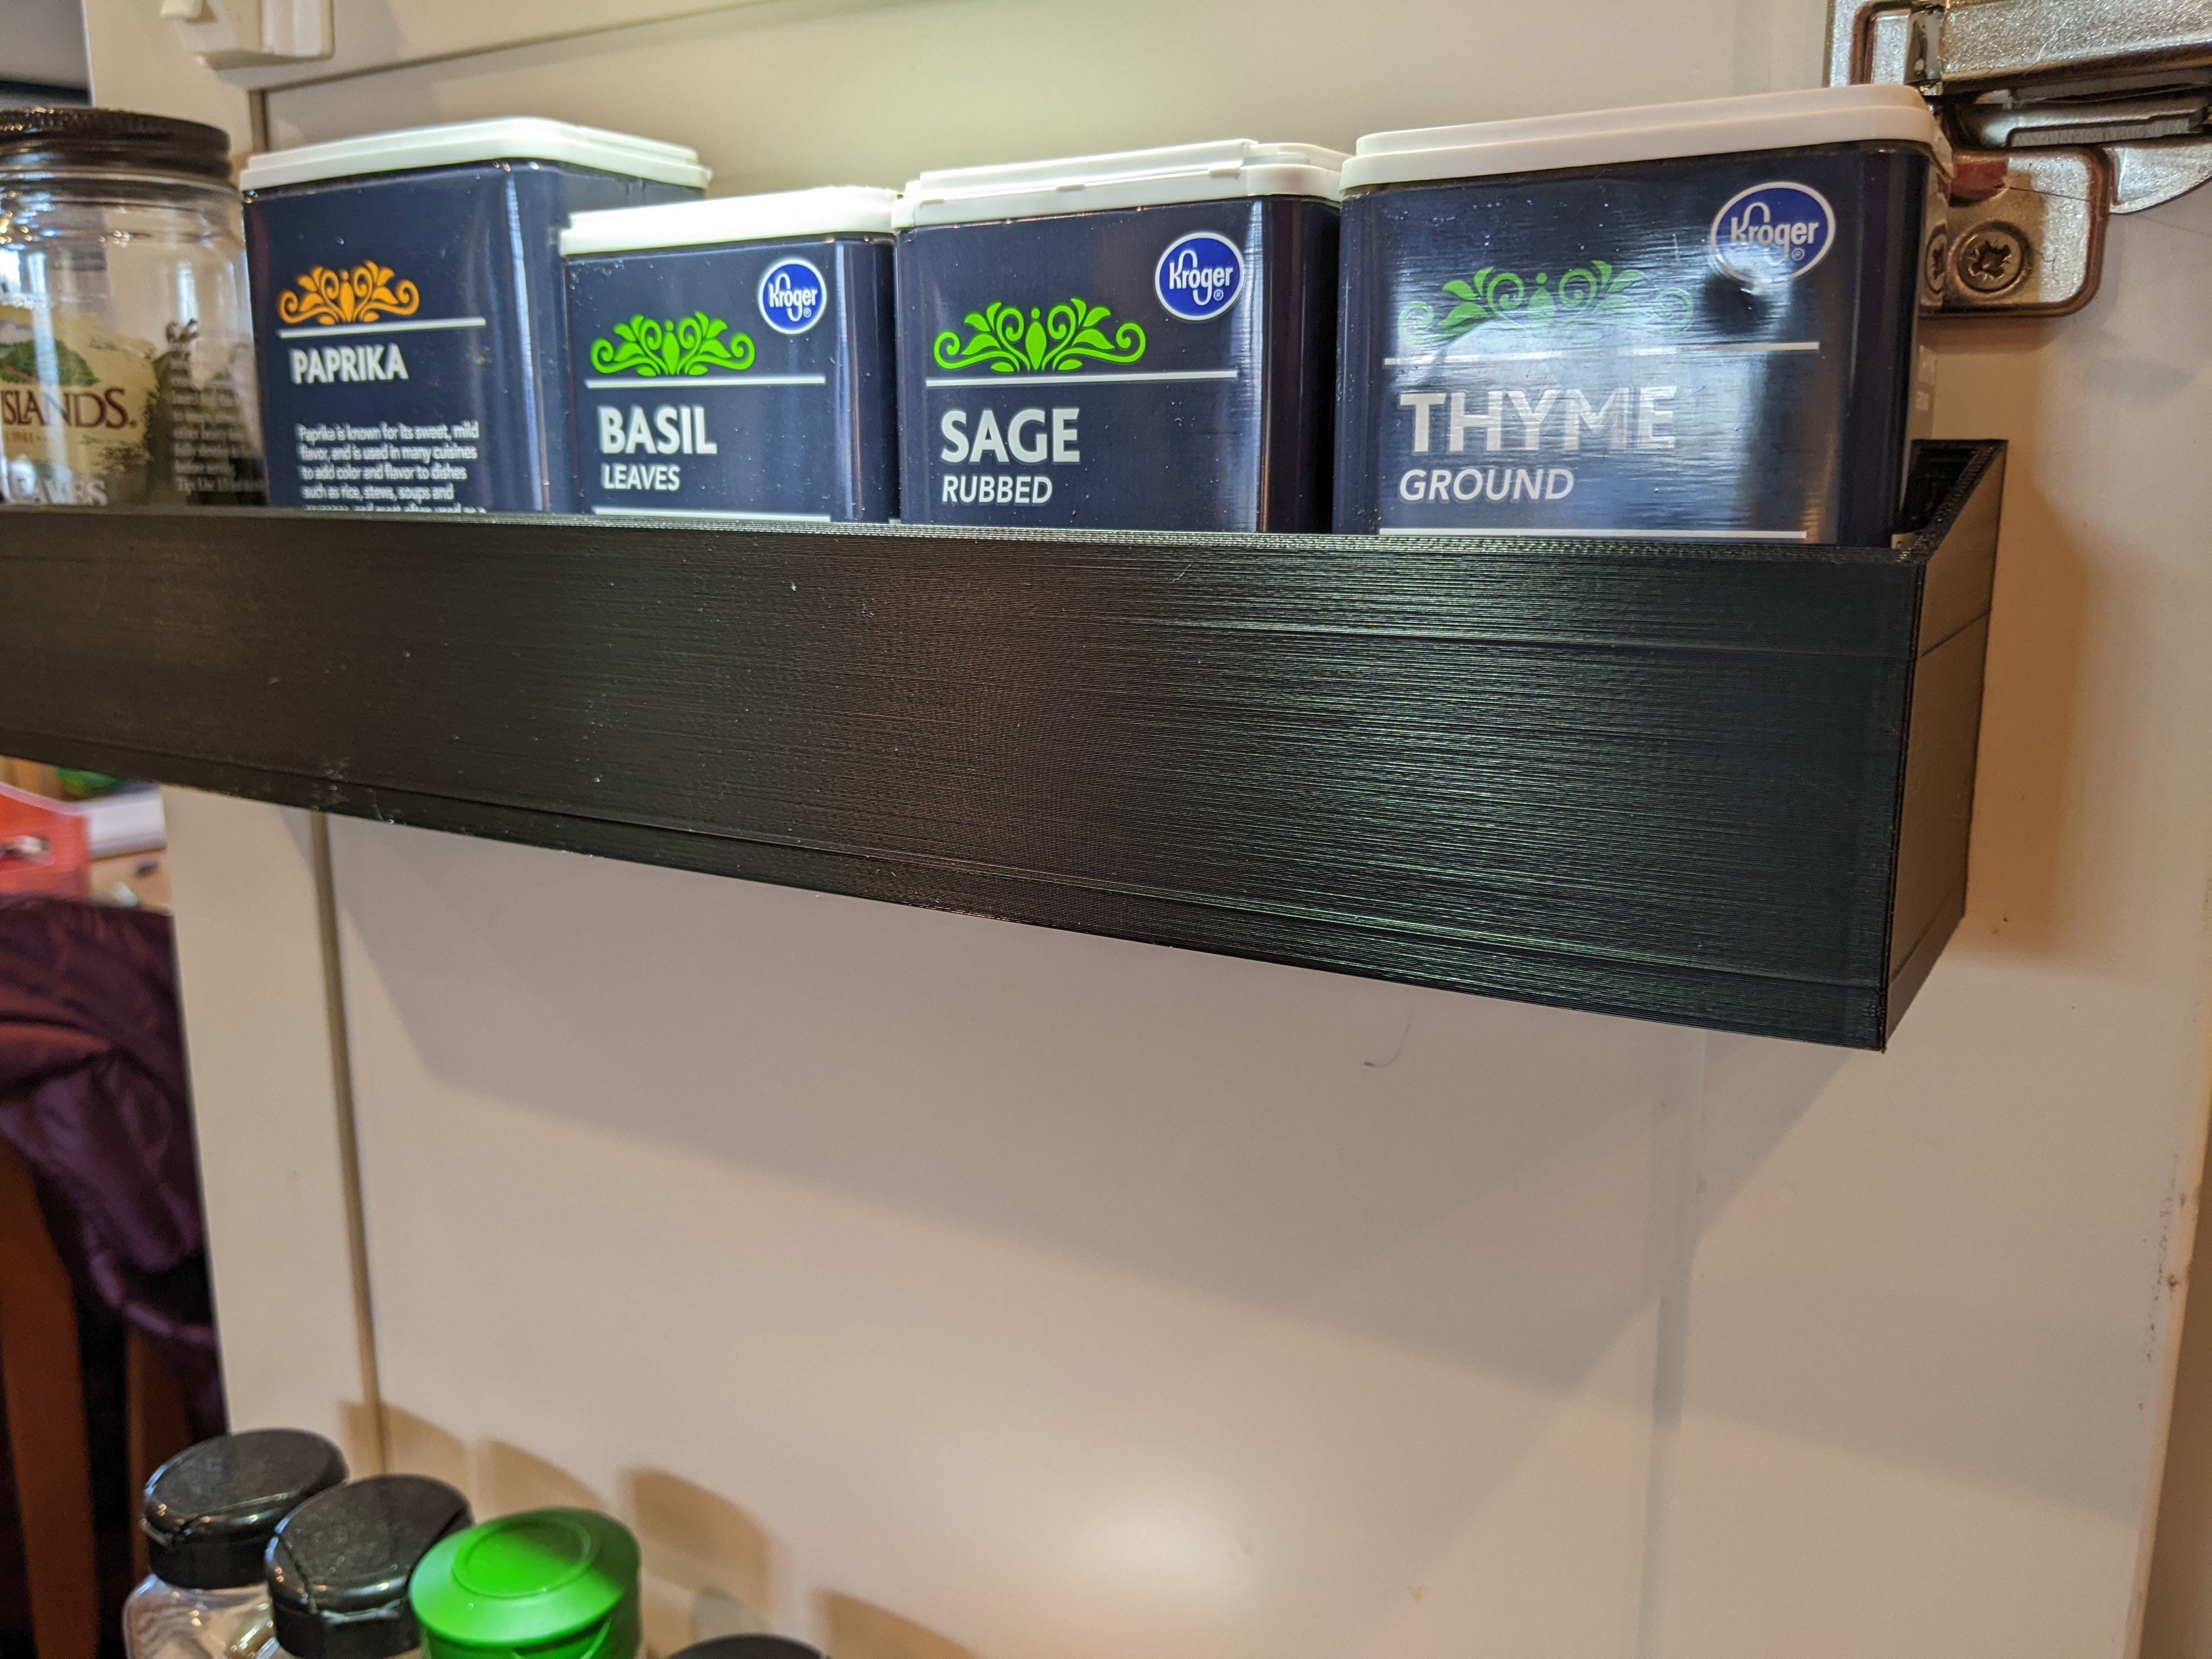
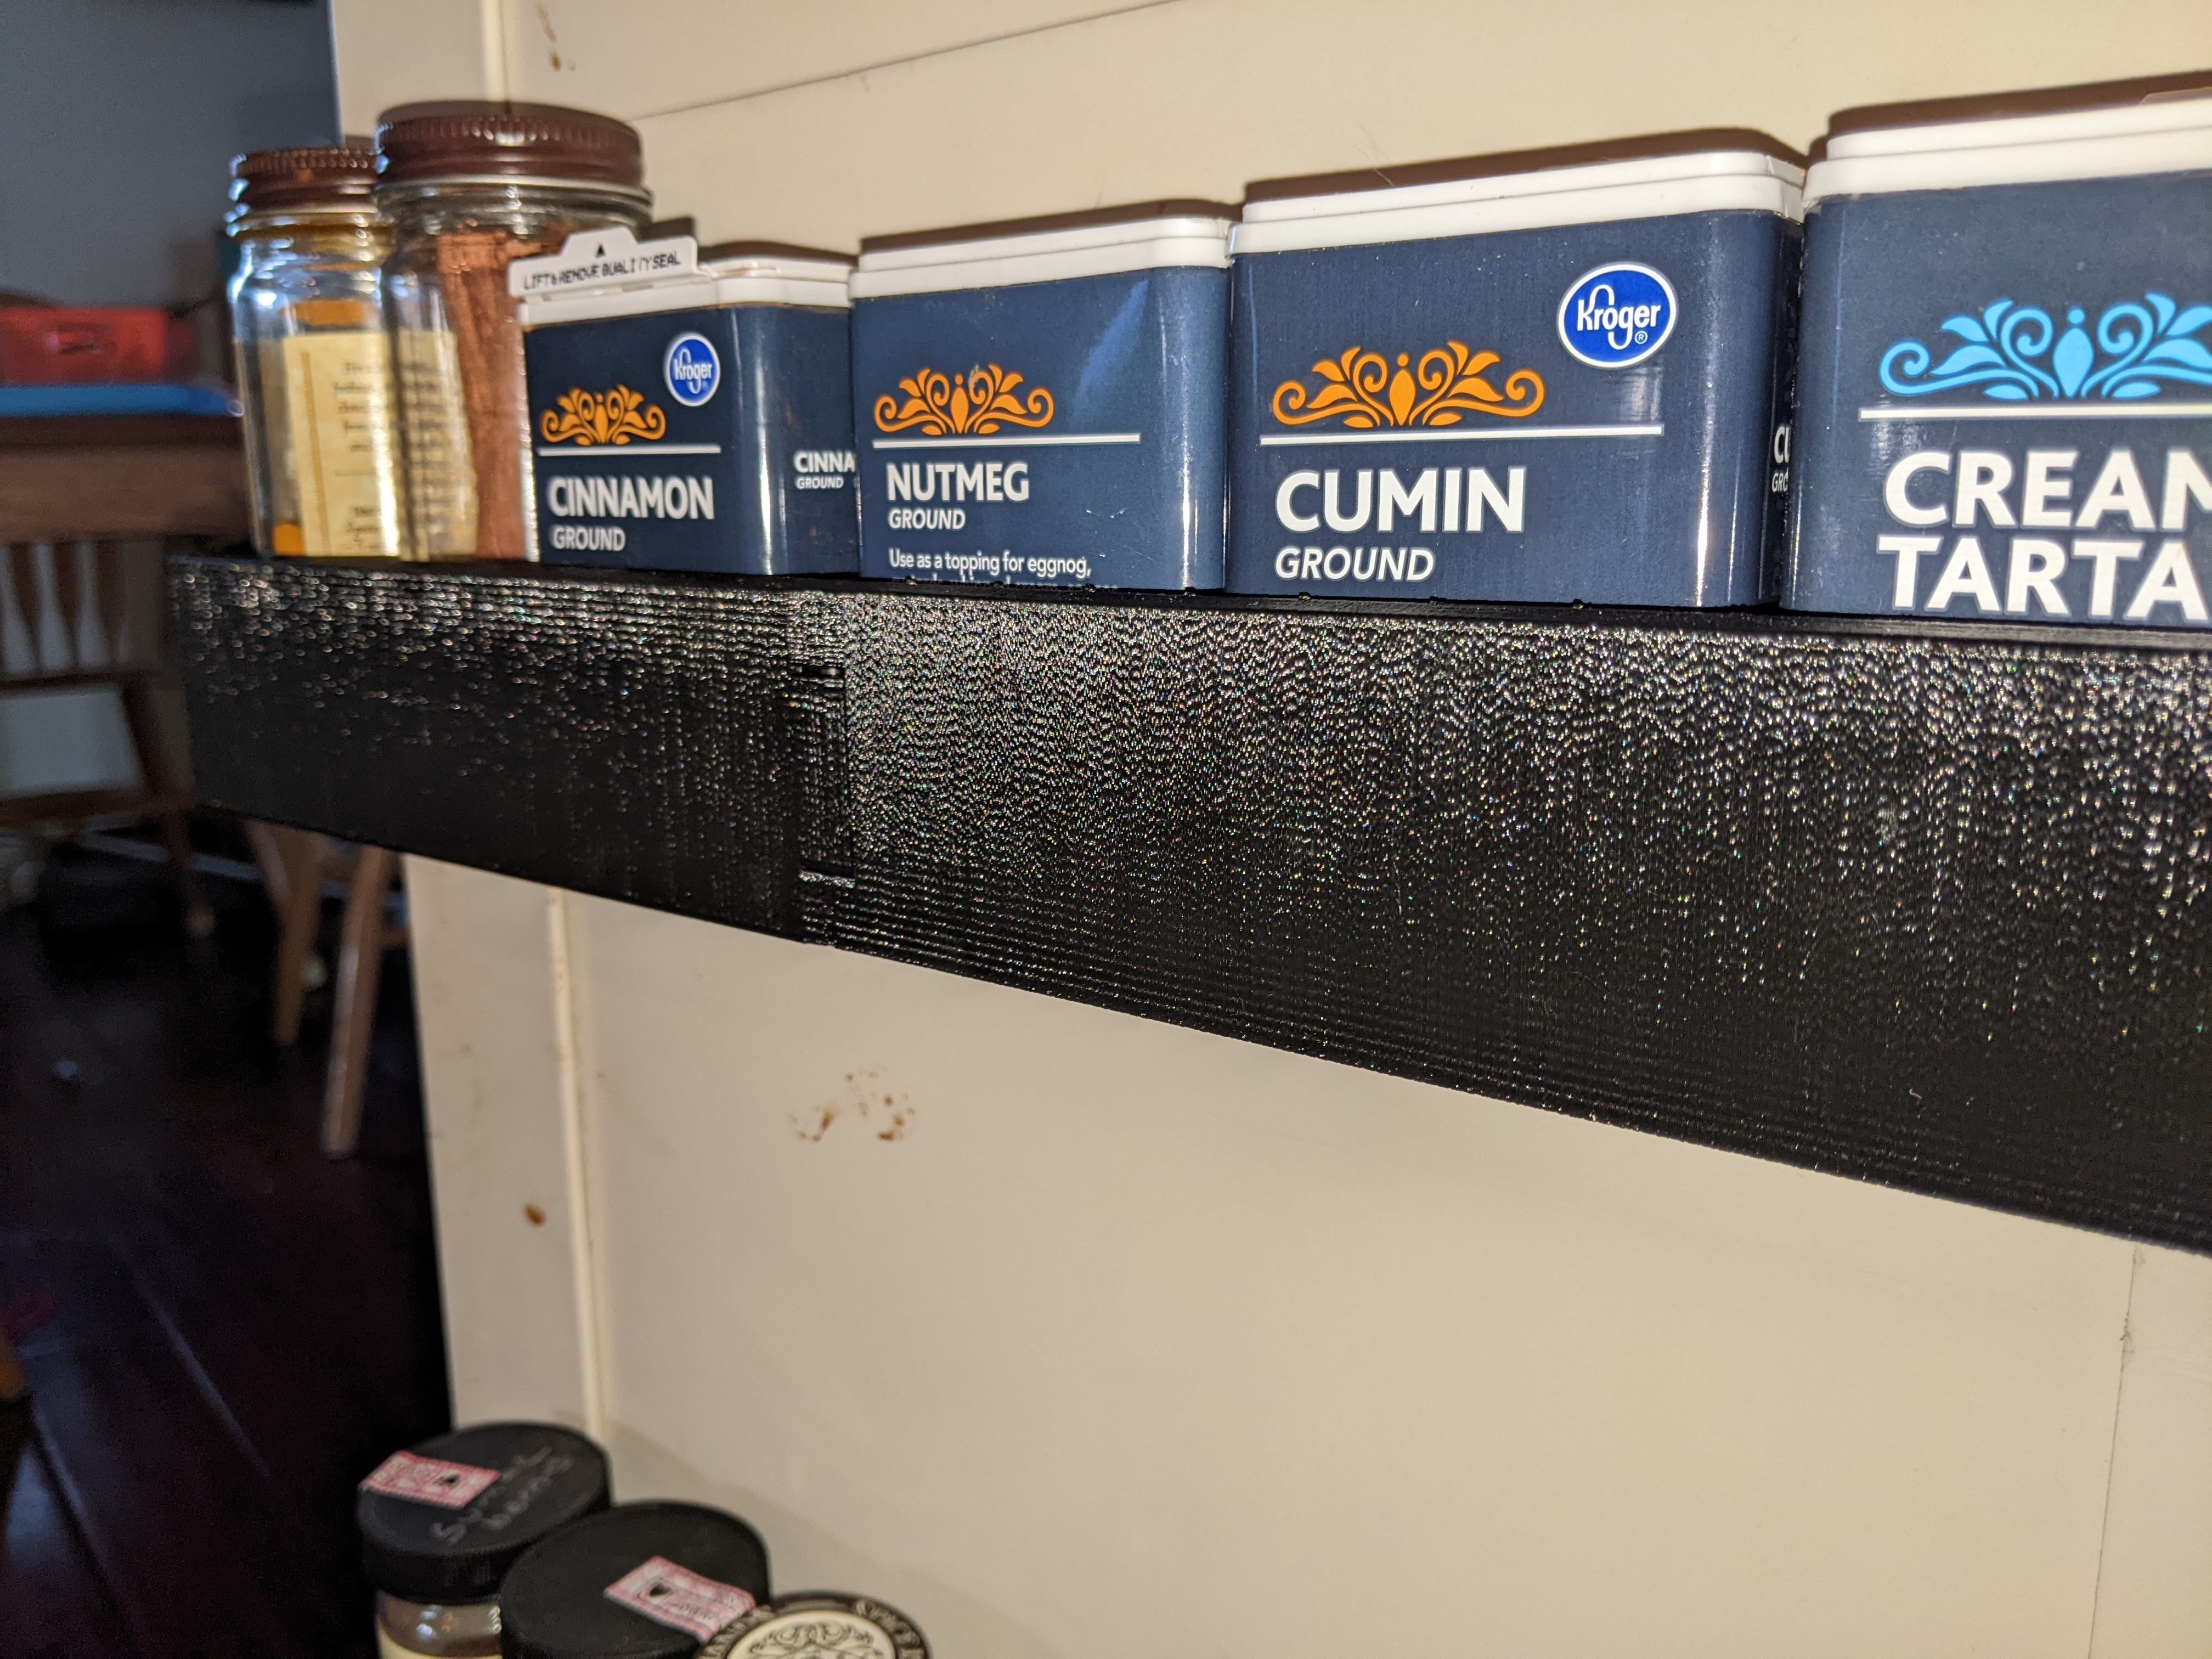
The part is a 345mm x 60mm spice rack that mounts to the inside of our pantry door.

About 7 years ago, I made four spice racks out of wood and painted them to match our cabinet door. Wear and tear (and kids) have resulted in them getting glued back together multiple times. I finally gave up, modeled the design, and have been printing replacements in PETG as they fail. So far they've been holding up a lot better. They're also a touch deeper than my original wood design, so they can fit the round spice island containers more easily.

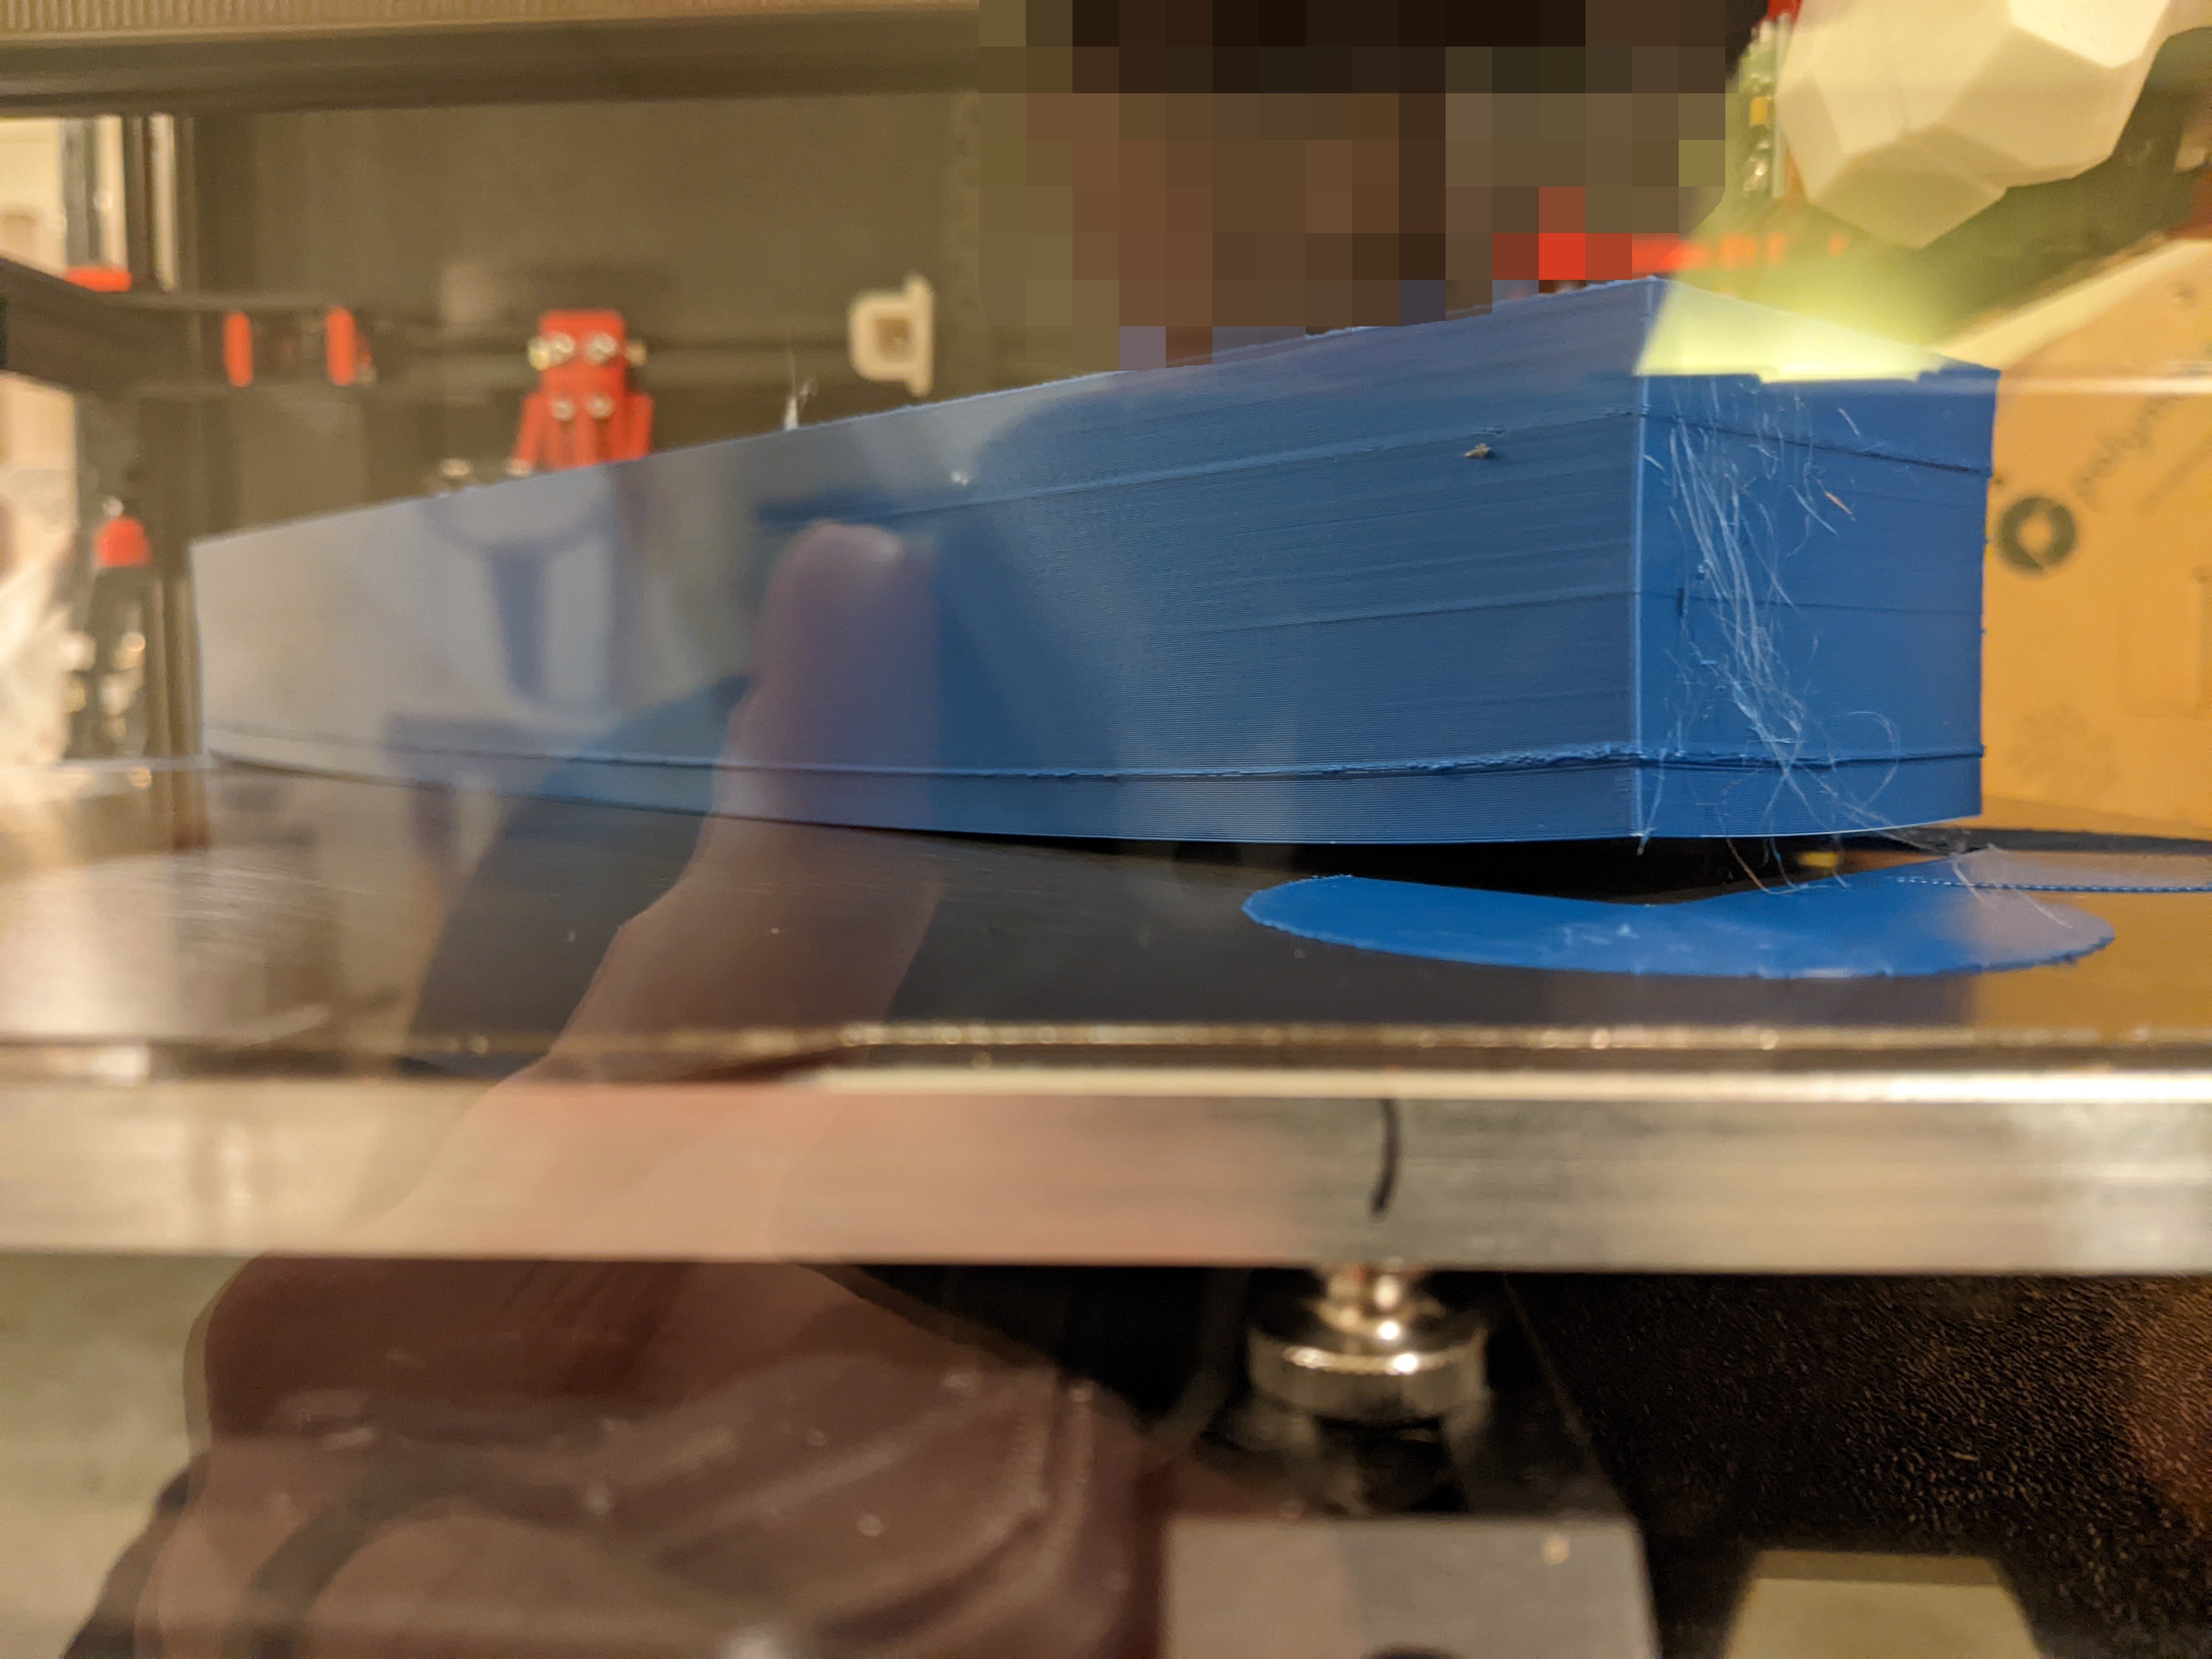
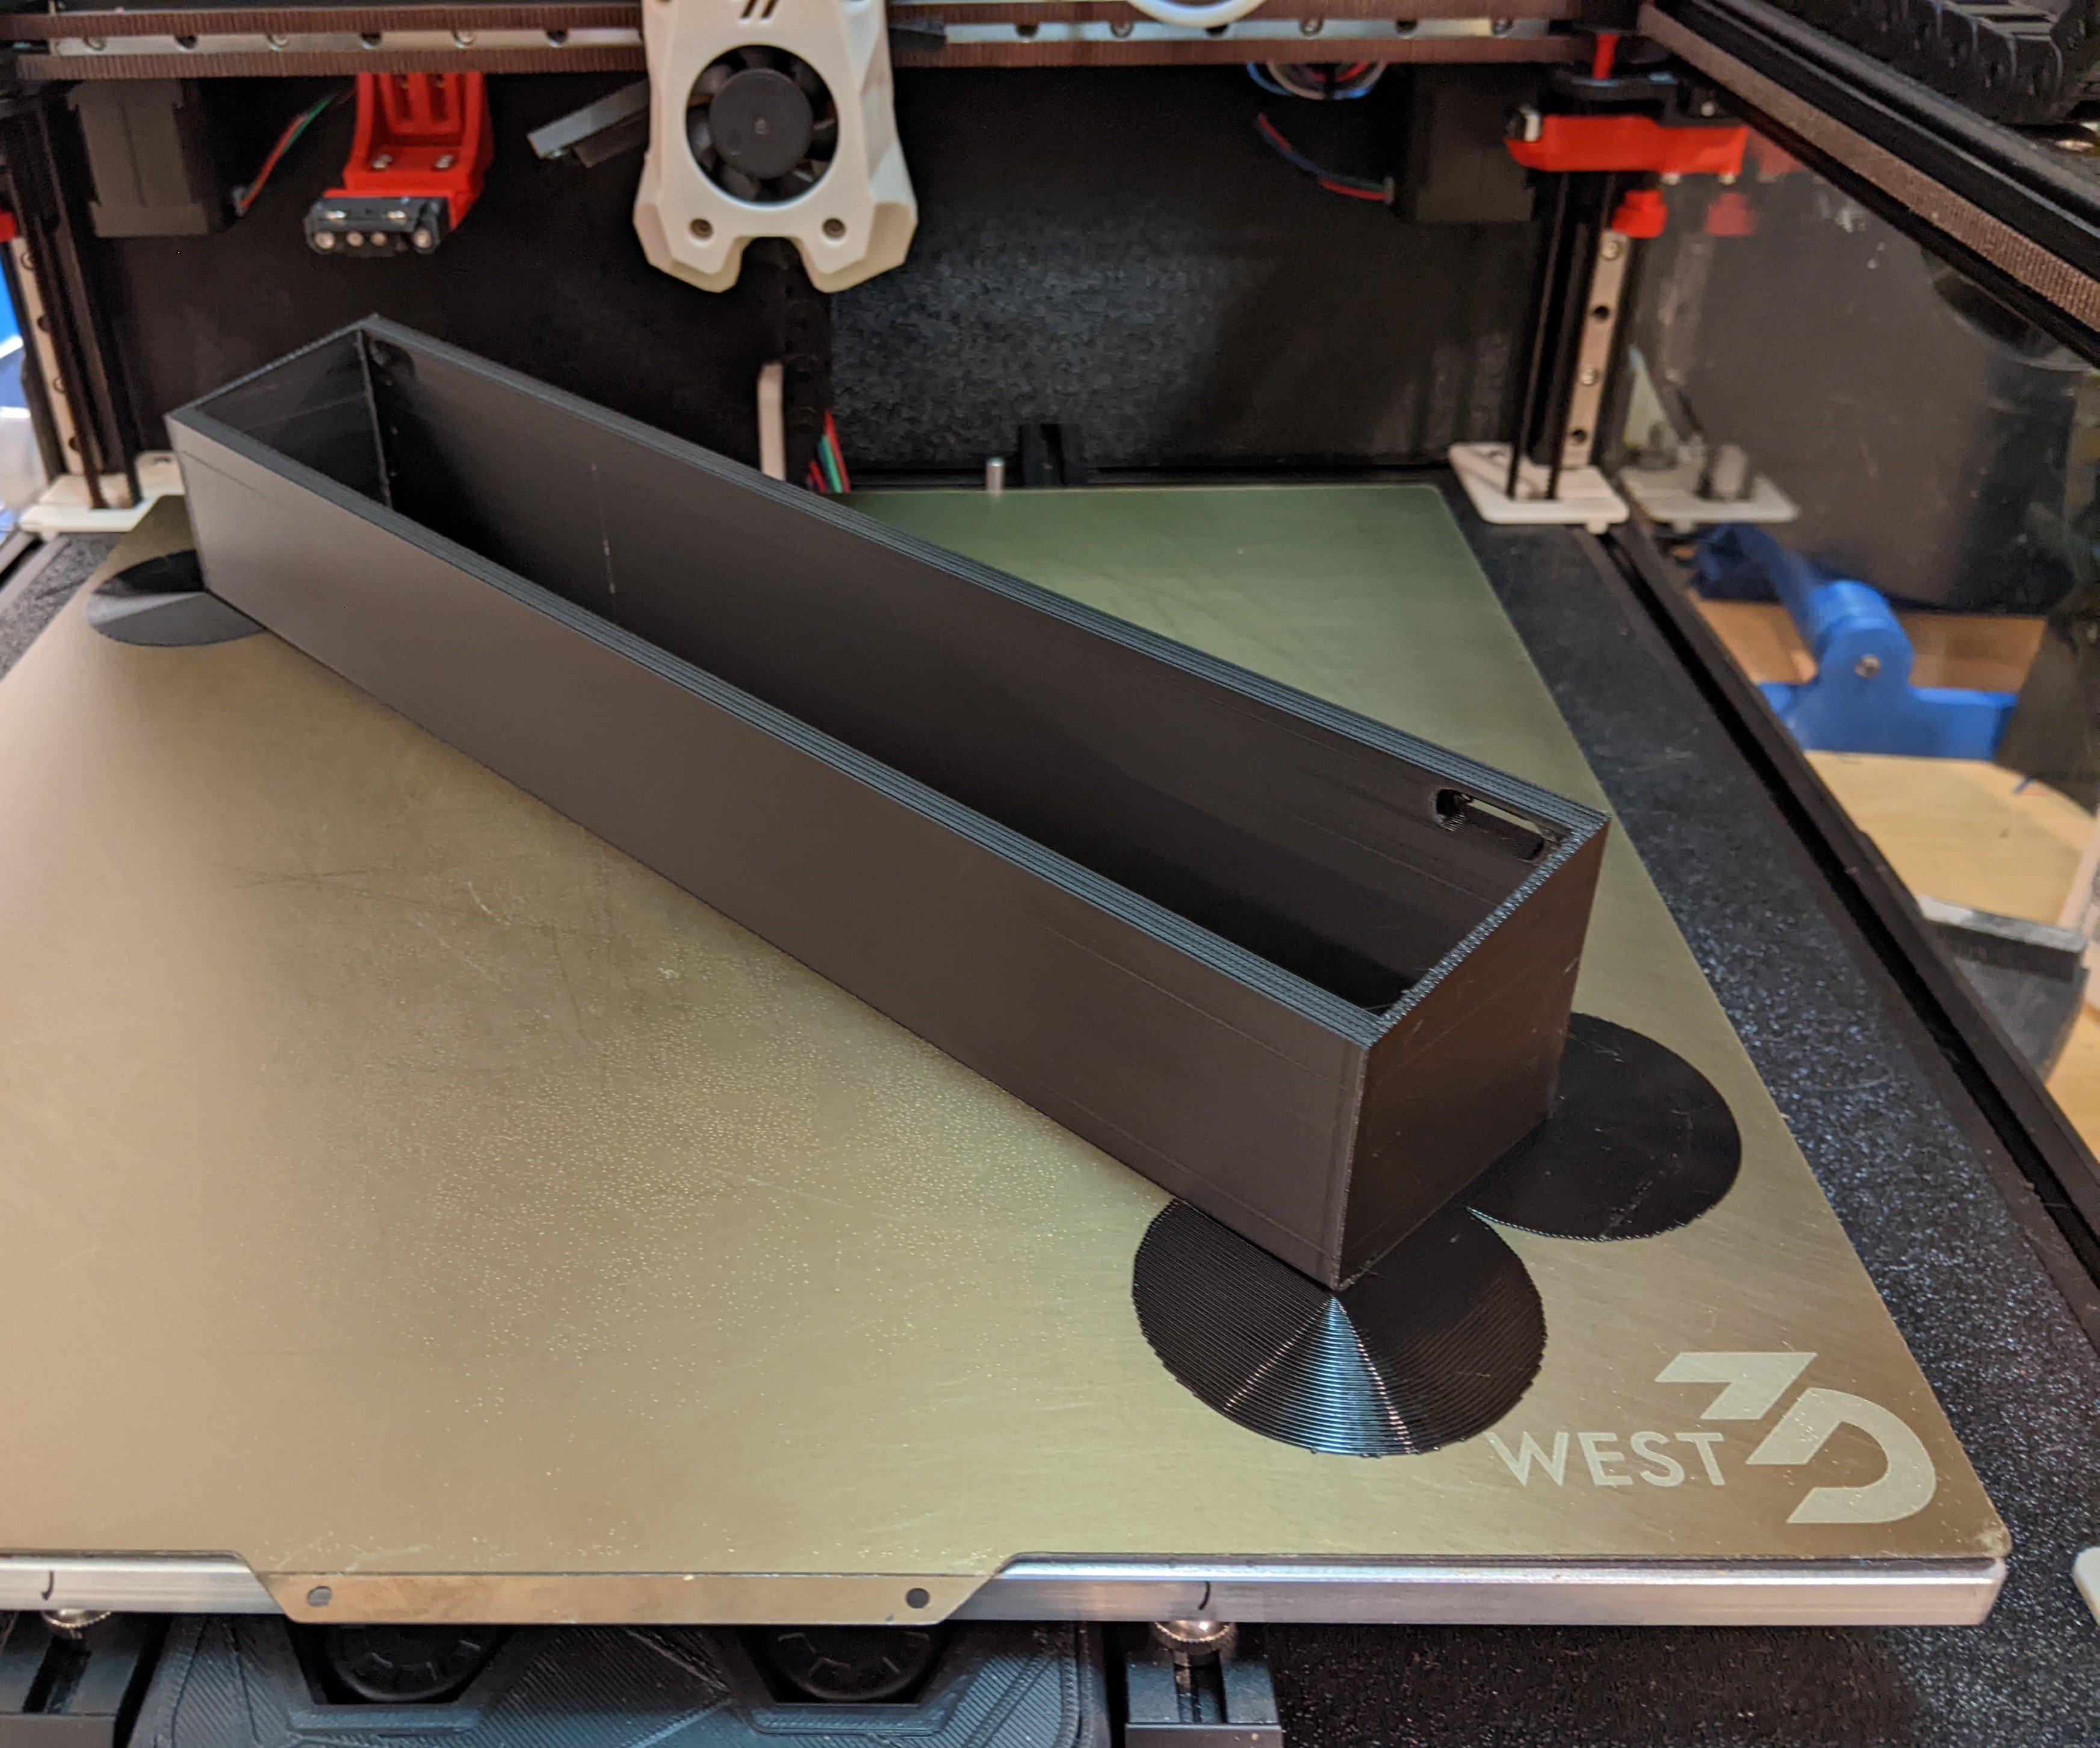
In the past, I had to print these in two halves on my i3 clone (a Monoprice Maker Select Plus, which is a rebadged Wanhao Duplicator i3 Plus). Now that I have a printer with a 350 mm^2 bed, I thought I would see if I could print the rack in one piece. My single ASA attempt was an epic fail due to warping, but the PETG print went very smoothly with very minor lifting. I've read others say PETG does not like enclosures, but I've printed a number of PETG parts with my Voron fully enclosed and they've come out very well. I struggled with PETG warping on larger parts with my unenclosed i3 clone.

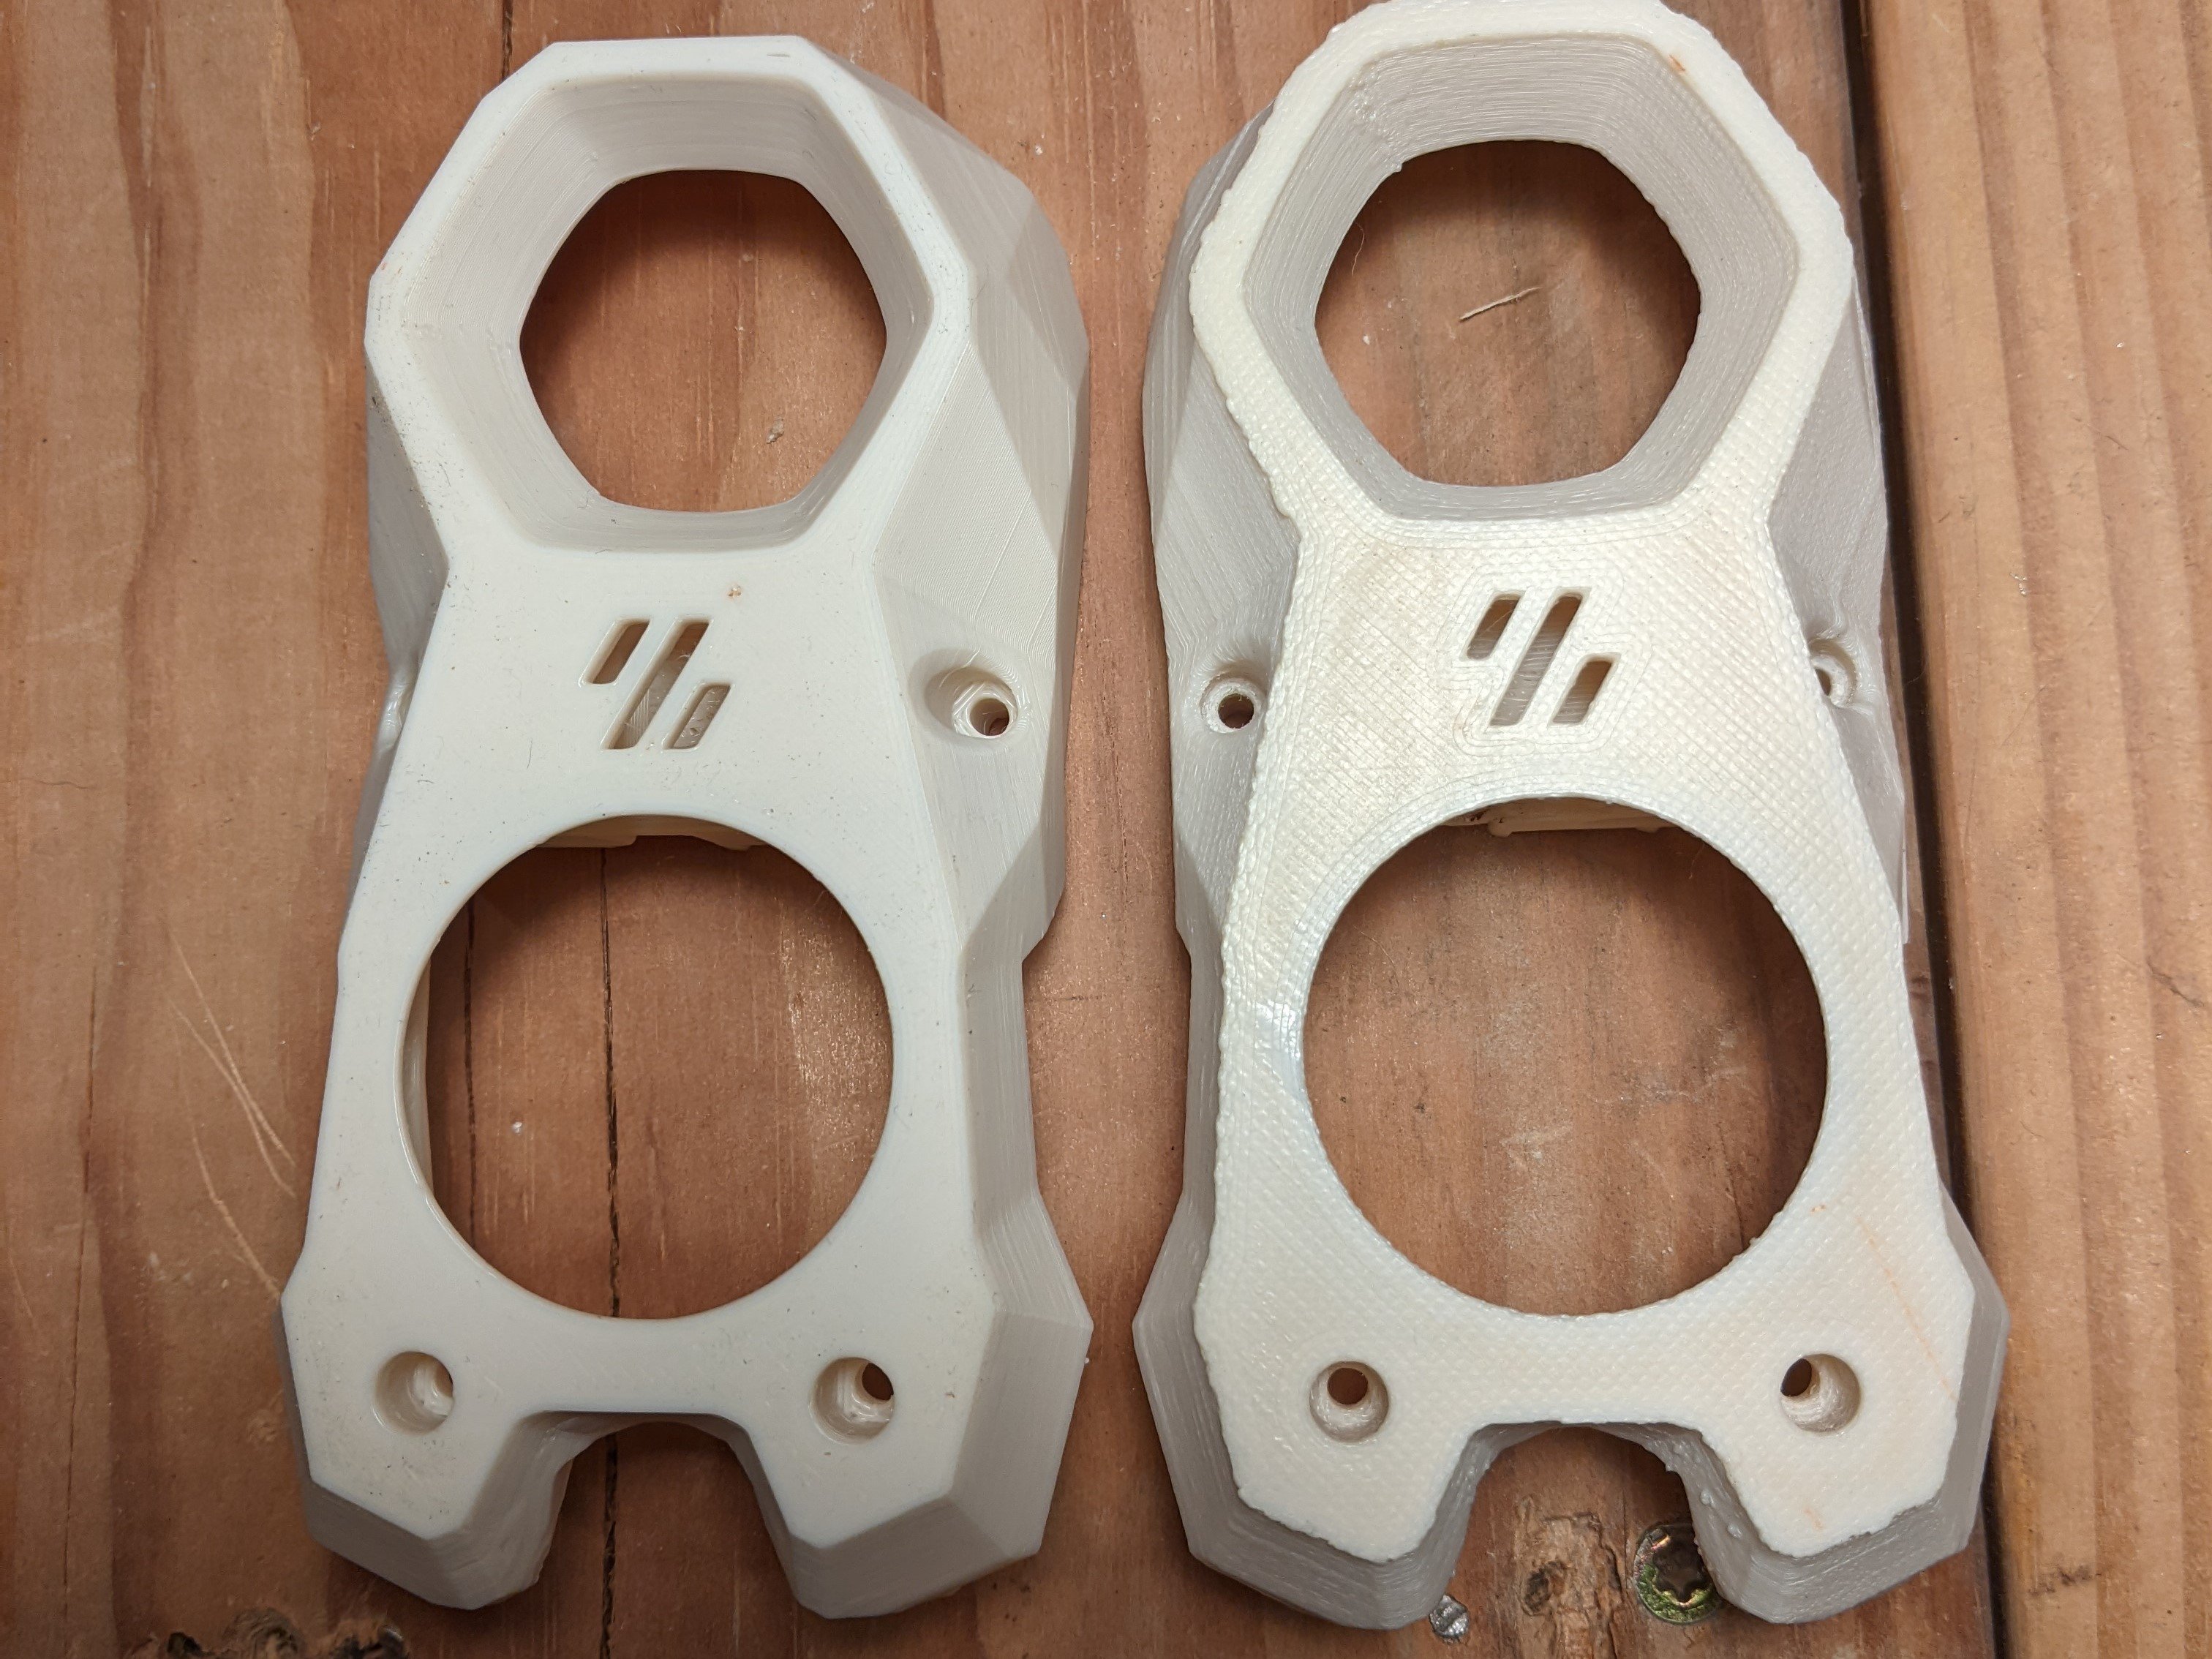
Here are a few photos comparing a rack I printed on my i3 clone to this one. The print quality is quite a bit better, but now that I have a higher ceiling to shoot for I'm realizing I have a further to go on my tuning journey. I will say that I never noticed things like the Slic3r buldge, that's also present in Super Slicer, until now.

I personally find it helpful to see other's prints under unflattering lighting, so with that said...

Somewhat flattering lighting (eg ambient)

Voron:

i3 clone:

Direct light, provided via a flashlight, perpendicular to the surface

Voron:

I3 clone:

direct light, provided via a flashlight, nearly parallel with the surface

Voron:

i3 clone:

Bonus photo of my ASA attempt

Sadly, I forgot to change my print temp back from 250 to 240, so there's quite a bit of wispy stringing. I suspect the print would have separated from the bed anyway. Any pointers here would be appreciated. The bed was clean (soap + water), was at 100, I let the printer heat soak for about 45 minutes with the filter going full tilt, first layer squish was solid good, smooth PEI (the textured side seems to have prints come loose more easily).


Printables link first

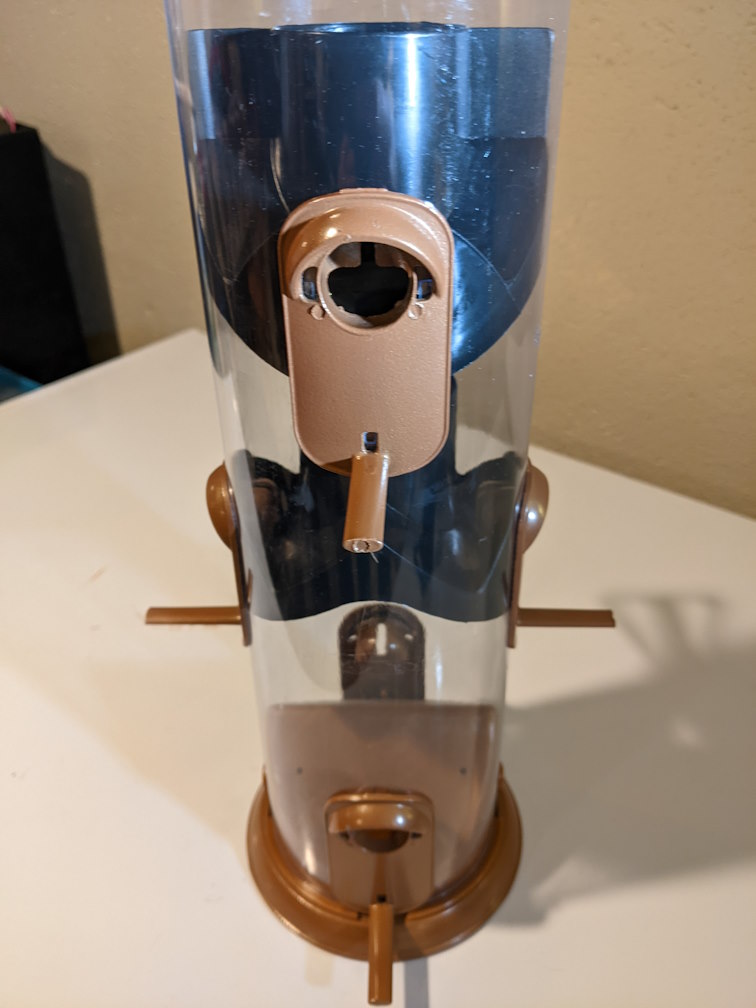
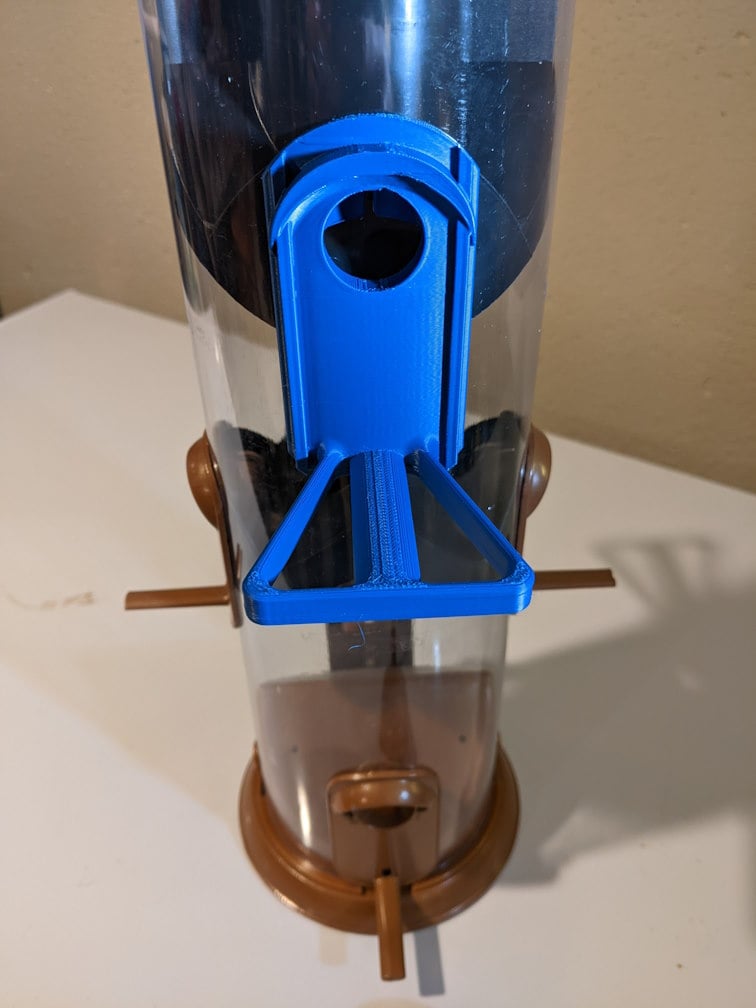
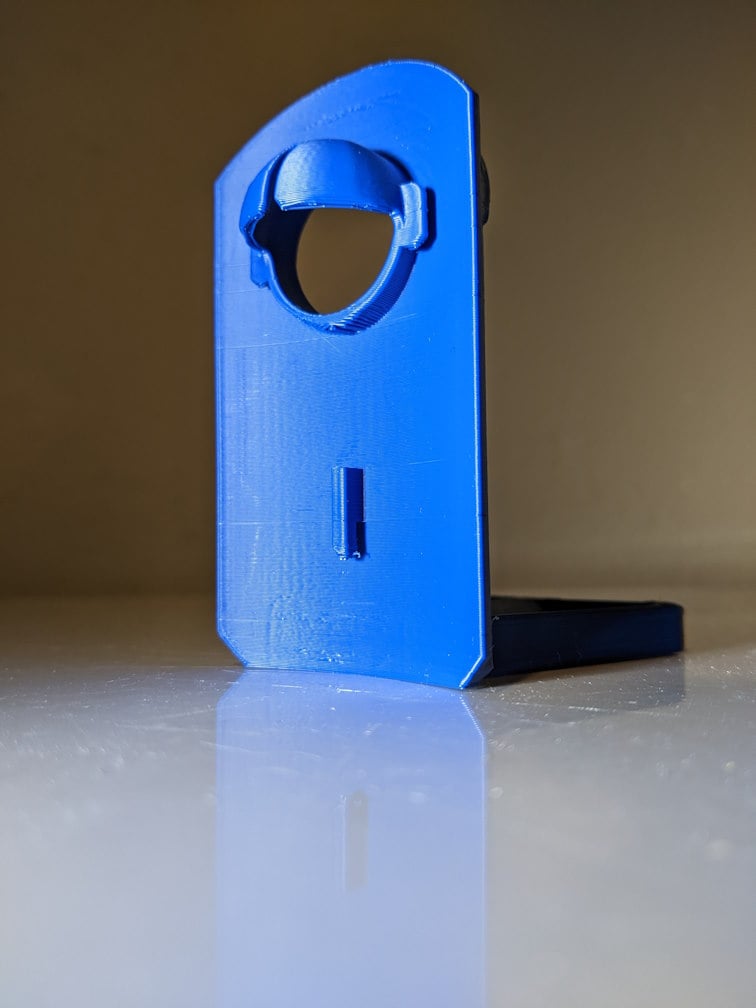
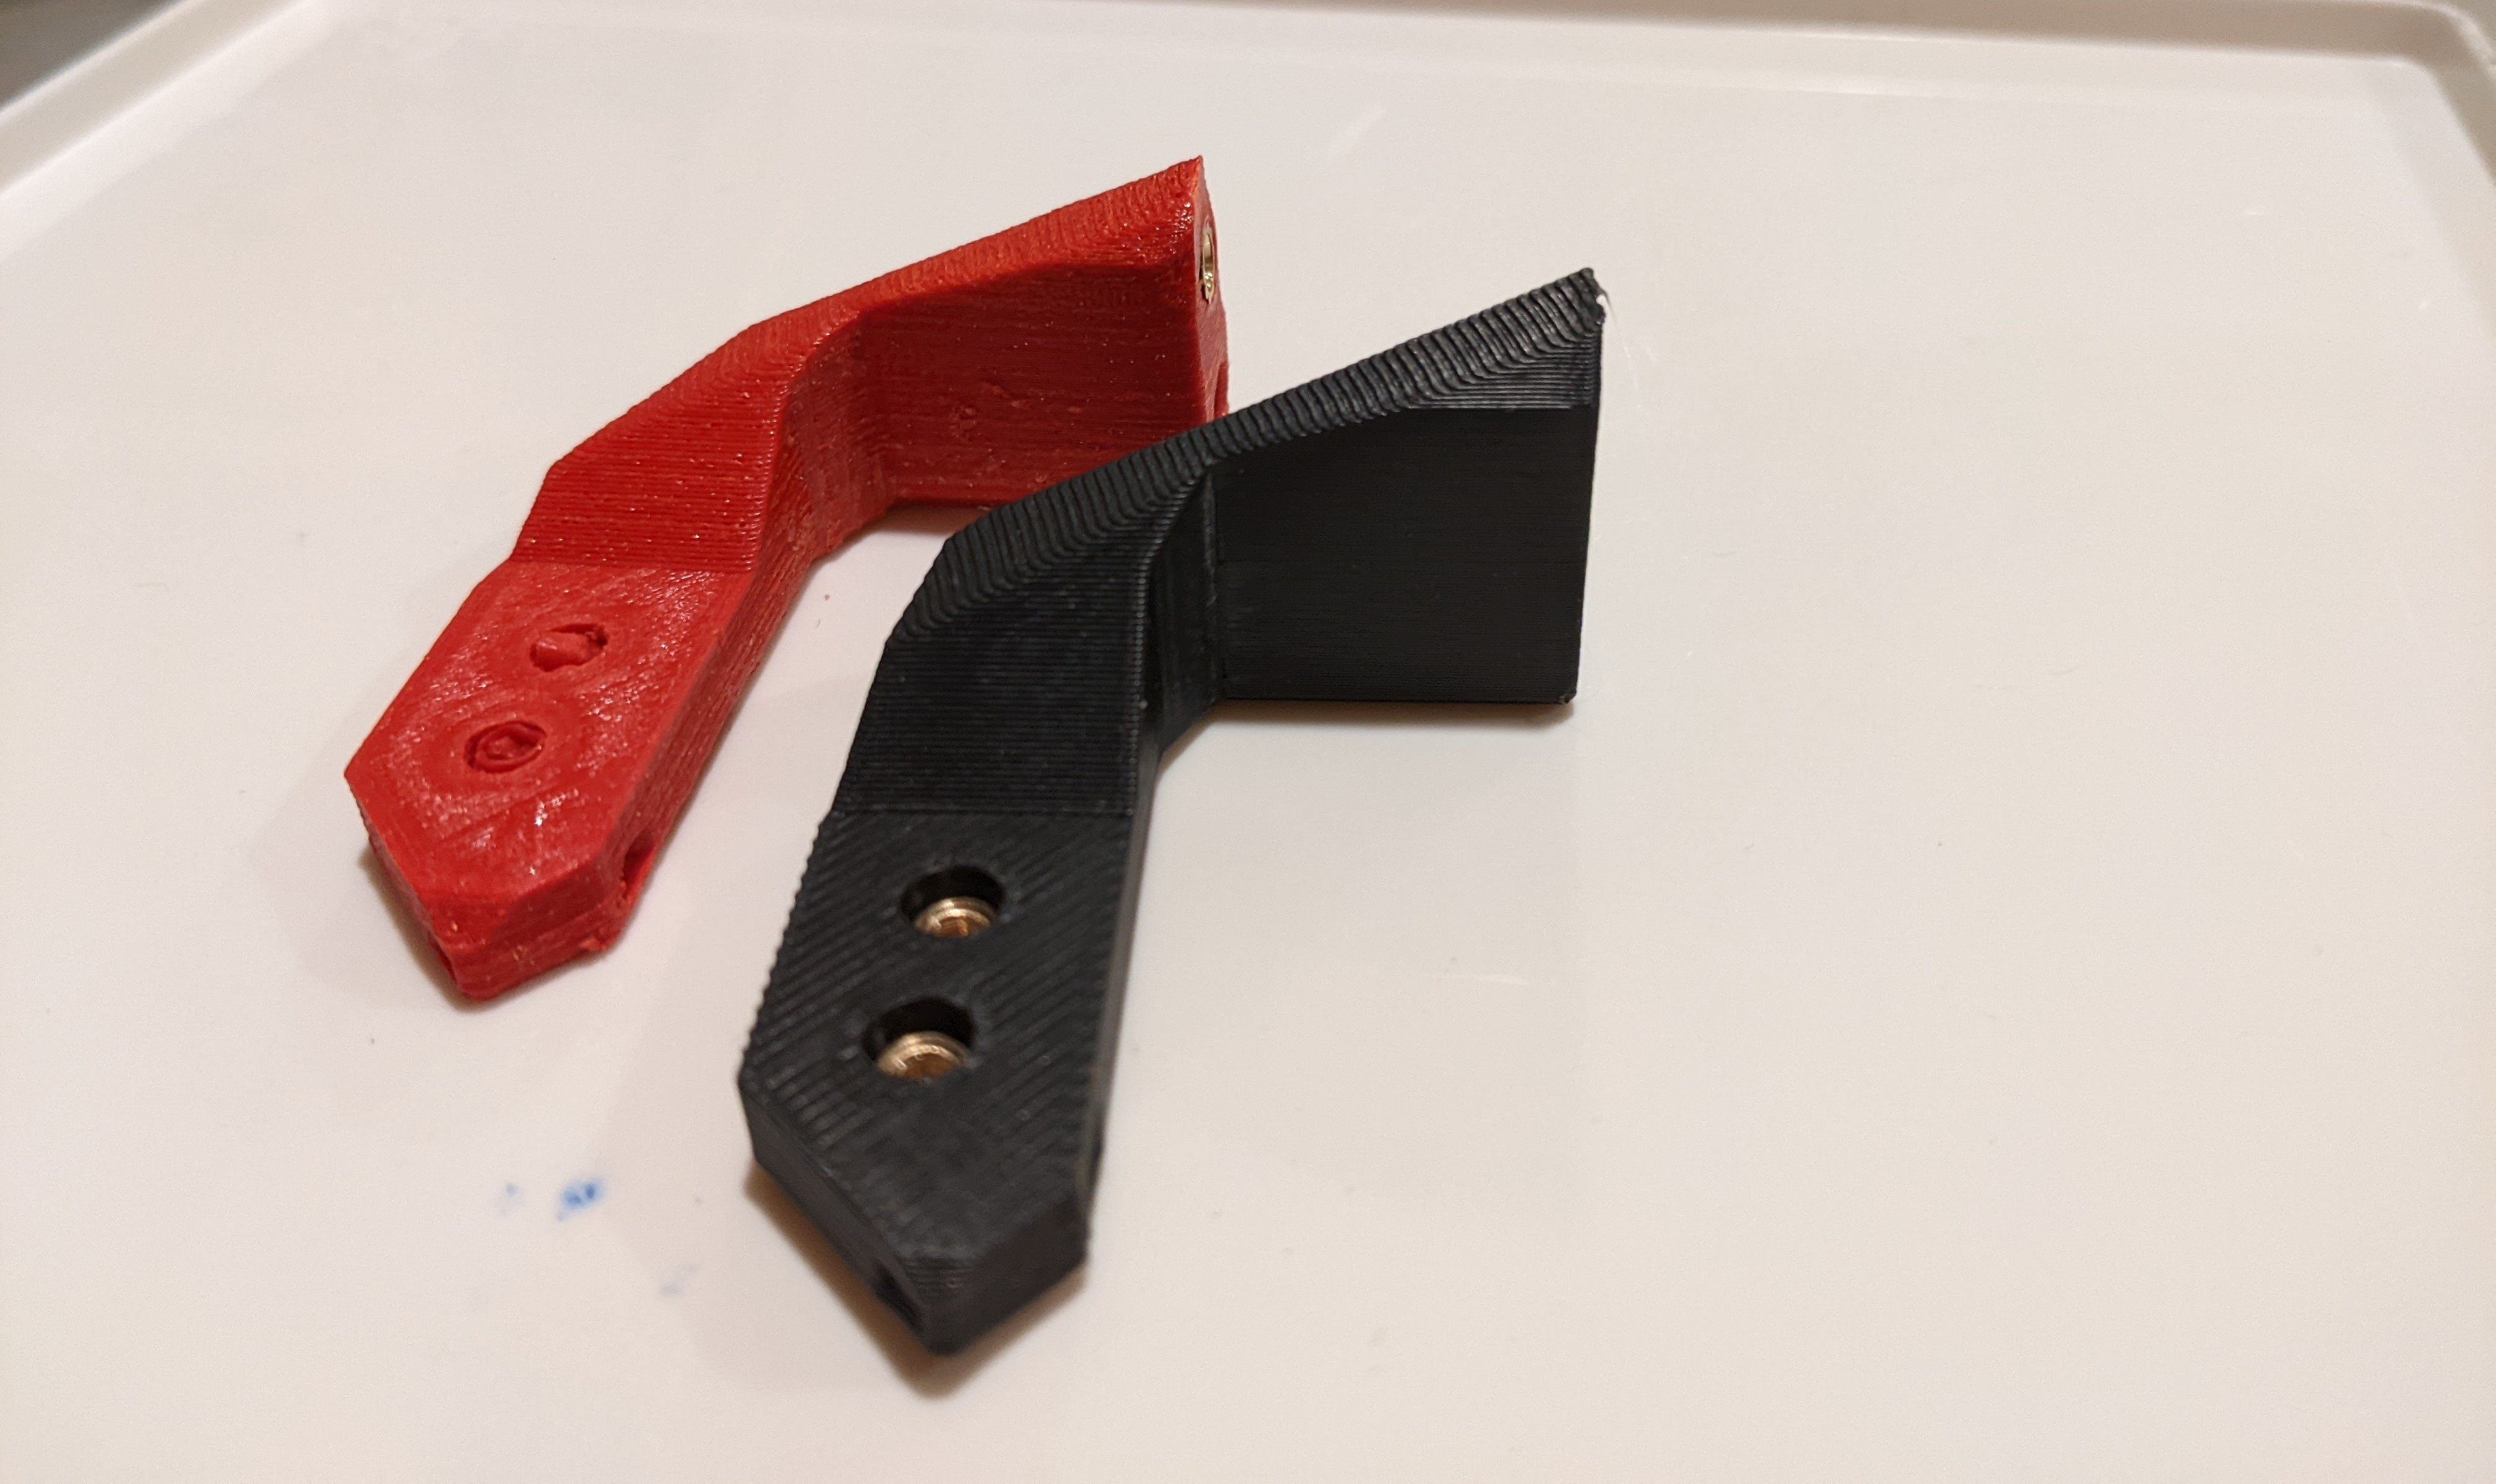
For the past 5 or so years, we've hard two bird feeders: one for larger birds and one for smaller birds. Another instance of the bird feeder in the photo above has been the smaller bird feeder until now. Over the years, I've fiddled with slip on adapters for the perches and eventually had to model a full replacement perch after a squirrel broke one of the original pot metal perches. My large bird feeder met the end of its life recently, and rather than replace it with a smaller capacity/larger perch unit I decided to modify my existing perch design to accommodate larger birds.

stock mount:

new mount:

back of new mount:


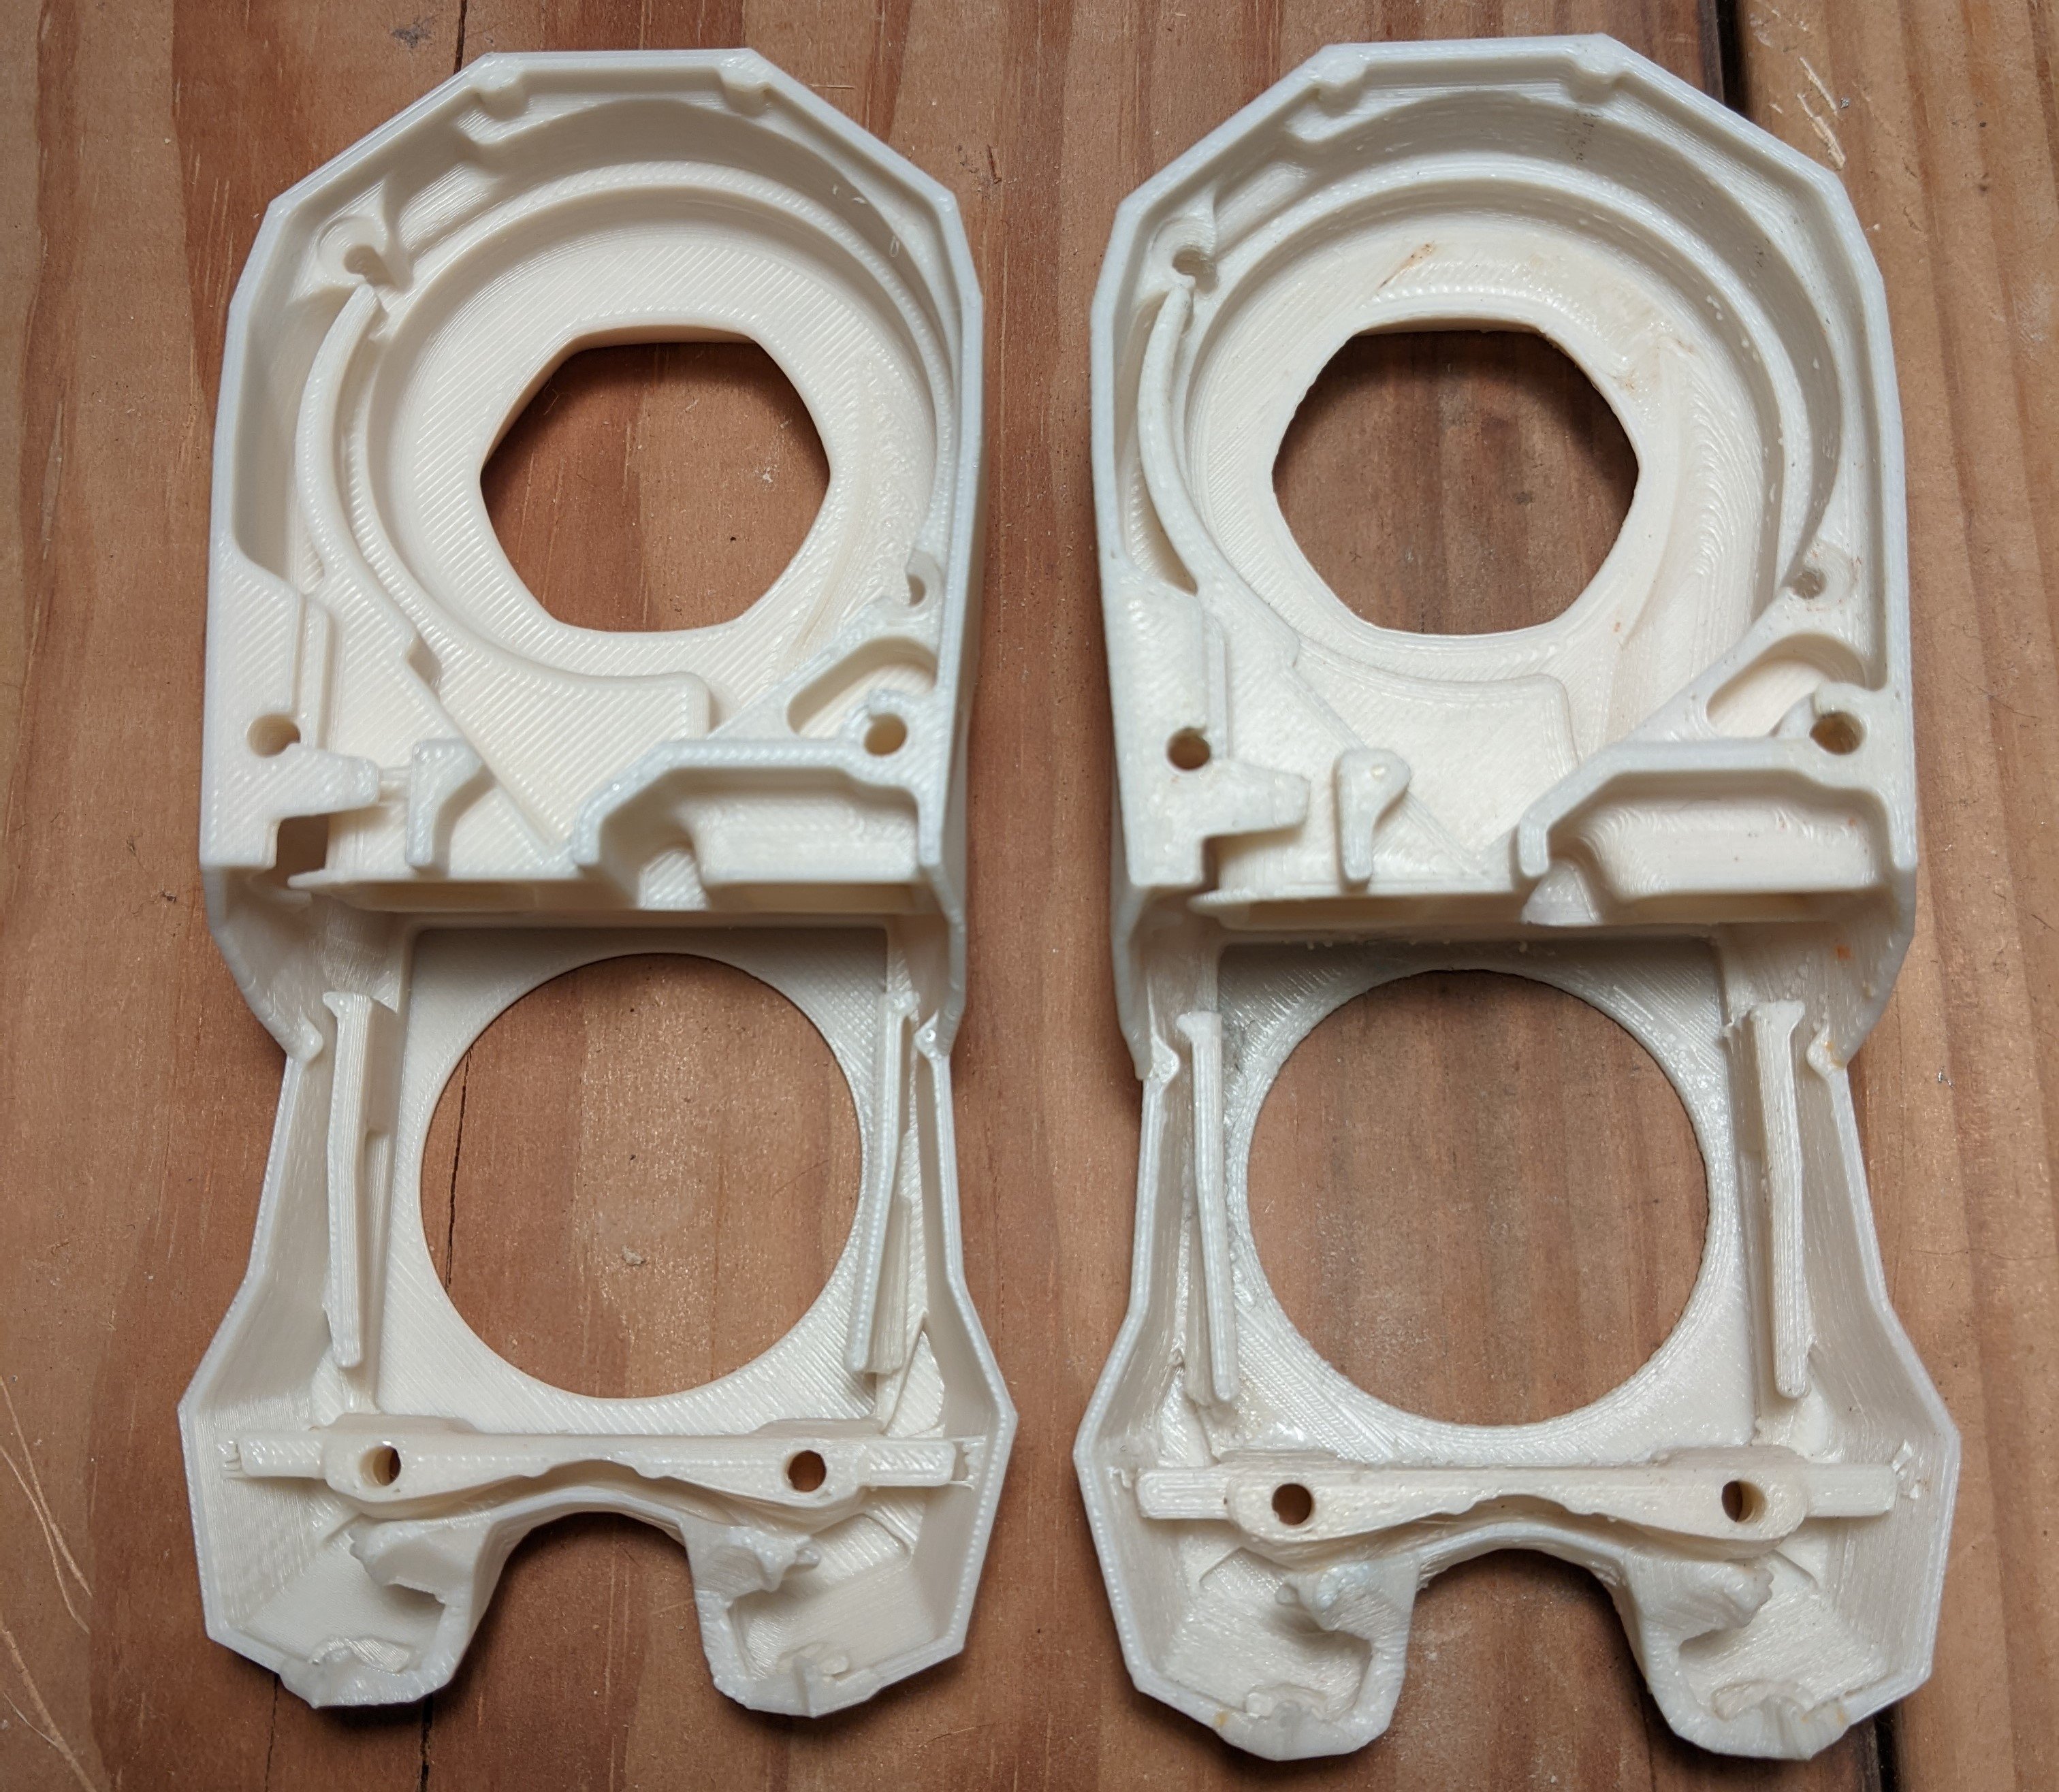
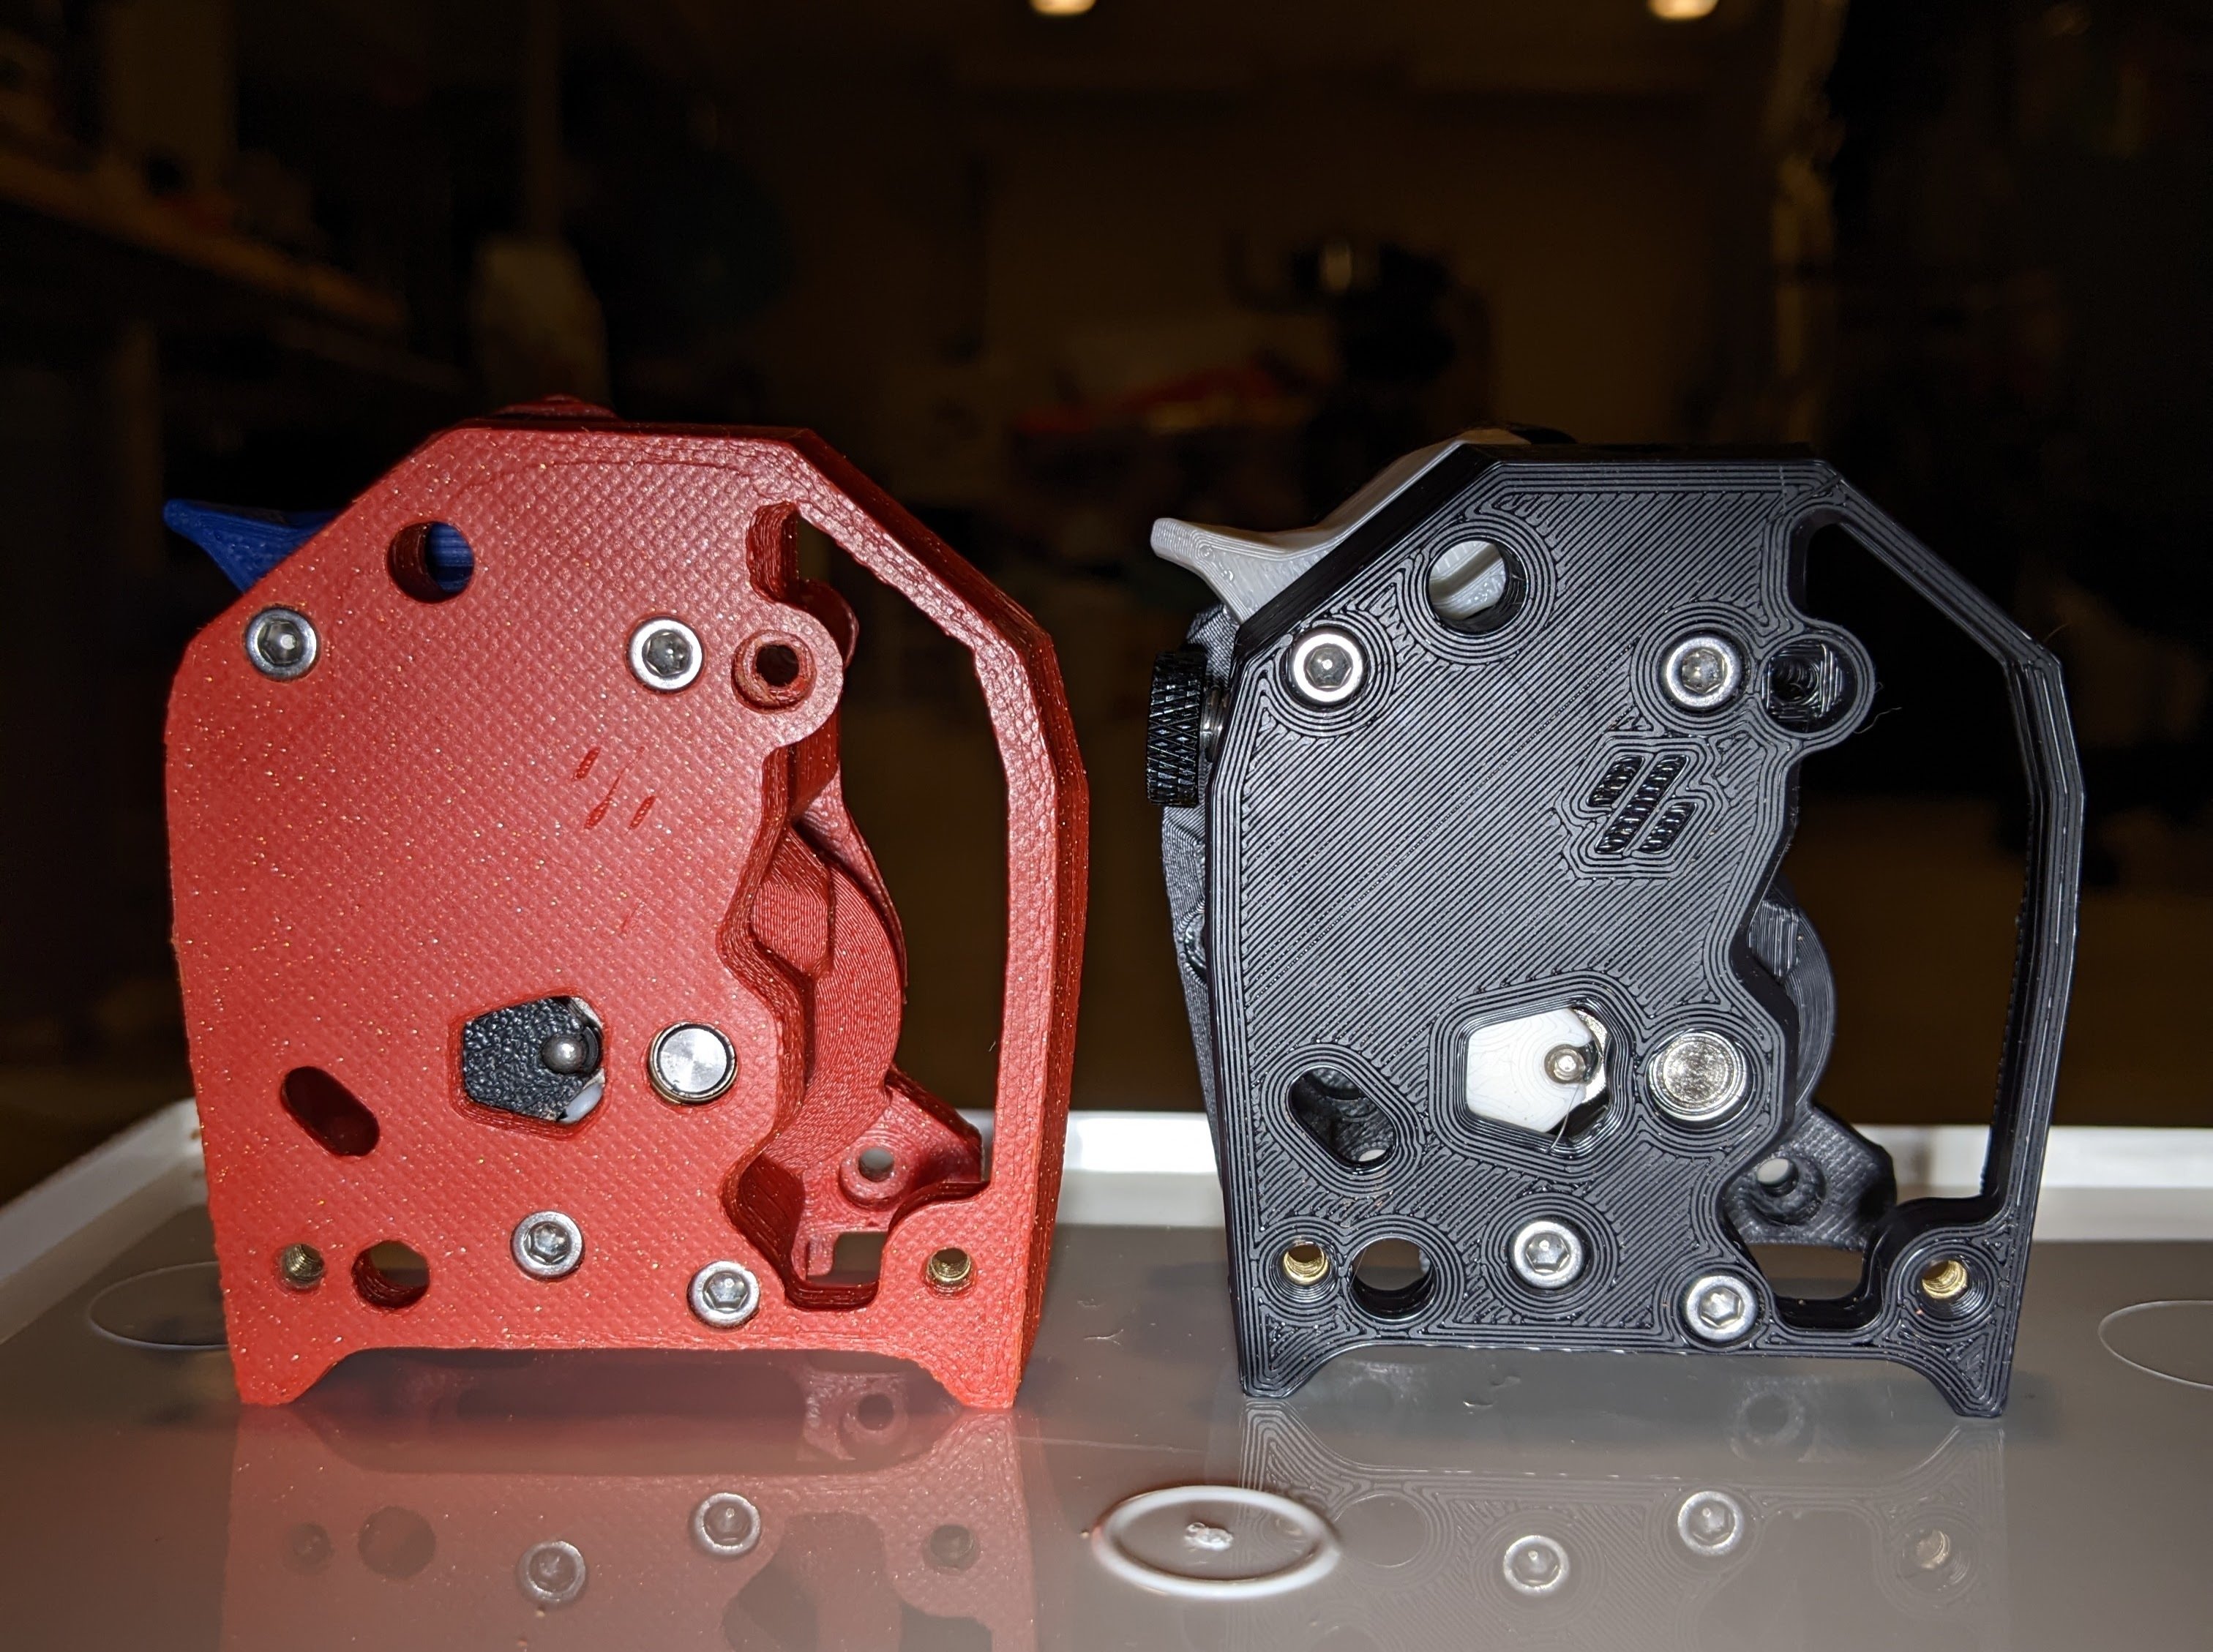
I printed all the parts I needed for my 2.4 build on my Monoprice Maker Select Plus (a rebranded Wanhao Duplicator i3 Plus), enclosed under a couple of cardboard boxes taped together. The parts were... functional, but not exactly pretty.

Motive for reprinting:

  • My z-homing isn't that consistent and I need to fiddle with live z a bit for each print. My StealtBurner didn't fit together that well, so I'm hoping that better fitting parts will result in more consistent homing
  • Moving to a Bondtech BMG Integrated Drive Gear Assembly in hopes of having fewer z-artifacts. If I'm going to rebuild my CW2, I might as well print it again too

While disassembling, I noticed that one of the bolts attaching the carriage to the linear rail was... very very lose (backed out 3+ turns). Maybe that was another contributor to my inconsistent homing.

More photos:

My first print with the rebuild is underway! I'm very excited to see if there's any change to the random z-artifacts I was seeing before, but I'm sad to report that my first klicky attach probe failed.


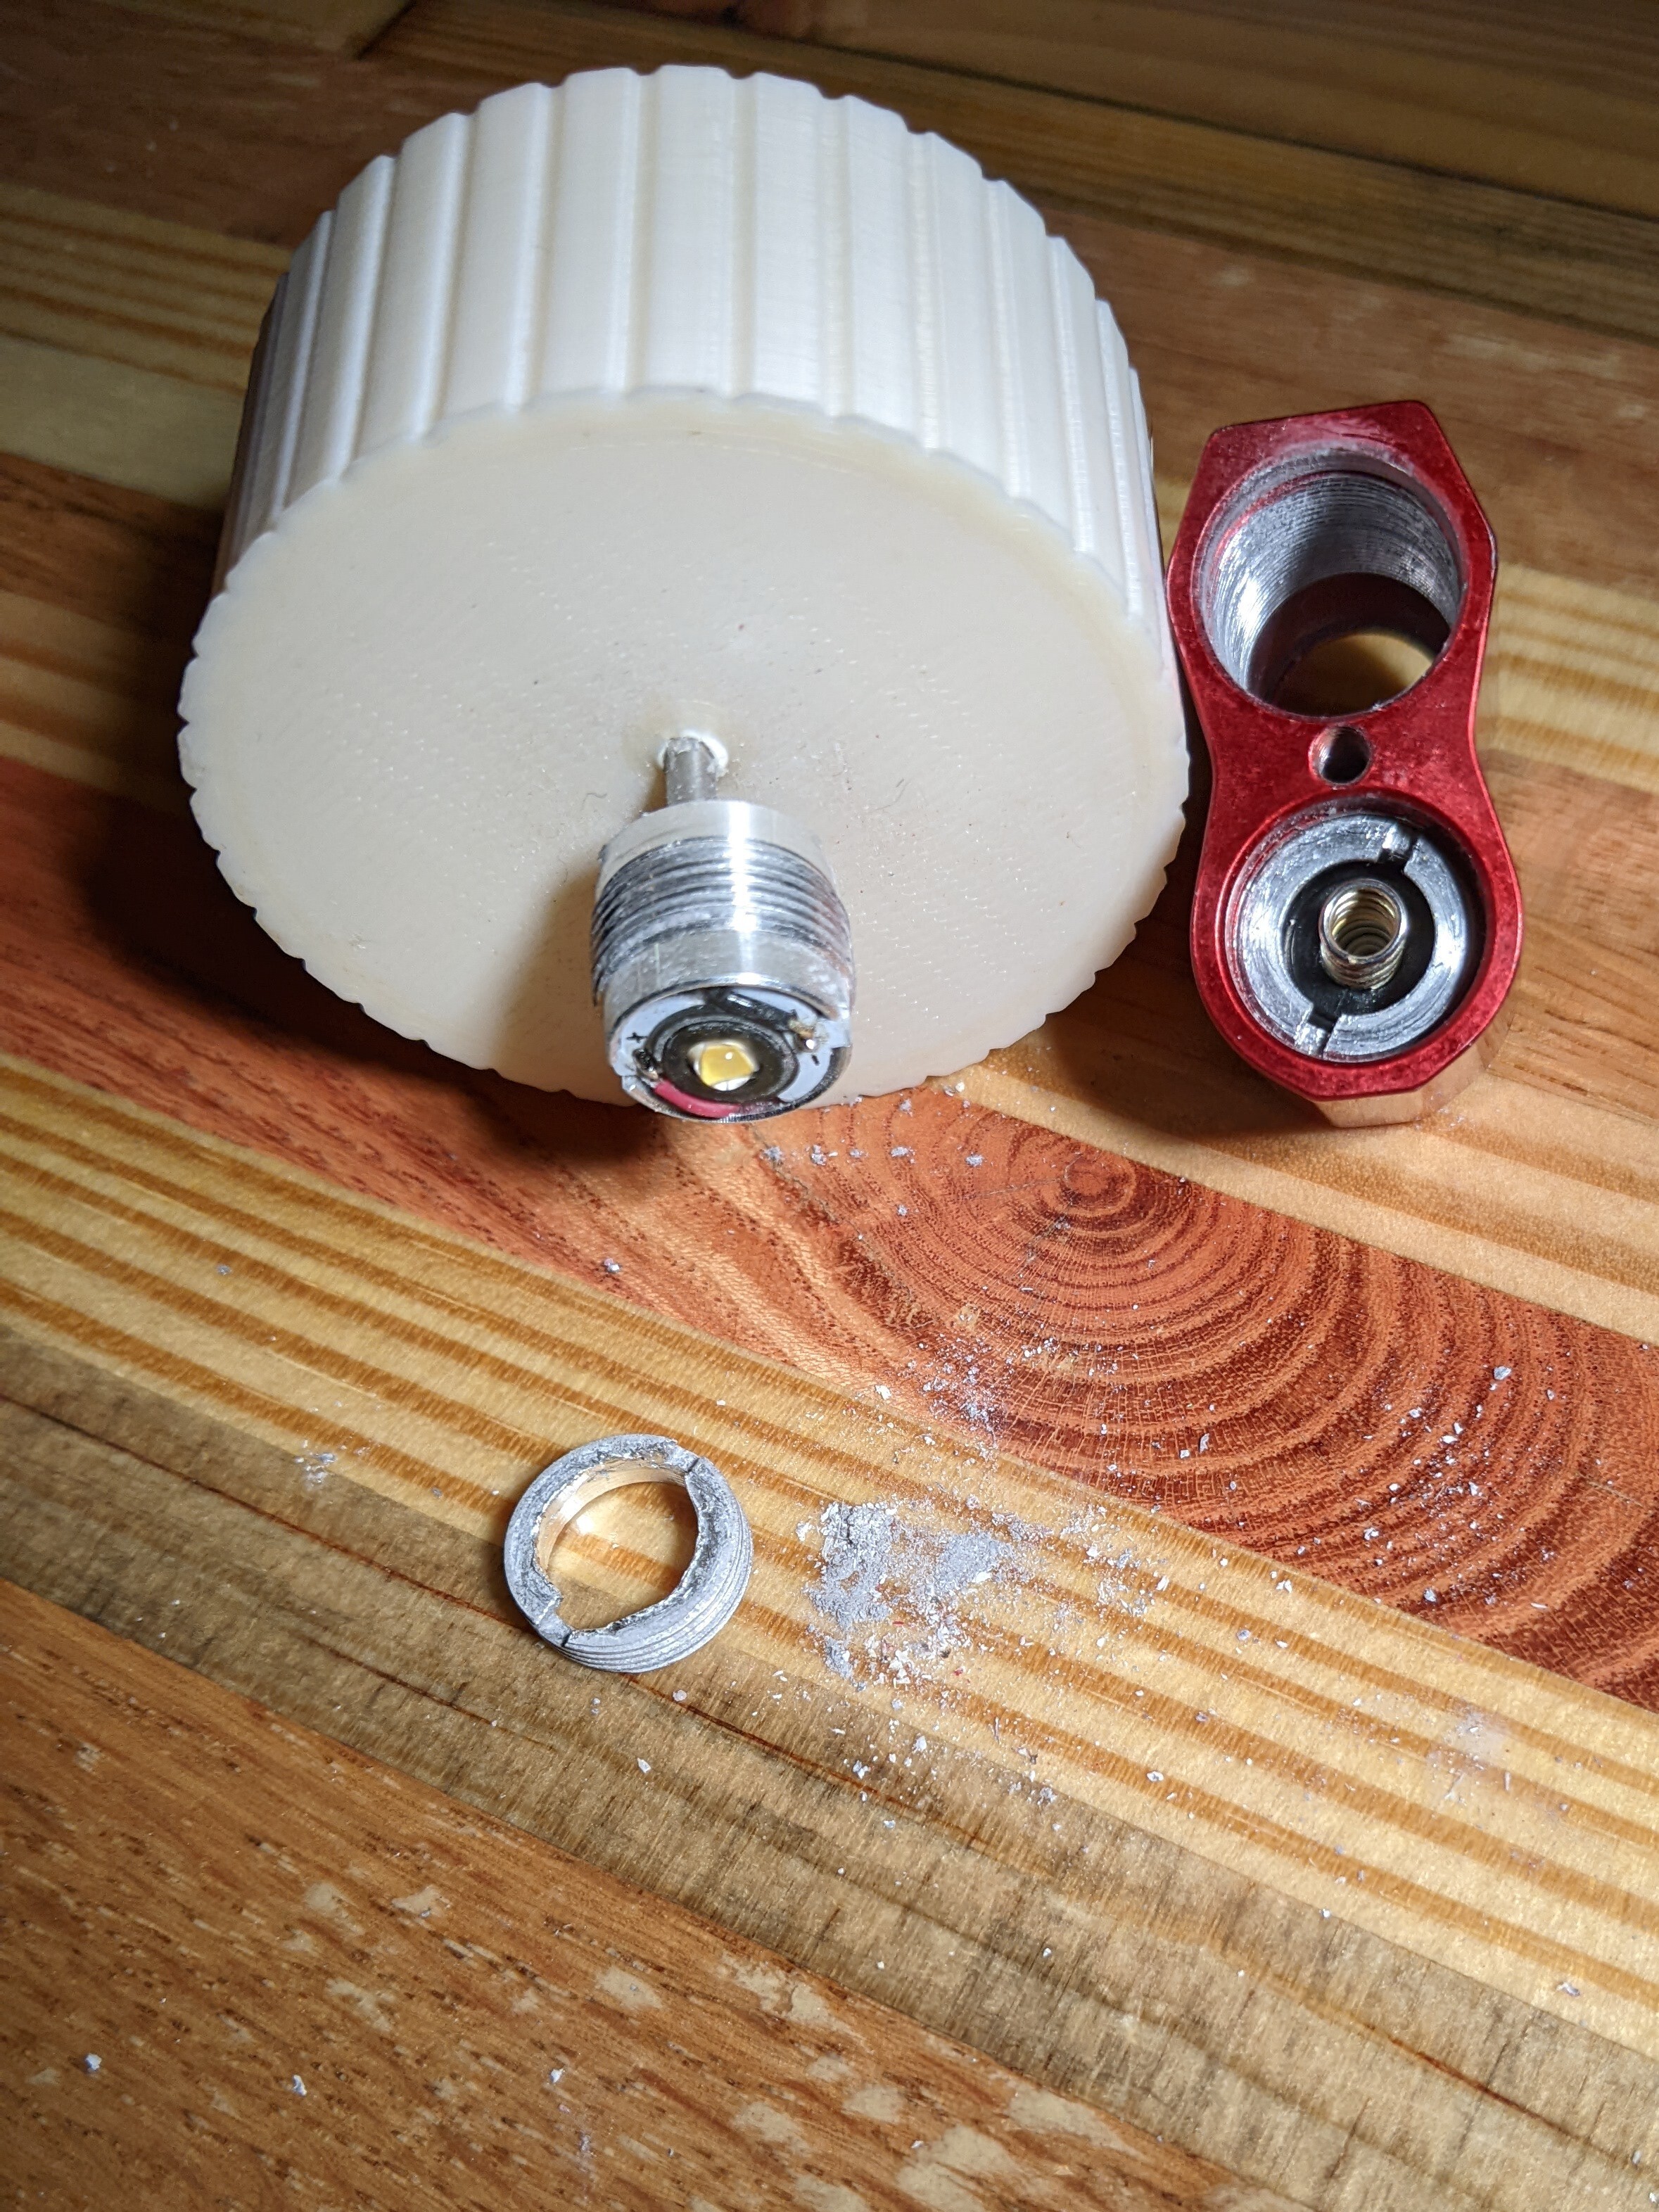
My oldest kid dropped this light... way too long ago and it stopped working. The light is very simple electrically and the switch was fine, so off to get a new Nichia pill/driver/LED combo. As a bonus, the newer (since like 2018, I've had this flashlight for a while) driver has much better mode spacing. The part was pretty cheap ($25), Benjamin was friendly/helpful, and I'm a happy camper.

Removal was a massive pain due to the tight packaging and threadlocker. Amusingly, the switch side had no threadlocker and came out easily using snapring pliers. I had to make a 'custom' tool to remove the driver. Annoying, pill itself was also threaded in addition to the retainer. The pill also didn't have as great of a spot to key into it, so removal was a one way road.

Thankfully no threads were harmed, everything went back together easily, and I have a working tiny pocket light again.

94
submitted 10 months ago by IMALlama to c/birding
 

I took this in Aruba before kids in 2016. Nothing special gear wise, thanks especially to a large bird that wasn't phased by me walking around near it..

D5300 + Nikon AF-S VR Zoom-Nikkor 70-300mm F/4.5-5.6G IF-ED

300mm, f/5.6, 1/4000, ISO 1800


This exhibit has been in place for a while, I'm guessing they had to replace the computer for some reason.


I just got this assembled last weekend.

printables, complete with F3D file.

This is a battery adapter that will allow you to insert D cell batteries into a LiitoKala Engineer Lii-500. I included the Fusion 360 file, so you can customize it to fit other applications, but odds are it will fit most 4+ 18650 based chargers that are also compatible with Ni-MH.

It prints in two halves that I simply hot glued together around their perimeter. It's not like this part is going to see very high loads… The parts are designed to print without supports. My copies are 20% infill (you could easily go with less) and 3 walls for an overall wall thickness of 1.16. Wall thickness is something I wouldn't change, at least for the battery side so the battery terminals don't eventual fail. The batteries are a very slight interference fit to ensure a robust electrical connection.

For terminals, I used 8mm wide nickle strip. I'm sure you could use something else, but I had some on hand and it seemed like an obvious application. Connections between the two halves were made via wires and solder.

9
submitted 1 year ago* (last edited 1 year ago) by IMALlama to c/vorondesign
 

Klipper started throwing an error and shutting down while trying to heat the extruder. The extruder was cold, which basically meant a heater wire break. Thankfully it was very easy to find. So much for buying a nicer harness. Grumbles aside, I wonder if this wire got pinched when I assembled the chains, which lead to an early failure.

I didn't have any spare PTFE wire on hand, so I spliced in a length of 16 gauge silicone wire and made sure to land the solder and heat shrink sections well away from any possible motion. I have replacement wire on order, but am tempted to run as is until it fails again...


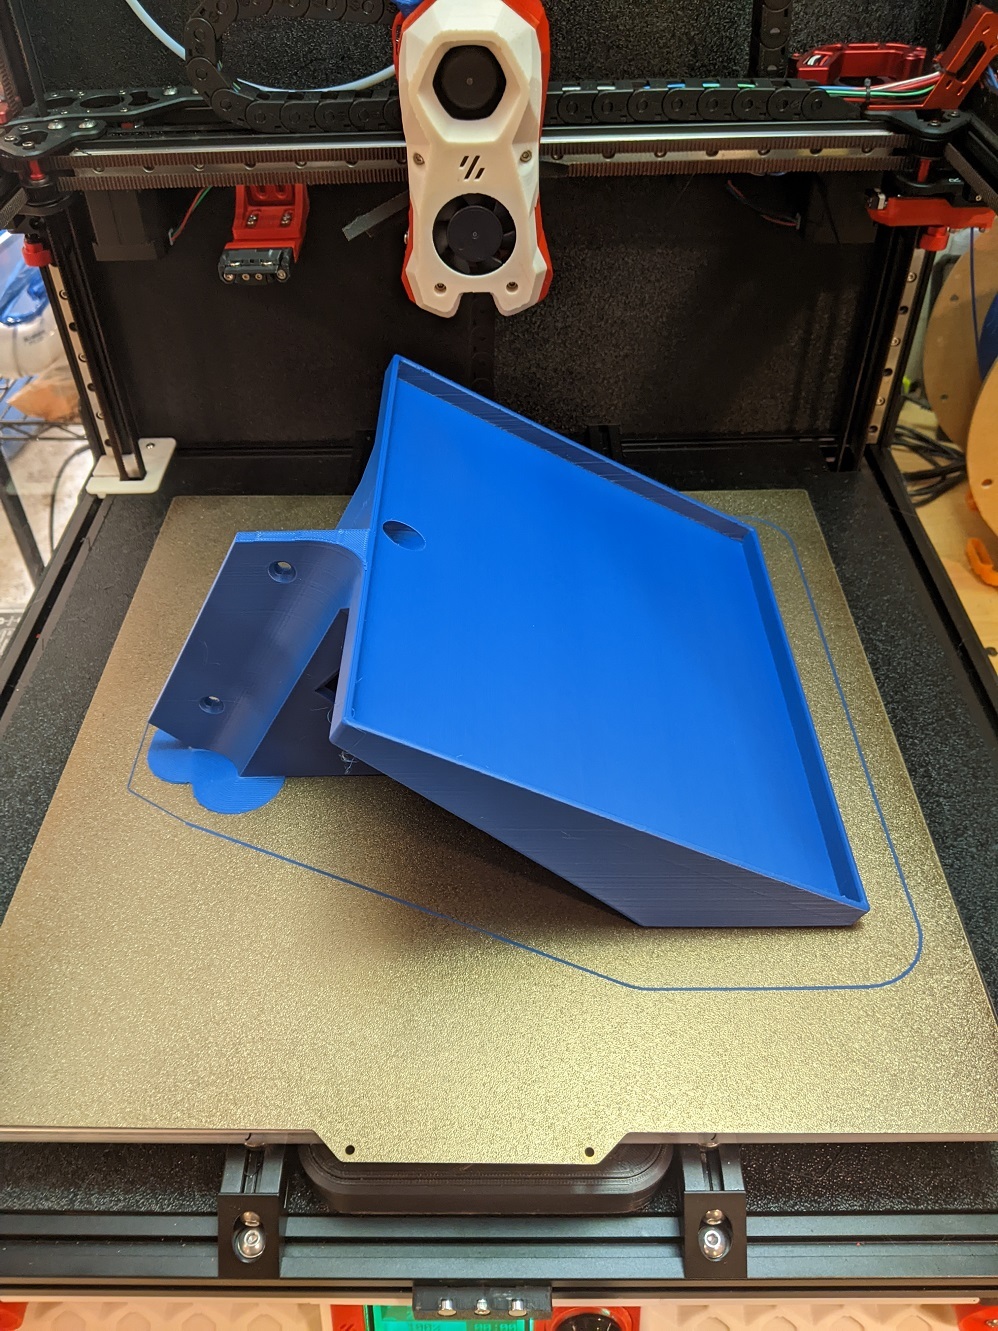
Working on a wall mount for my NAS to get it out of my basement airspace and into a closet. It's a tray that the NAS fits fairly snugly in and will screw into an exposed stud.

Once the UPC holder is printed, I'll post completed/mounted pictures over in [email protected]

Skirt to give a feel for bed footprint:

Looks like I have some ringing/ghosting to take care of. Maybe it's time for me to use that accelerometer I have mounted to my stealth burner...


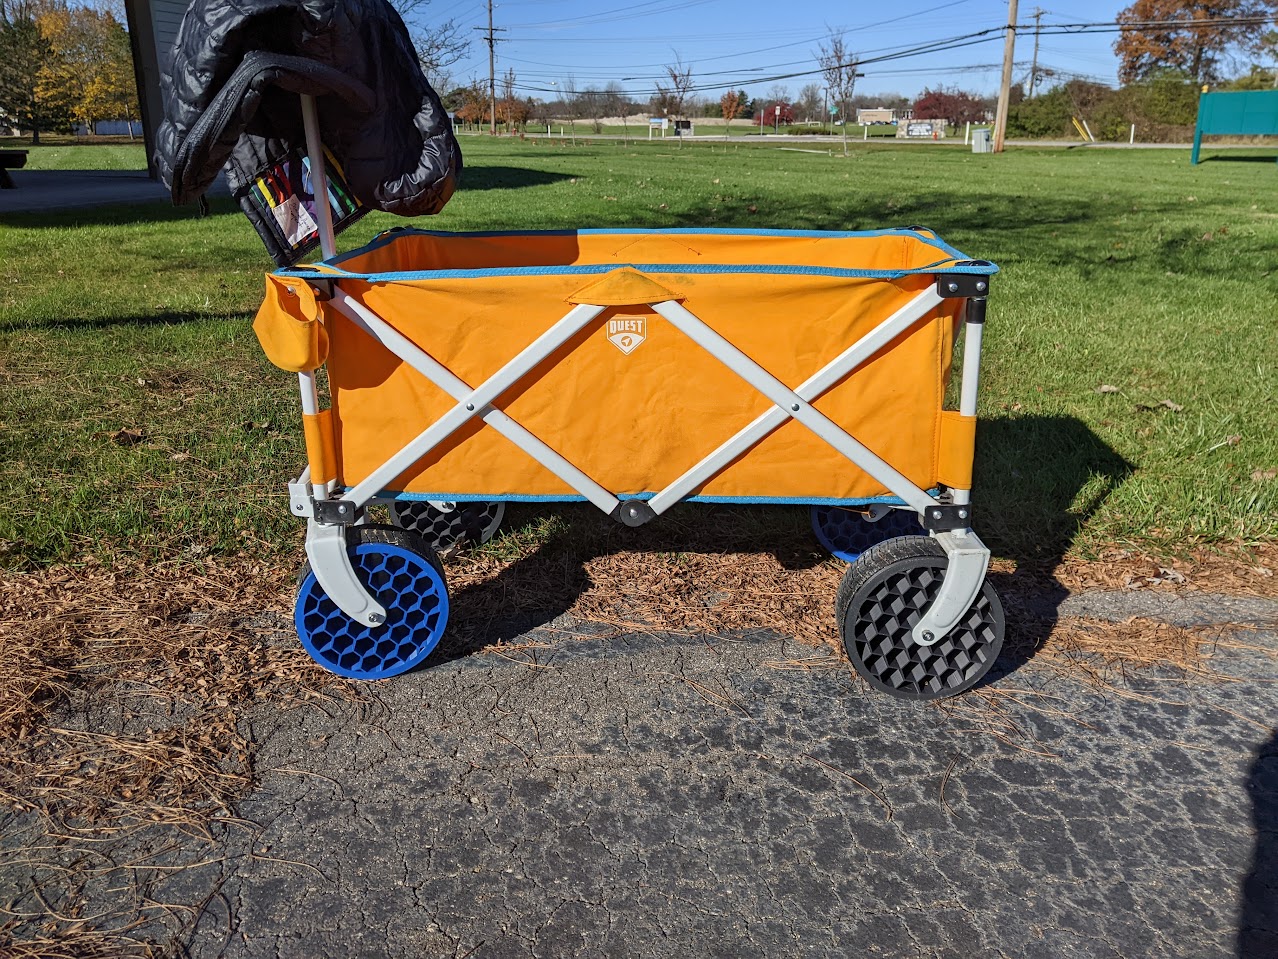
Our kids are starting to outgrow our double stroller, but will still want to ride from time to time. We've had this wagon for years, but it needed some upgrading. Rather than toss it and buy a new kid wagon, I decided to modify this one. Its biggest deficit was its wheels. They had metal sleeve bushings instead of real bearings and the wheels themselves were basically just an ABS doughnut with a narrow/thin rubber bands for tread. The treads had all cracked and fallen off. All this made the wagon hard to pull and loud.

I decided to make my own wheels to solve both problems. The new wheels consist of two halves and a TPU tread. The halves are keyed to mate with each other and are held together with m3 nuts/threadserts. Each half contains two skate bearings, resulting in four bearings per wheel. It's probably overkill, but I didn't want to leave the two halves unsupported in the center of the wheel at their interface.

Built in bridges for the somewhat weird shape to trick the slicer.

Now my 3 year old can pull me around in the wagon.

24
submitted 1 year ago* (last edited 1 year ago) by IMALlama to c/vorondesign
 

The build was completed about 2 months ago. In that time I've gone through probably 5 KG of filament.

Image

These stats are a little misleading, so here's some detail behind them

  • The majority of the shutdowns are the bowden tube getting caught between the gantry and the rear extrusion it rides on, causing y-homing to fail. I think I sorted that out now
  • The errors were generally klicky mount errors while the printer was young. That's also sorted
  • I've only had one aborted print that was aborted more than 2 minutes into the actual print where I lost bed adhesion due to not adjusting my offset after decreasing my print temp and lowering pressure advance
  • That 18h 22m and 22s was repeated three more times printing TPU treads for some ASA wagon wheels for the a wagon I'm messing with for my kids. At this point, I would call the printer pretty reliable and I'm treating it like my old I3 clone - if the first layer goes down well the print will go well

The printer is... fairly lightly tuned, but the quality is quite a bit better than my old I3 clone while printing faster. I'm sure I could tune more, but at this point I'm happy. I ran e-steps, got my z-offset nailed, ran a temp tower, ran Ellis's pressure advance, and ran a retraction test (spoiler: it didn't matter).

Here are some test prints that some of you may be familiar with. Everything is in ASA, 240 extruder temp, 0.4mm nozzle. Since I tend to print larger functional parts I'm going to probably move to a bigger nozzle.

Screws smoothly after running it up and down the threads once

Image

Super Slicer's built in retraction test. No stringing to see at any value

Image

Voron cube

Image

Same cube, cnother face, somewhat harsher lighting

Image

Same cube, same face as two photos ago, very harsh lighting. It's kind of amusing how bad the print looks with direct light at such a steep angle relative to the face. It would be kind of nice to improve this, but under normal lighting you'll never see this.

Image

view more: ‹ prev next ›