113
If incandescent lightbulbs have a vacuum inside, why do they get so hot on the outside?
(self.nostupidquestions)
a man in his twenties broke through the Jet d’eau’s security barrier and put his head on the nozzle. He was then thrown violently backwards.
After coming to his senses, the young man tried to hang on to the jet. A gesture which earned him to be propelled several meters high before falling on the slab.
It starts literally 2 sentences in, you can't find it?
Not wanting to eat out their significant other isn't necessarily correlated to toxic masculinity; I think you're conflating two different things. It's possible to be selfish completely unrelated to toxic masculinity. Not every instance of a male doing something wrong is attributable to toxic masculinity.
It can't come soon enough!
My only regret is that I have Boneitis
I just typed a long happy comment about this that Jerboa just derped away into the ether. I'm registered and eager to get out Lemmy-Boost, since Boost was the reddit app I used most.
Honestly, at 19, he's legally an adult in most (all?) countries. If he was 5 or 10 I'd agree with you 100%. I'm sure his parents/upbringing/whatever shaped his decision-making, but dude was old enough to make his own decisions.
“I had Disney, Hulu, I was holding on to their collective testicles so hard that they couldn’t, y’know, there was nowhere for them to go. But there was also nowhere for me to go, and who wants to hold on to those for that long?”
What a great quote
That blue light thing is pseudo-science.
You got a source for that?
You wish you'd never have switched from Friendster?
Sure thing, glad you found it helpful!
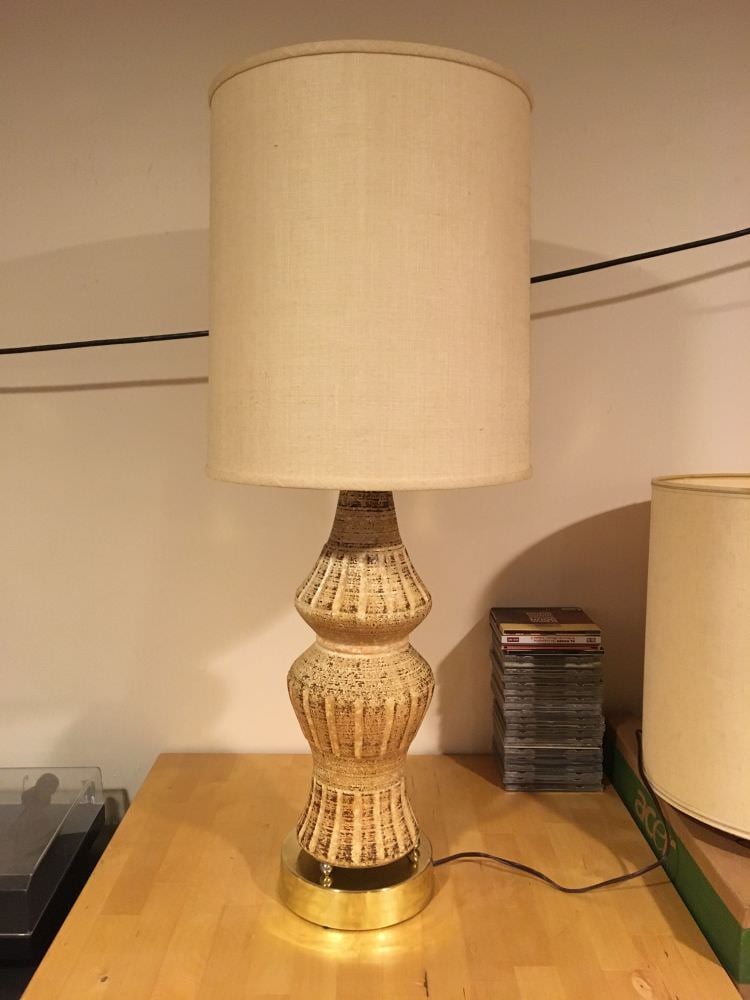
Originally posted in r/LampRestoration in ~2018

I found the lamp more or less in this condition a while back. $9.99 on 50% off day at Goodwill, so it cost me $5 (wooo!). The ceramic body of the lamp is in fine shape, which is great because that's the hardest piece to work on. The rest of it is a mess though. I'm glad Goodwill didn't just toss it in the trash considering how sad it looked on the shelf there. Mine now.

Close up of the sticker on the base. "Genuine Lesie China," at least I assume that's what it says. I've seen a couple other references to Mid Century Leslie China lamps, but I've never heard of the manufacturer before this. You can also see how bad the corrosion is on the base.

Close up of the neck. It seems to have come unscrewed, and that's why it was hanging like the first picture shows. There are only a few threads showing, too.

Inside the cup part, where the socket is.

I pulled the bottom apart a bit, that wire is all sorts of shot. Hopefully no one was actually using the lamp with the wire in this condition.

Twisted wire at the other end, all the way to the socket. It's a bit hard to see in the picture, but the shielding is pretty frayed.

Body removed and quickly reassembled just to use as a reference for how it goes together.

Reference shot of the bottom bits.

Reference shot of the top bits.

Everything laid out. Time for polishing. Unfortunately each and every piece failed the magnet test, so I'm going to have to be really careful and light-handed with the polishing, so I don't burn through the plated brass layer.

After polishing. Came out ok. The photos don't really show it, but the bottom piece still has a fair amount of scratch marks from the polishing, but once the old lacquer and tarnish and crud was off I called it done. I'd rather have scratches that you can see if you look closely than spots of completely missing brass. I also didn't bother trying to smooth out the dents in the base. They're from where the three balls sit on it, so they're going to be pretty well covered once it's reassembled, and it would just make new dents anyway.

Spray lacquer. Don't mind the bits in the top right corner, those are from another project, I just lacquered them at the same time.

When I went to reassemble everything I wasn't even able to thread it all back together because the main pipe was just barely long enough. I have bits of pipe nipple and couplers laying around, so I added about 1/2 inch of length. This made everything much easier. I'm sure the fact that the pipe was just barely long enough is what made it fall apart in the first place.

Everything reassembled except the electrical bits.

New wire, pulled through to the top. I also added a small grommet. It probably originally had one, but it had long since hardened and crumbled to dust. This'll prevent the cord from getting frayed by the hole in the base.

Socket attached, underwriter's knot knotted.

Reassembled the shell of the socket. Normally I consider this type of socket one-time-use. You often have to tear apart to remove it, so I usually replace them. In this case the bottom and top halves seemed to have separated themselves when I was disassembling, and they were in perfectly good shape. They snapped right together and held, so I decided it's good enough to reuse. The contacts inside looked fine.

Pulled the wire tight and screwed the socket into place, and lined up the switch with the opening. Because of the camera flash you can really tell what a crappy job I did polishing because I was scared to burn through the brass.

Screwed the key back into place.

Pulled the slack out of the new wire and squeezed the grommet in place.

The adhesive on the sticker was all gooey, so I was able to pull it off pretty easily. I cleaned the residue off of it carefully with acetone, and then used clear silicone to glue it back on. The flash in this photo makes it look more worn than it is, it's still reasonably easily legible.

Three sticky felt dots on the base.

Pop the harp back into place. I've never seen this style harp before, it sort of pops into the cup bit. If you know anything about it or have seen them on other lamps Iet me know. I didn't really spend time polishing the harp because it'll basically be completely hidden, and I'm lazy.

Done! Stuck a shade on for photos.
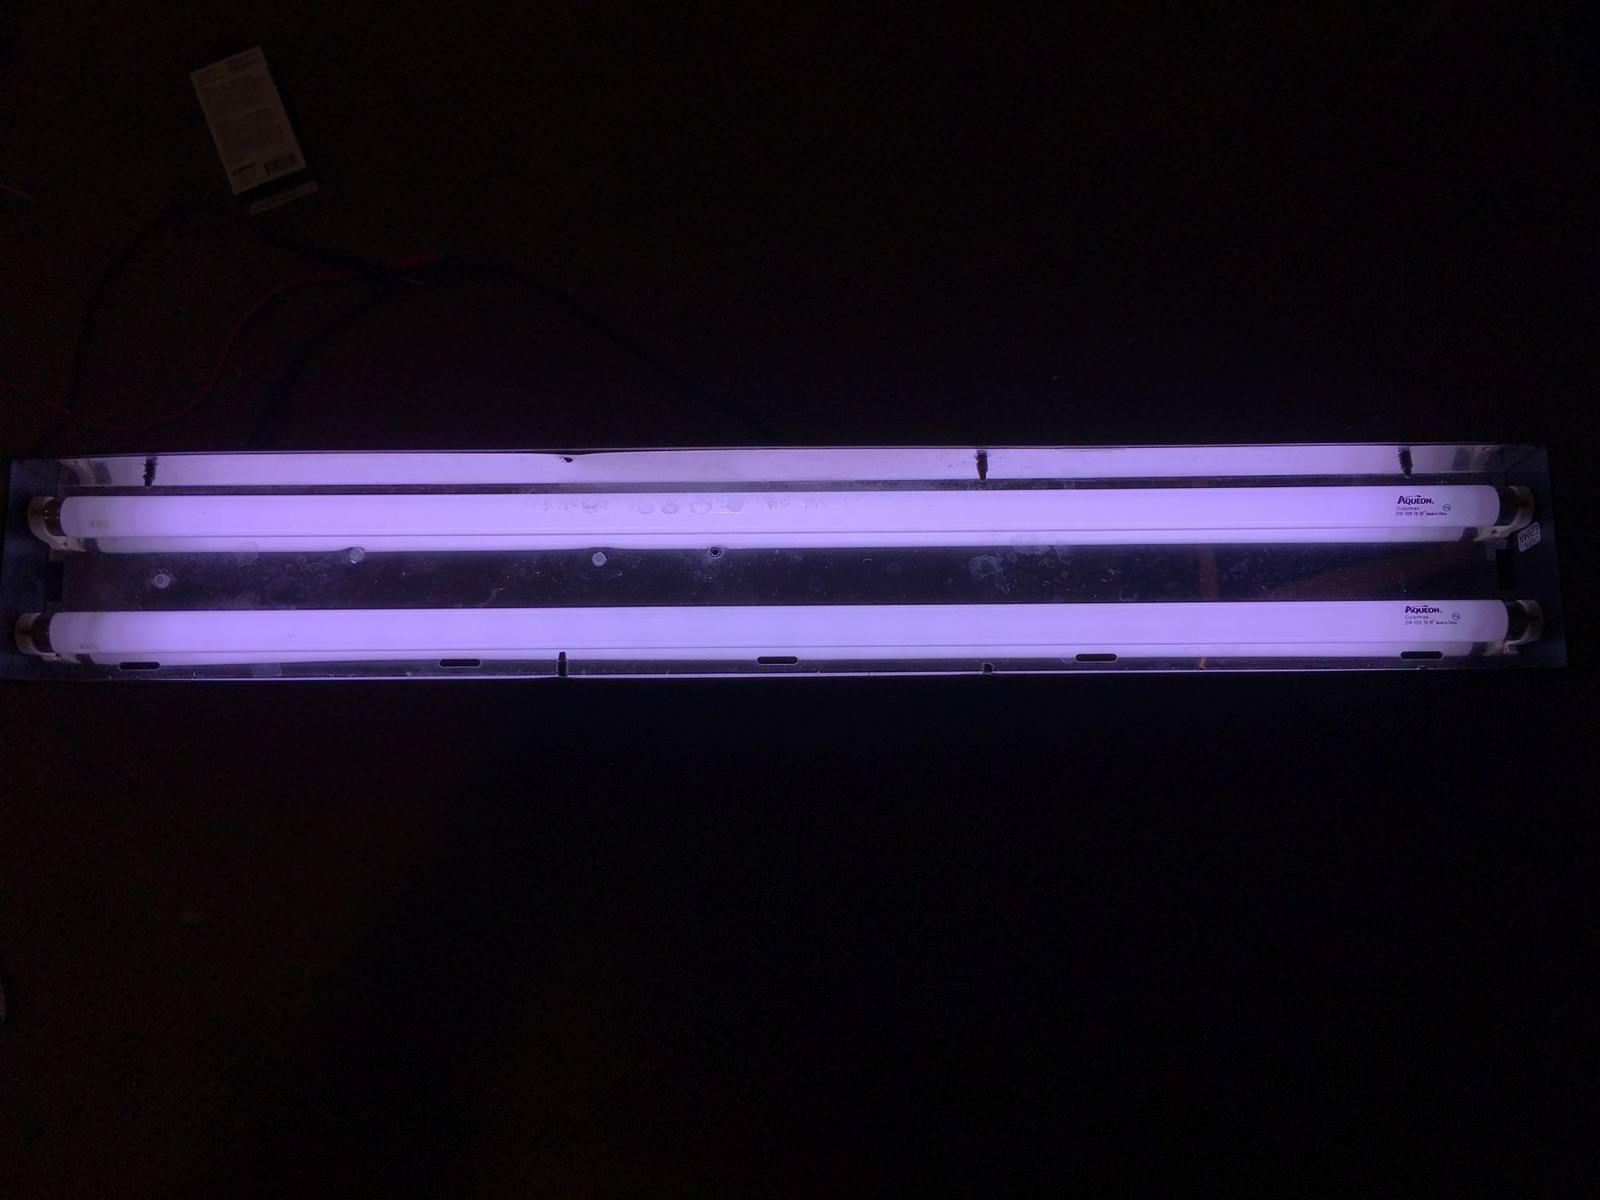
Originally posted in r/LampRestoration in ~2018
I have a large aquarium with a few fluorescent light fixtures. I noticed that one had started to occasionally take a few flips of the switch before it would turn on. Finally it just quit for good. I suspected the ballast, since the bulbs never flickered or anything. Swapping in a known good bulb from one of the other lights confirmed it, the issue is something other than the bulbs, and there isn't really much else other than the ballast.

Didn't take a proper before pic, but all that's been done here is removal of the bulbs and the plastic clips that hold the reflector to the black housing.

Reflector removed from the housing. Everything is attached to the backside of the reflector, the housing does literally nothing beyond, well, housing everything.

No pics of the multi-meter in action because I only have two hands. I could either measure the voltage or hold the phone to take a pic, not both at the same time. Voltage measured ~115 on the black and white wires coming in from the outlet, but nothing on the wires going to the bulbs. This confirmed my suspicions.

Fluorescent fixtures are not my strong suit so I labelled all the wires. In retrospect I didn't really need to do this.

The other side, and more notes on which wires go where

Close up of the old ballast. The label has a little diagram. This is where I realized that I maybe didn't need to label all the wires.

New ballast. New wiring diagram. Different color wires. All that labeling work I did was in vain. I had a hard time selecting a replacement ballast, there may as well be an infinite number of choices nd like I said this isn't my strong suit. I wanted one for two T8 bulbs, and the same number of wires as the original. The Fxx number refers to the length of the bulb. I've got F30 bulbs. This ballast is labelled as working with F25 bulbs and F32 bulbs (as well as some others. I decided that since 30 is between 25 and 32, this will be fine. Makes sense to me, hopefully I'm right and I won't be drastically shortening the life of the ballast.

New ballast installed and wires reconnected to the sockets. The new ballast is quite a bit smaller than the one it's replacing, so I used one of the existing holes, and made a new one for the other mounting tab.

Success!
Ummm.
Those two things are opposites