Food and Cooking

1255 readers
1 users here now

All things culinary and cooking related. Share food! Share recipes! Share stuff about food, etc.

Subcommunity of Humanities.


This community's icon was made by Aaron Schneider, under the CC-BY-NC-SA 4.0 license.

founded 1 year ago
MODERATORS
1


I bought some paw print molds for cookies. I don't want the cookies to be stone hard, but also not too soft. Is there some dow, that can be poured in, so it fills every nook & cranny?

2


y2u.be/p4YcdEF93G4

Props to Doc Mike for being a voice of science amid the prevalence of wrong info on the Web.

3


Palak paneer

Punjabi-style samosa

This was my first time making samosa, and they're wonky looking but delicious.

4


I've been eating healthy recently and would like to add sweet potatoes to my diet since they are quite nutritious. Although I'm not a picky eater, the semi sweetness of this variety isn't appetizing to me. Does anyone have any suggestions or recipes to help them taste more savory? Thanks in advance!

5


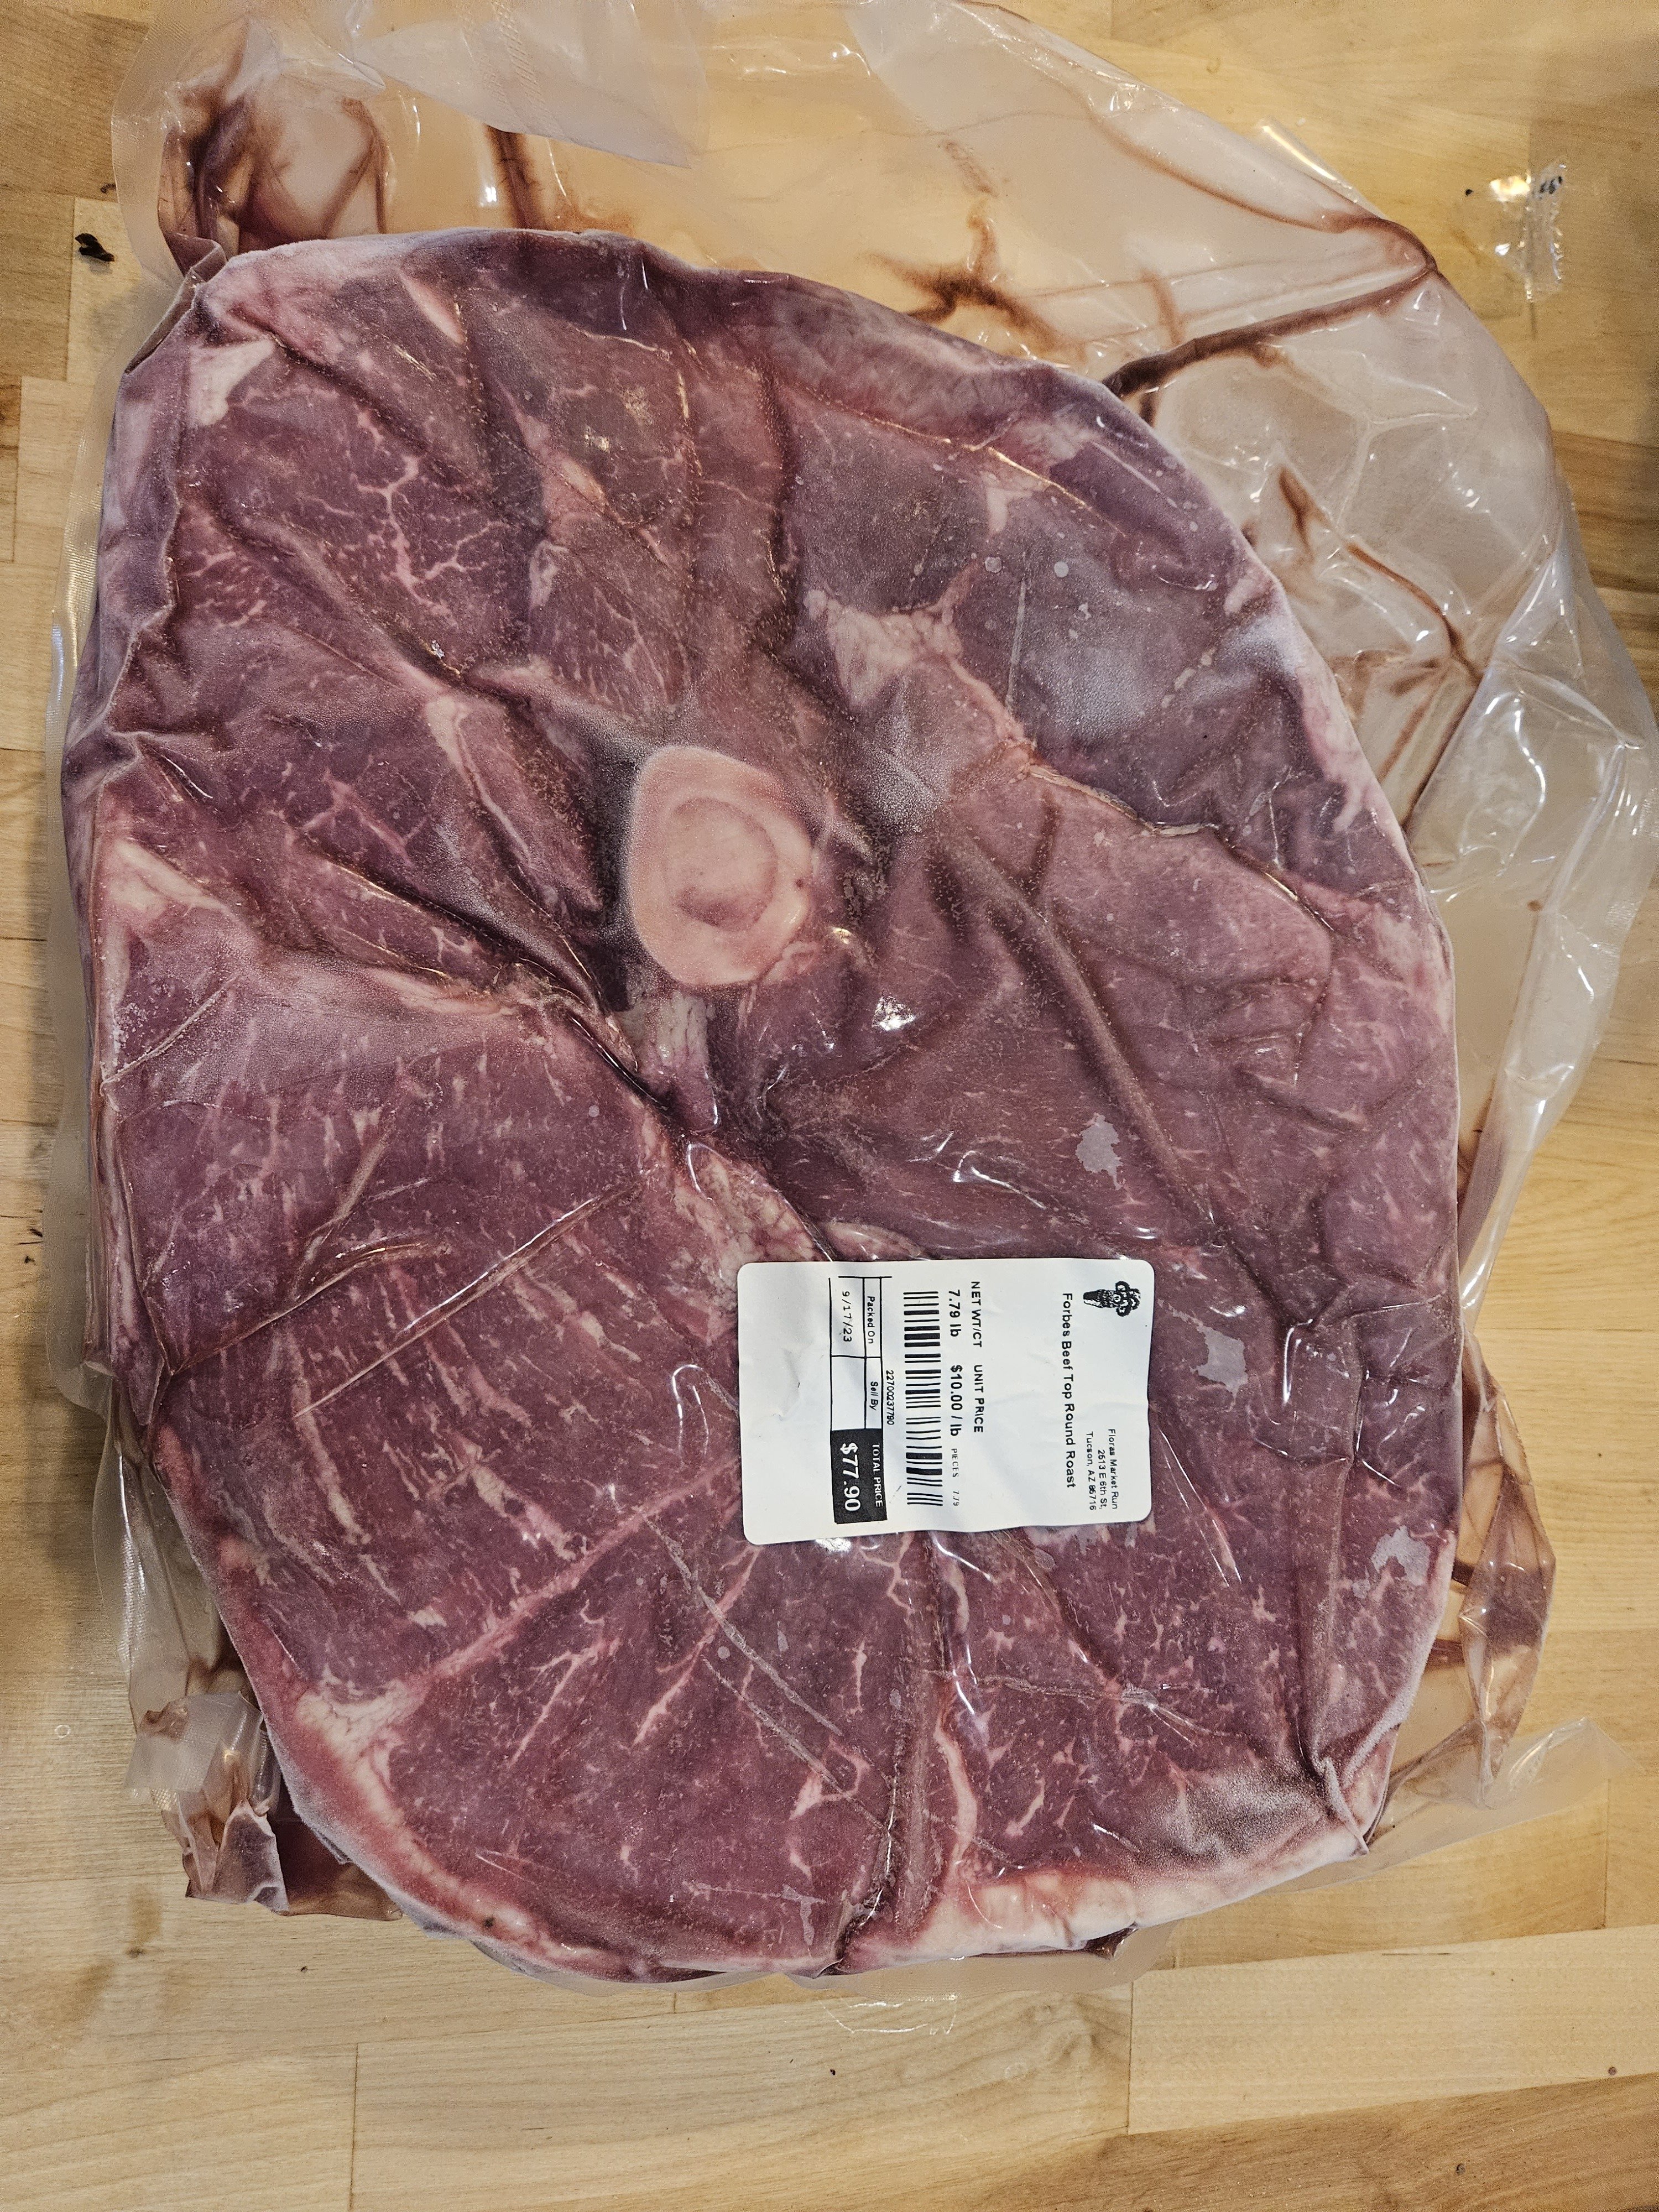
I'd highly appreciate some suggestions on how to prepare this monster after it has defrosted.

6


I don't want to support Chick-fil-A but I love the sauce/dip. Is there a copycat in a bottle that's just as good? Should I just mix my own? I find plenty of recipes online but it's convenient to have it premixed... (our fridge door is overloaded already)

7
5
submitted 9 months ago* (last edited 9 months ago) by original2 to c/[email protected]
8
 
 
9
12
Homemade bento! (lemmy.world)
submitted 1 year ago by Milx to c/[email protected]


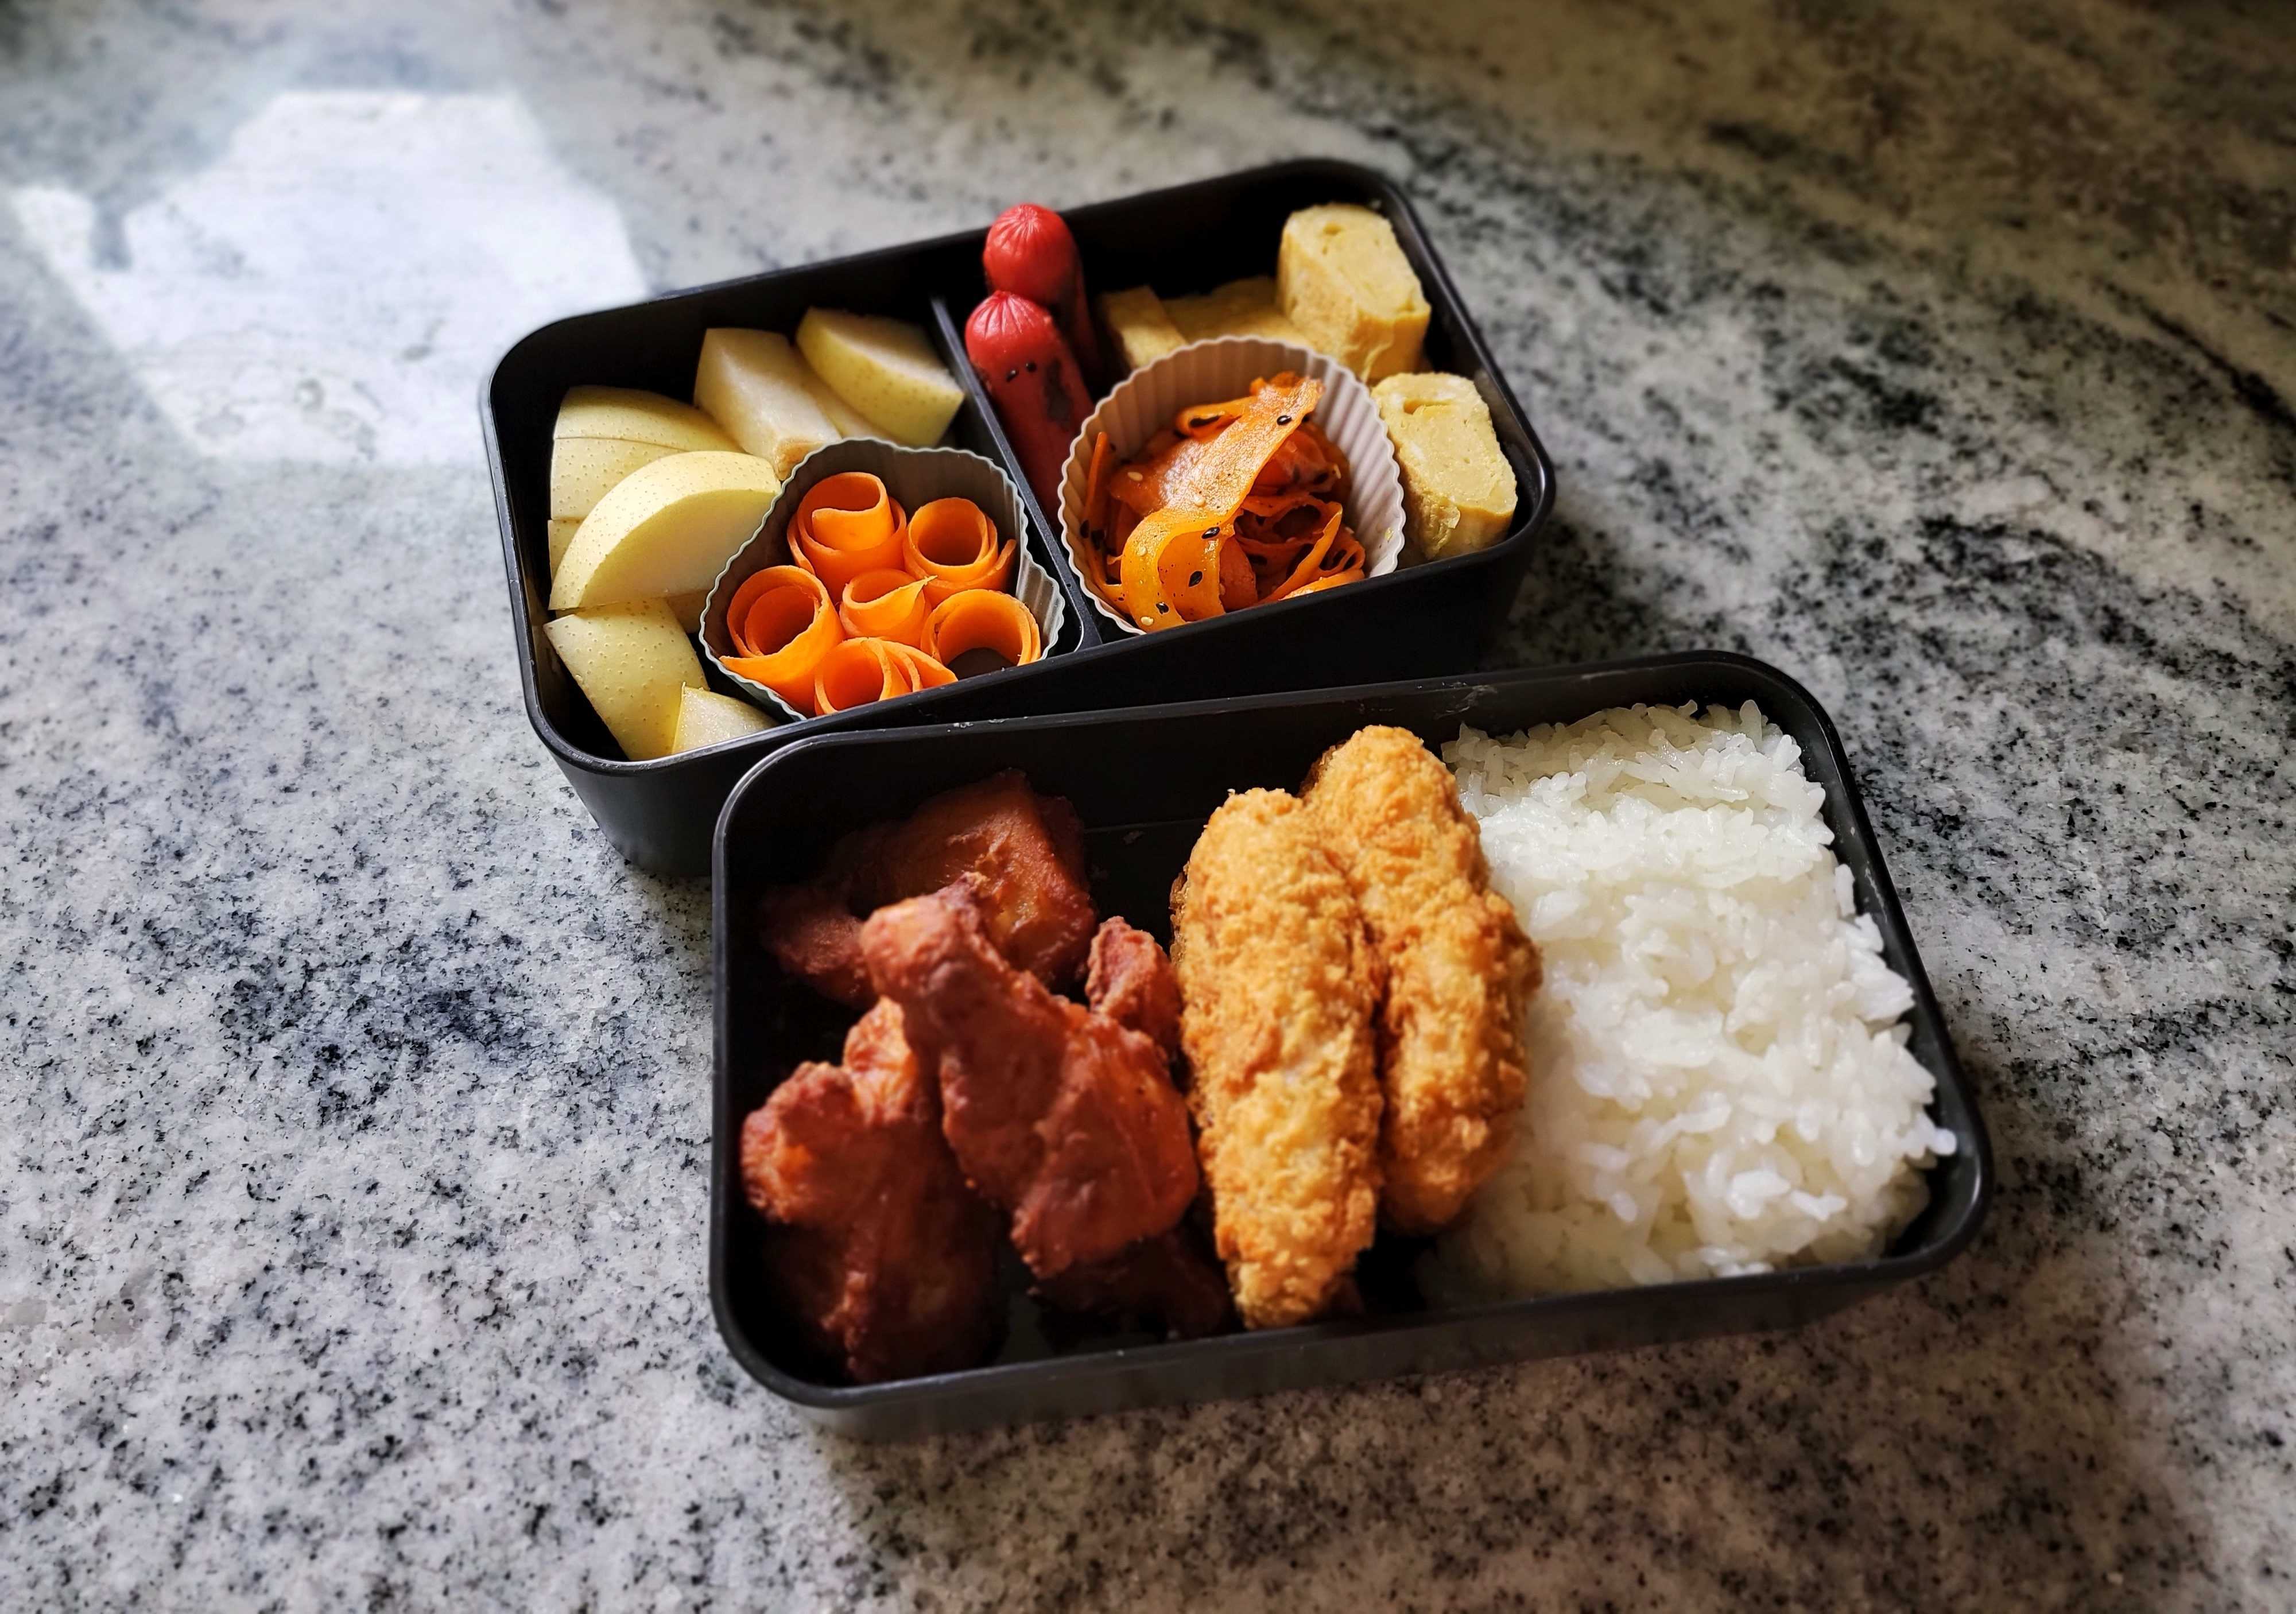
Featuring: octopus weenies, rolled omelet, ribboned carrots, potato curry croquettes, kara age, sand pear, and rice :)

10
11


Fruit seasons are short. Strawberries are out for a few weeks, then cherries fill the shelves, followed closely by ripe nectarines and peaches. Forty-five seconds later, they’re all gone and we’re left with apples (again). In order to cram as much summer fruit into my tum-tum as possible, it helps to have a few novel preparations at my disposal. Pies and cobblers are nice, but this fruity dessert lets you cool off with no oven time. Great any time of year, but especially for summer, you should make yourself a Japanese fruit sandwich.

The Japanese fruit sando, also called a “fruit sandwich,” is delightfully simple to make, requires few ingredients, and highlights any fruit, or fruits, you fill it with. It’s like a sandwich version of a strawberry shortcake, or mixed-fruit shortcake, except the “cake” is a not-so-sweet bread slice. All you need is some peeled fruit, soft bread, and sweetened whipped cream.

I started with a little bit of plastic wrap laid out on a plate. This is to wrap the sandwich up after filling it, but you can use an alternative wrap (I like Bee’s Wrap), or just put it in a container with a lid. Lay out a slice of soft bread. You can use sliced white bread, potato bread, challah, milk bread, or sliced brioche like I did.

Image for article titled The Japanese Fruit Sando Is a Summer Essential

Photo: Allie Chanthorn Reinmann

Spread about half of the whipped cream onto the slice of bread. Don’t worry about matching up the corners perfectly. Add the fruit. Part of the fruit sandwich’s allure is the presentation, so think about where you’ll cut it in half and line up the fruit along that imaginary line. Cover the fruit with the rest of the whipped cream, trying your best to sneak it in between and around the fruit pieces. I gave the plate a couple firm taps against the counter to coerce the whipped cream downward. Place the second slice on top and give the sandwich a gentle press to get good contact.

Image for article titled The Japanese Fruit Sando Is a Summer Essential

Photo: Allie Chanthorn Reinmann

Making fruit sandwiches all summer calls for the right equipment:

Food wrap that’s easier on the environment: Bee’s Wrap Reusable Food Wrap
Save your forearms with a whipped cream helper: Hamilton Beach Electric Hand Mixer
A serrated knife for perfect cuts: Victorinox Serrated Bread Knife

Clean any bulging whipped cream off the edges. Eventually we will take the crust off, so this cream is extra. (We call this a snack.) Wrap up the sandwich in the plastic wrap (or put it in a container) and pop it in the fridge to set for at least 30 minutes, but three or four hours is ideal. Giving it this time to set will allow the bread to absorb some of the moisture in the cream, making the bread softer, and the cream firmer. This is important for cutting it later, and the overall texture. If you skip this wait time, your sando will slide apart, or make a squidgy mess when you try to eat it.

After the sandwich has rested, cut off the crusts. This gives the dessert a beautiful finish, but it’s otherwise completely unnecessary and I respect the crust-lovers out there who keep it on. Gently prod your sandwich to find where you put the fruit, and cut through for a nice cross-section. This is easy with strawberries, but if you filled the sandwich with smaller, softer fruits then you might need to find them first. I cut through using a serrated knife. The sawing motion and shape of the blade prevents the bread from pinching.

The bread is plush, but not soggy, and slightly sweet. The cream is fluffy and firm, kind of like cool ice cream, and super rich. Just when you think it’s too much whipped cream, you get a relieving bite of tangy, bright fruit. Keep it simple with strawberries, or mix it up with different fruit combinations, like halved mandarin oranges, bananas, melon, and/or kiwi. Enjoy your fruit sando with a hot, bitter espresso. Japanese fruit sandwich Ingredients:

4 ounces heavy whipping cream
1 teaspoon sugar
¼ teaspoon vanilla extract
5 strawberries (or other ripe fruit, peeled or hulled)
2 slices of soft bread (milk bread, challah, or brioche)

Whip the cream with the sugar until you get a medium-firm peak. Fold in the vanilla extract. Spread half of the whipped cream onto one slice of bread. Top decoratively with fruit. Spread the rest of the whipped cream between the fruit pieces and all over the top. Top with the other slice of bread and press gently. Wrap the sandwich in plastic wrap and let it set in the fridge for three or four hours.

Cut off the crusts, and cut the sandwich in half, making sure to cut through fruit to show the decorative pattern. Enjoy as a cool dessert, or snack, on a hot summer day.

12


I love my slow cooker (just to clarify - slow cooker - pot made out of ceramic/clay, with a cover, heated by electric heater, very cheap - you can get it even for ~20€)

I use it (currently) for 3 recipes, but I would like to expand this. The rule is that you just put all the stuff in (ok maybe some of them a bit latter) and that is it, no pre-cooking, some fancy manipulating of the food,...

(I will write recipes in the comments so that they can get up/down voted)

13


I took a bite then realized I forgot the cotija cheese. Grilled shrimp and chicken tacos with whatever toppings I could find in the fridge.

14
 
 
15


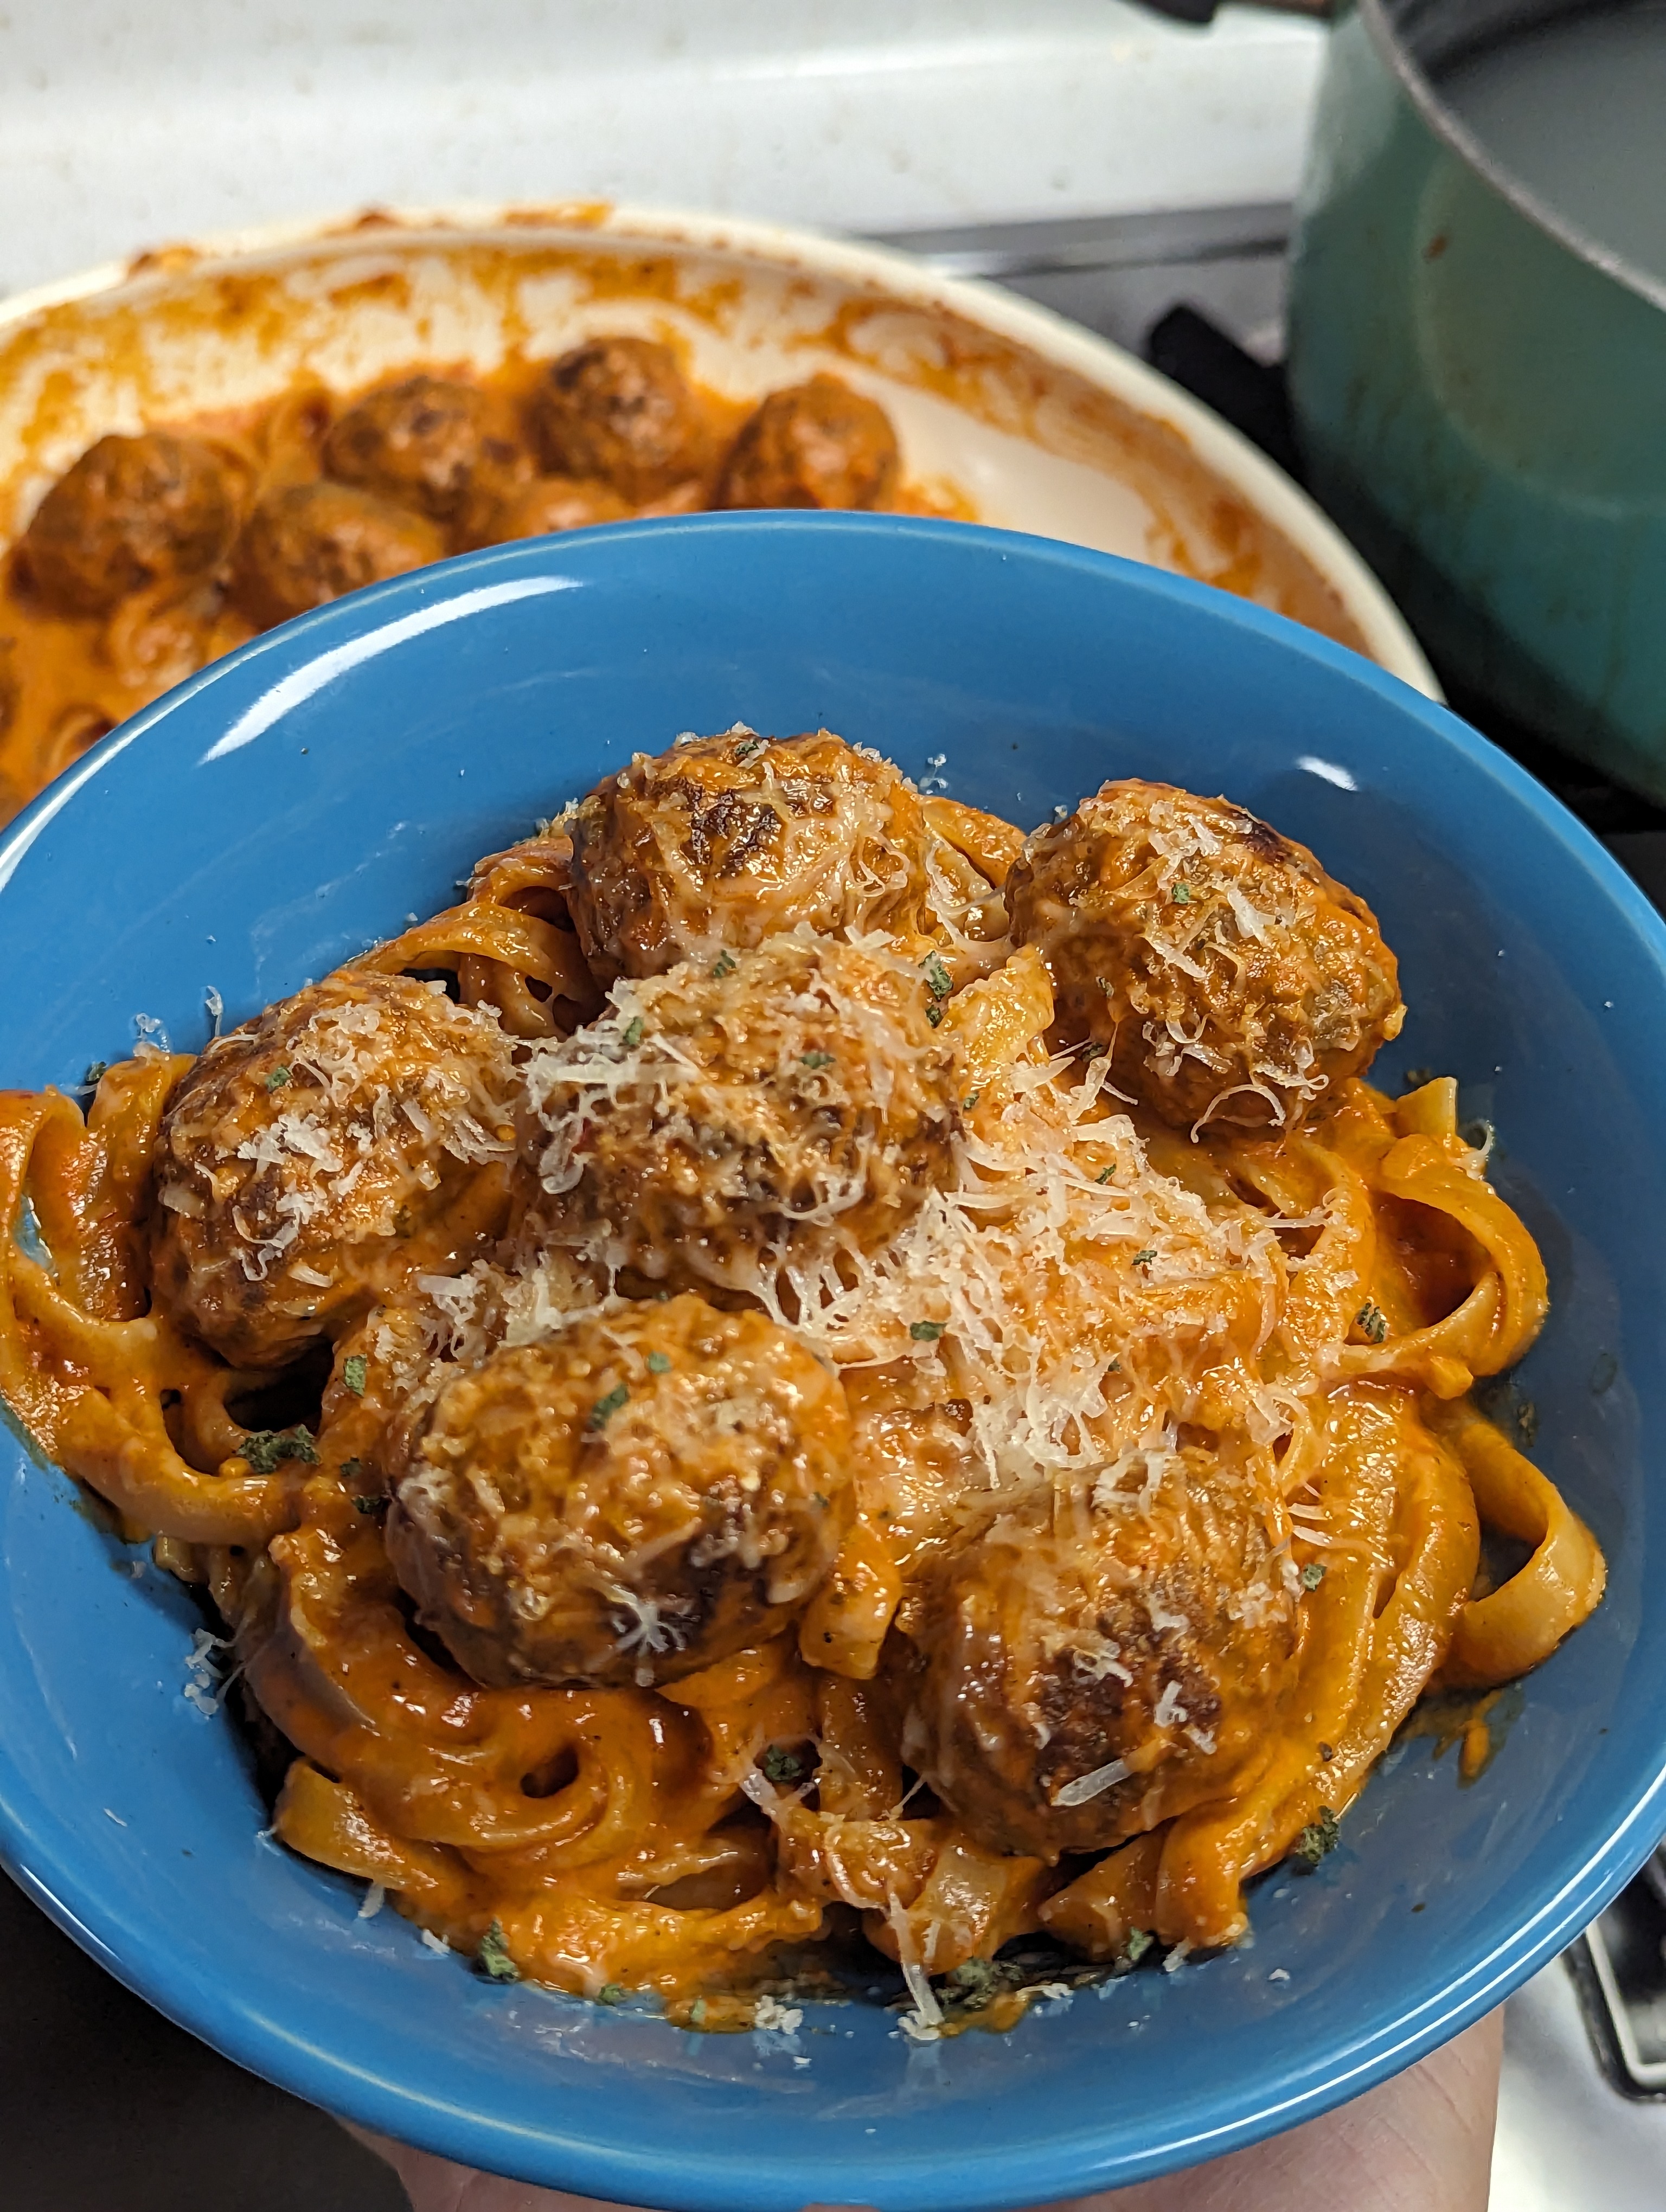
[Image description: a blue bowl with fettuccini pasta with meatballs in an orange sauce, topped with grated parmesan and diced sage.]

Rough recipe:

-Start your pasta (I used fettuccine) and broil your meatballs. I was lazy and used pre-cooked meatballs from Costco that just need a little browning.

-Saute thinly sliced shallots in oil until they started to brown, added in diced garlic, pepper, and some dried Italian seasoning blend.

-Once those cooked to golden, I pushed them to the edge of my pan. I'm using a pan that's really too big for the burner, but by moving where the heat is at, it allows me to keep the onion/garlic mixture warm without cooking further. A normal recipe would say remove from pan, but I'm lazy and don't want to clean the extra dish.

-On the hot side of the pan, add a bunch of oil and a small can of tomato paste. Fry the paste in the oil until the excess water is driven out. You'll know it's ready when you start seeing little brown caramelization patches as you stir the paste.

-Start adding splashes of vodka to the paste, stirring and adding until the mixture has cooled enough that the alcohol isn't immediately boiling off.

-Turn the heat down and add chopped fresh sage, oregano, thyme, and a little bit of rosemary, and mix back in the onion/garlic.

-Add a splash of heavy cream until it reaches the right shade of orange.

-Once your pasta is al dente, add it to the pan and mix into the sauce. Add ladles of the pasta water to loosen the sauce as needed.

-Add the meatballs and serve, topped with grated parmesan and diced sage.

16
17
18


Tenderized pork tenderloin, double breaded with seasoned flour and saltine cracker crumbs.

19
 
 
20


21


[Image decription: A round, light-reddish-brown loaf of bread on a wire cooling rack. There is a split down the center of the bread where it expanded in the oven while baking, called an "ear". The top of the bread is lightly dusted with flour except in the split area.]

I started learning to bake about a year ago with bread. Lately I've mostly been making cookies and recently been learning to make pie, but I felt an itch to come back to the basics.

Recipe:

  • 400g bread flour
  • 260g warm water (65%)
  • 2g instant or active dry yeast (about 1 teaspoon) (0.5%)
  • 8g salt (2%)

This bread was made with a poolish, not sourdough starter. A poolish is a preferment, and gives you a flavor similar to sourdough without the need to care for a sourdough starter. Poolish is the traditional way to make french baguettes, so if you know that flavor you know what to expect from a poolish.

Make the poolish:

  • Mix 200g flour, 200g water, and a pinch of yeast (seriously, a tiny amount). Cover and let stand at room temperature for 12 hours. After this time the poolish should be bubbly and smell nice and yeasty, maybe slightly alcoholic.

Make the dough:

  • Pour the remaining 60g of water into the poolish and mix to loosen it up. Then add the remaining 200g flour and mix thoroughly to combine. Let sit for 20 minutes to autolyse - this hydrates the flour and makes it stronger.

  • Add in the yeast and salt and mix to combine. At this stage it's easiest to mix with wet hands in a pinching motion to combine in the salt and yeast.

  • Optionally, knead for about 5 minutes by hand or about 3-4 minutes by stand mixer with a bread hook attachment. If kneading by hand, be sure to have a dough scraper handy, it will be sticky. You can skip this step entirely. Kneading will make it rise better in the oven, if you skip it may be a flatter loaf.

  • Cover and let the dough stand in a bowl for 15 minutes, then stretch and fold it. Repeat, including the wait time, until you've stretch/folded 4 times total.

  • Cover the dough and refrigerate for around 24 hours or up to a few days.

  • About 1 hour before you plan to bake, take the dough out and shape it into a taut ball. Then put it seam side down into either a proofing basket or a mixing bowl lined with a well-floured kitchen towel. Cover with a damp towel and let rise. The dough should grow around 50-66% in size. When you firmly poke it with a damp finger, the spot you poke should bounce back slightly but still leave an indent.

  • Preheat the oven to 450 degrees. Place a dutch oven or heavy lidded pot in the oven to preheat it as well.

  • Flip the dough onto parchment paper and slash it on top with a razor blade or a serrated bread knife to give it a weak spot to expand while baking.

  • Bake in the dutch oven, lid on, for 30 minutes. Then remove the lid and bake at least another 15 minutes, or longer if you want a darker crust.

  • Let cool for at least an hour before slicing - this is actually important, the inside of your loaf needs to finish baking from the residual heat when you pull it out! If you slice early it will wind up gummy

  • Enjoy!

22
 
 
23


What's your go-to, make ahead recipes that are pretty easy to get a week's worth made on a sunday? I'm looking for new recipes to try and get myself into a diet better than mcdonalds. I have access to an instant pot.

24


Green onions are actually ok for her to eat.

25
view more: next ›