hotday03

joined 1 year ago
MODERATOR OF
 

source


SEC asked Coinbase to halt trading in everything except bitcoin, CEO says | Financial Times

Receive free Cryptocurrencies updates

We’ll send you a myFT Daily Digest email rounding up the latest Cryptocurrencies news every morning.

The US Securities and Exchange Commission asked Coinbase to halt trading in all cryptocurrencies other than bitcoin prior to suing the exchange, in a sign of the agency’s intent to assert regulatory authority over a broader slice of the market.

Coinbase chief executive Brian Armstrong told the Financial Times that the SEC made the recommendation before launching legal action against the Nasdaq-listed company last month for failing to register as a broker.

The SEC’s case identified 13 mostly lightly traded cryptocurrencies on Coinbase’s platform as securities, asserting that by offering them to customers the exchange fell under the regulator’s remit. 

But the prior request for Coinbase to delist every one of the more than 200 tokens it offers — with the exception of flagship token bitcoin — indicates that the SEC, under chair Gary Gensler, has pushed for wider authority over the crypto industry.

“They came back to us, and they said . . . we believe every asset other than bitcoin is a security,” Armstrong said. “And, we said, well how are you coming to that conclusion, because that’s not our interpretation of the law. And they said, we’re not going to explain it to you, you need to delist every asset other than bitcoin.” 

If Coinbase had agreed, that could have set a precedent that would have left the vast majority of the American crypto businesses operating outside the law unless they registered with the commission.

“We really didn’t have a choice at that point, delisting every asset other than bitcoin, which by the way is not what the law says, would have essentially meant the end of the crypto industry in the US,” he said. “It kind of made it an easy choice . . . let’s go to court and find out what the court says.”

Brian Armstrong, chief executive of Coinbase

According to Brian Armstrong, if Coinbase had agreed, the vast majority of the American crypto businesses would risk operating outside the law unless they registered with the SEC © Reuters

Oversight of the crypto industry has hitherto been a grey area, with the SEC and the Commodity Futures Trading Commission jockeying for control.

The CFTC sued the largest crypto exchange, Binance, in March of this year, three months before the SEC launched its own legal action against the company. 

Gensler has previously said he believes most cryptocurrencies with the exception of bitcoin are securities. However, the recommendation to Coinbase signals that the SEC has adopted this interpretation in its attempts to regulate the industry.

Ether, the second-largest cryptocurrency, which is fundamental to many industry projects, was absent from the regulator’s case against the exchange. It also did not feature in the list of 12 “crypto asset securities” specified in the SEC’s lawsuit against Binance.

The SEC said its enforcement division did not make formal requests for “companies to delist crypto assets”.

“In the course of an investigation, the staff may share its own view as to what conduct may raise questions for the commission under the securities laws,” it added.

Stocks, bonds and other traditional financial instruments fall under the SEC’s remit, but US authorities remain locked in debate as to whether all — or any — crypto tokens should fall under its purview.

Oversight by the SEC would bring far more stringent compliance standards. Crypto exchanges typically also provide custody services, and borrow and lend to customers, a mix of practices that is not possible for SEC-regulated companies.

“There are a bunch of American companies who have built business models on the assumption that these crypto tokens aren’t securities,” said Charley Cooper, former CFTC chief of staff. “If they’re told otherwise, many of them will have to stop operations immediately.” 

“It’s very difficult to see how there could be any public offerings or retail trading of tokens without some sort of intervention from Congress,” said Peter Fox, partner at law firm Scoolidge, Peters, Russotti & Fox. 

The SEC declined to comment on the implications for the rest of the industry of a settlement involving Coinbase delisting every token other than bitcoin.___


source


Bill Hwang seeks to subpoena 10 banks, shift blame for Archegos collapse | Reuters

NEW YORK, July 27 (Reuters) - Bill Hwang, the founder of Archegos Capital Management, on Thursday asked a judge to let him subpoena documents from 10 banks, in an effort to shift blame as he defends against criminal fraud charges that the firm's collapse was his fault.

In a filing in Manhattan federal court, Hwang said the documents will show that Archegos' counterparties "played a pivotal role" in the March 2021 collapse of his once-$36 billion firm, and that his swaps trades were legal.

The office of U.S. Attorney Damian Williams, which is prosecuting Hwang, did not immediately respond to a request for comment.

Hwang's request came three days after UBS (UBSG.S) agreed to pay $388 million in fines to U.S. and British regulators over poor risk management at Credit Suisse, which lost $5.5 billion when Archegos met its demise.

UBS bought Credit Suisse last month, under pressure from Swiss regulators. Other banks also lost money when Archegos collapsed, but less than Credit Suisse.

Prosecutors accused Hwang of borrowing aggressively to fund total return swaps that boosted Archegos' exposure to stocks such as ViacomCBS and Discovery to more than $160 billion, and concealing the risks by borrowing from several banks.

Archegos failed after the prices of some of its stocks fell. That caused it to miss margin calls, and banks to dump stocks that had backed the swaps and which they had bought as hedges.

"Any disconnect or attenuation between Archegos's swaps and its counterparties' hedges bears directly on the likelihood that Mr. Hwang could have affected, or did affect, the market in the manner alleged in the indictment," Thursday's filing said.

Other banks that Hwang wants to subpoena, in addition to UBS, are Bank of Montreal (BMO.TO), Deutsche Bank (DBKGn.DE), Goldman Sachs (GS.N), Jefferies (JEF.N), Macquarie (MQG.AX), Mitsubishi UFJ (8411.T), Mizuho (8411.T), Morgan Stanley (MS.N) and Nomura (8604.T).

In March, U.S. District Judge Alvin Hellerstein rejected Hwang's motion to dismiss his 11-count indictment. Hwang has pleaded not guilty. A trial is scheduled for Feb. 20, 2024.

The case is U.S. v. Hwang et al, U.S. District Court, Southern District of New York, No. 22-cr-00240.

Reporting by Jonathan Stempel in New York; Editing by Daniel Wallis

Our Standards: The Thomson Reuters Trust Principles.


How to configure Samba Server share on Ubuntu 22.04 Jammy Jellyfish Linux - Linux Tutorials - Learn Linux Configuration

File servers often need to accommodate a variety of different client systems. Running Samba on Ubuntu 22.04 Jammy Jellyfish allows Windows systems to connect and access files, as well as other Linux systems and MacOS. An alternative solution would be to run an FTP/SFTP server on Ubuntu 22.04, which can also support the connections from many systems.

The objective of this tutorial is to configure a basic Samba server on Ubuntu 22.04 Jammy Jellyfish to share user home directories as well as provide read-write anonymous access to selected directory.

There are myriads of possible other Samba configurations, however the aim of this guide is to get you started with some basics which can be later expanded to implement more features to suit your needs. You will also learn how to access the Ubuntu 22.04 Samba server from a Windows system.

In this tutorial you will learn:

  • How to install Samba server
  • How to configure basic Samba share
  • How to share user home directories and public anonymous directory
  • How to mount Samba share on MS Windows 10

How to configure Samba Server share on Ubuntu 22.04 Jammy Jellyfish Linux

How to configure Samba Server share on Ubuntu 22.04 Jammy Jellyfish Linux

Software Requirements and Linux Command Line Conventions

  • Category: System
    • Requirements, Conventions or Software Version Used: Ubuntu 22.04 Jammy Jellyfish
  • Category: Software
    • Requirements, Conventions or Software Version Used: Samba
  • Category: Other
    • Requirements, Conventions or Software Version Used: Privileged access to your Linux system as root or via the sudo command.
  • Category: Conventions
    • Requirements, Conventions or Software Version Used: # – requires given linux commands to be executed with root privileges either directly as a root user or by use of sudo command$ – requires given linux commands to be executed as a regular non-privileged user

How to configure Samba Server share on Ubuntu 22.04 step by step instructions


  1. Let’s begin by installation of the Samba server. This is a rather trivial task. First, open a command line terminal and install the tasksel command if it is not available yet on your Ubuntu 22.04 system. Once ready, use tasksel to install the Samba server.
    $ sudo apt update
    $ sudo apt install tasksel
    $ sudo tasksel install samba-server

  1. We will be starting with a fresh clean configuration file, while we also keep the default config file as a backup for reference purposes. Execute the following Linux commands to make a copy of the existing configuration file and create a new /etc/samba/smb.conf configuration file:
$ sudo cp /etc/samba/smb.conf /etc/samba/smb.conf_backup
$ sudo bash -c 'grep -v -E "^#|^;" /etc/samba/smb.conf_backup | grep . > /etc/samba/smb.conf'

  1. Samba has its own user management system. However, any user existing on the samba user list must also exist within the /etc/passwd file. If your system user does not exist yet, hence cannot be located within /etc/passwd file, first create a new user using the useradd command before creating any new Samba user. Once your new system user eg. linuxconfig exits, use the smbpasswd command to create a new Samba user:
$ sudo smbpasswd -a linuxconfig
New SMB password:
Retype new SMB password:
Added user linuxconfig.

  1. Next step is to add the home directory share. Use your favourite text editor, ex. atom, sublime, to edit our new /etc/samba/smb.conf Aamba configuration file and add the following lines to the end of the file:
[homes]
   comment = Home Directories
   browseable = yes
   read only = no
   create mask = 0700
   directory mask = 0700
   valid users = %S

  1. Optionally, add a new publicly available read-write Samba share accessible by anonymous/guest users. First, create a directory you wish to share and change its access permission:
$ sudo mkdir /var/samba
$ sudo chmod 777 /var/samba/

  1. Once ready, once again open the /etc/samba/smb.conf samba configuration file and add the following lines to the end of the file:
[public]
  comment = public anonymous access
  path = /var/samba/
  browsable =yes
  create mask = 0660
  directory mask = 0771
  writable = yes
  guest ok = yes

  1. Check your current configuration. Your /etc/samba/smb.conf samba configuration file should at this stage look similar to the one below:
[global]
   workgroup = WORKGROUP
   server string = %h server (Samba, Ubuntu)
   log file = /var/log/samba/log.%m
   max log size = 1000
   logging = file
   panic action = /usr/share/samba/panic-action %d
   server role = standalone server
   obey pam restrictions = yes
   unix password sync = yes
   passwd program = /usr/bin/passwd %u
   passwd chat = *Enter\snew\s*\spassword:* %n\n *Retype\snew\s*\spassword:* %n\n *password\supdated\ssuccessfully* .
   pam password change = yes
   map to guest = bad user
   usershare allow guests = yes
[printers]
   comment = All Printers
   browseable = no
   path = /var/spool/samba
   printable = yes
   guest ok = no
   read only = yes
   create mask = 0700
[print$]
   comment = Printer Drivers
   path = /var/lib/samba/printers
   browseable = yes
   read only = yes
   guest ok = no
[homes]
   comment = Home Directories
   browseable = yes
   read only = no
   create mask = 0700
   directory mask = 0700
   valid users = %S
[public]
  comment = public anonymous access
  path = /var/samba/
  browsable =yes
  create mask = 0660
  directory mask = 0771
  writable = yes
  guest ok = yes

  1. Our basic Samba server configuration is done. Remember to always restart your samba server, after any change has been done to /etc/samba/smb.conf configuration file:
$ sudo systemctl restart smbd

  1. (optional) Let’s create some test files. Once we successfully mount our Samba shares, the below files should be available to our disposal:
$ touch /var/samba/public-share 
$ touch /home/linuxconfig/home-share 

Access Ubuntu 22.04 Samba share from MS Windows

  1. At this stage we are ready to turn our attention to MS Windows. Mounting network drive directories might be slightly different for each MS Windows version. This guide uses MS Windows 10 in a role of a Samba client. To start, open up your Windows Explorer then right click on Network and click on Map network drive... tab.

    Map network drive option on MS Windows

    Map network drive option on MS Windows

  2. Next, select the drive letter and type Samba share location which is your Samba server IP address or hostname followed by the name of the user’s home directory. Make sure you tick Connect using different credentials if your username and password is different from Samba one created with the smbpasswd command on Ubuntu 22.04.

    Select network folder configuration options and click Next

    Select network folder configuration options and click Next

  3. Enter Samba user’s password as created earlier on Ubuntu 22.04.


    Enter Samba password

    Enter Samba password

  4. Browse user’s home directory. You should be able to see the previously created test file. As well as you should be able to create new directories and files.

    The home directory is browsable, with read and write permissions

    The home directory is browsable, with read and write permissions

  5. Repeat the mounting steps also for the publicly anonymous samba directory share.

    Mount the public Samba directory to a different drive letter in Windows

    Mount the public Samba directory to a different drive letter in Windows

  6. Confirm that you can access the Public samba share directory.

    Connected to the public Samba share and the test file is viewable

    Connected to the public Samba share and the test file is viewable

All done. Now feel free to add more features to your Samba share server configuration.

Closing Thoughts


In this tutorial, we learned how to install Samba on Ubuntu 22.04 Jammy Jellyfish Linux. We also saw how to create a Samba share, a Samba user, and configure read and write access. Then, we went over the steps to connect to our Samba server from a client machine running MS Windows. Using this guide should allow you to create a file server that can host connections from various operating systems.


How to Partition and Format Disk Drives on Linux - Cherry Servers

Formatting and partitioning disks is a key aspect of Linux administration. You can use formatting and partitioning to address use cases like prepping storage media for use, addressing space issues with existing disks, or wiping a filesystem.

This article will walk you through how you can partition and format disks to complete common Linux administration tasks.

What is disk formatting in Linux?

Disk formatting is the process that prepares a storage partition for use. Formatting deletes the existing data on the partition and sets up a filesystem.

Some of the most popular filesystems for Linux include:

  • Ext4 - Ext4 is a common default filesystem on many modern Linux distributions. It supports file sizes up to 16TB and volumes up to 1EB. It is not supported on Windows by default.
  • NTFS - NTFS is a popular filesystem developed by Microsoft. It supports 8PB max volume and file sizes. The Linux kernel added full support for NTFS in version 5.15.
  • FAT32 - Is an older filesystem, but you may still see it used in the wild. It supports a 4GB max file size and a 2TB max volume size. Many *nix and Windows operating systems support FAT32.

What is partitioning in Linux?

Partitioning is the process of creating logical boundaries on a storage device. Common examples of storage devices include hard disk drives (HDDs), solid-state drives (SSDs), USB flash drives, and SD cards. Creating a partition on a drive logically separates it from other partitions. This logical separation can be useful for a variety of scenarios, including limiting the growth of a filesystem and installing multiple operating systems on a single drive.

How to Partition and Format Disk Drives on Linux

Now let's dive into partitioning and formatting disks on a Linux system.

Prerequisites

Before we begin, you'll need:

  • Access to the terminal of a Linux system. We'll use Ubuntu 22.04 LTS.
  • sudo/root privileges
  • An available disk you want to format and partition. We are going to use a server with custom partitioning layout from Cherry Servers.
  • Backups of any data you don't want to lose (optional)

How to view disks in Linux

To view available disks in Linux, run this command:

fdisk -l | grep "Disk /"

Output should look similar to:

list Linux disk devices

The fsdisk output above included loop devices which are logical pseudo-devices, but not real disks. If you need a more refined view of your disks, use the lsblk -I 8 -d command. "-I 8" specifies a the kernel device number for block devices and the -d excludes partitions.

The output should look similar to:

list specific disk devices

If you need more information to properly identify your drives, use lshw -class disk. The output will include additional identifying information such as the product, size, vendor, bus, and logical name (the device’s path), similar to this:

list more information about disk devices

How to view existing partitions in Linux

Before you create a new partition, you may want to view your existing partitions. To view existing partitions in Linux, use the lsblk command. The output should look similar to:

list existing disk partitions

Partitions have a TYPE of part and are nested under their disks in the output like sda1 in our example.

If you want to see information like file system types, disk labels and UUIDs, use the command lsblk -f. The output should look similar to:

list full information about existing disk partitions

How to Partition a Disk in Linux

There are several ways to partition disks in Linux, including parted and gparted, but we'll focus on the popular fdisk utility here. For our case, we'll assume our disk is mounted on /dev/sda. We will create a primary partition and use the default partition number, first sector, and last sector that fdisk selects. You can modify these options based on your requirements.

Note: If you're partitioning a disk that is currently mounted, first unmount it with the command `umount </path/to/disk>.

To begin, we'll open our drive in fdisk with this command:

fdisk /dev/sda

That will launch the interactive fdisk utility and you should see output similar to:

fdisk utility

At the Command (m for help): prompt, type n to create a new partition. The output should look similar to:

fdisk create new partition

It shows that the disk that is mounted on /dev/sda directory has one primary partition that is formatted and being used at the moment.

We'll press enter to select the default and create a new primary partition. Then, we'll be prompted to give a partition number.

select partition number

We'll use the default of 2 and then get prompted for a sector number.

select first disk sector

We'll press enter to accept the default first sector, and then get prompted for a last sector.

select last disk sector

Again, we'll press enter to accept the default and fdisk will create the partition. Note that if we wanted to create a smaller partition, we could use a smaller gap between our first and last block. This would enable us to create multiple partitions on the drive.

The full output looks like this:

see full fdisk output

You may enter p to see a partition table and make sure your changes are correct:

check partition table

As you can see, we now have two partitions on the /dev/sda disk. At the Command (m for help): prompt, input a w to write the changes to the Linux system. The output should look similar to:

save fdisk changes

fdisk will then exit and you'll be back at Linux shell. We can see our newly created partition sda by running the command lsblk /dev/sda. The output should look similar to:

check new partition

How to format a disk in Linux

Now that our disk is fully partitioned, we can format the newly created sda2 partition. The general syntax for formatting a disk partition in Linux is:

mkfs.<filesystem> </path/to/disk/partition>

For example, to format our newly created /dev/sda2 partition, we can use this command:

mkfs.ext4 /dev/sda2

The output should look similar to:

format new partition to ext4 file system

To use an NTFS filesystem instead, the command is:

mkfs.ntfs /dev/sda2

To use a FAT32 filesystem instead, the command is:

mkfs.fat -F 32 /dev/sda2

The -F parameter specifies the FAT-TYPE, which determines if the file allocation tables are 12, 16, or 32-bit.

How to mount a disk in Linux

Once a disk is partitioned and formatted, we can mount the filesystem in Linux.

First, if your mount point doesn't already exist, created it with the mkdir command. The general command syntax is:

mkdir </path/for/your/mount/point>

For example, to make our mount point /var/cherry, use this command:

mkdir /var/cherry

Next, we mount our partition using the mount command. The general command structure to mount a disk partition in Linux is:

mount -t <filesystem_type> -o <options> </path/to/disk/partition> </path/for/your/mount/point>

Note: If you omit the -t option, the mount command will default to auto and attempt to guess the correct filesystem type.

For example, to mount our /dev/sda2 (which has an Ext4 filesystem) to /var/cherry in read/write mode, we can use this command"

mount -t ext4 -o rw /dev/sda2 /var/cherry

If there are no errors, the command will not return any output.

You can confirm your partitions mount point is correct with the lsblk /dev/sda command. The output should include a new mountpoint /var/cherry for your newly formatted /dev/sda2 device:

new device mount point

Finally, to ensure the disk automatically mounts when your Linux system boots, you need to add it to /etc/fstab.

⚠️ Warning: Be careful! Errors in /etc/fstab can cause your system not to boot!

The general format for an /etc/fstab partition entry is

</path/to/disk/partition> </path/for/your/mount/point> <filesystem_type> <options_from_mount> <dump> <pass_number>

Paraphrasing Ubuntu's Fstab File Configuration,<dump> enables or disables backups using the command dump. It can be set to 1 (enabled) or 0 (disabled) and is generally disabled. <pass_number> determines the order fsck checks the partition for errors when the system boots. Generally, a system's root device is 1 and other partitions are 2. 0 disables the fsck check on boot.

To edit /etc/fstab, open it in a text editor like nano or vim and make the changes. For our /dev/sda2 partition mounted at /var/cherry, we'll use this configuration:

/dev/sda2 /var/cherry ext4 rw 0 0

Save the changes and close your text editor when you're done.

Conclusion

That's it! Now you know the basics of how to partition and format disks on Linux. For a deeper dive on the topic of partitioning, formatting, and mounting drives, we recommend reading the man pages for the specific tools we used here like the mkfs.<type> utilities (e.g. mkfs.ext4), fdisk, mount, and fstab.


source


HOWTO: Resize a Linux VM's LLVM Virtual Disk on a ZVOL | TrueNAS Community

If you have a Linux VM, which uses the LLVM filesystem, you can easily increase the disk space available to the VM.

Linux Logical Volume Manager allows you to have logical volumes (LV) on top of logical volume groups (VG) on top of physical volumes (PV) (ie partitions).

This is conceptually similar to zvols on pools on vdevs in zfs.

This was tested with TrueNAS-CORE 12 and Ubuntu 20.04.

Firstly, there are some useful commands:

pvs - list physical volumes
lvs - list logical volumes
lvdisplay - logical volume display
pvdisplay - physical volume display
df - disk free space

So, to start

df -h - show disk free space, human readable

and you should see something like this

Code:

Filesystem                         Size  Used Avail Use% Mounted on
dev                               2.9G     0  2.9G   0% /dev
tmpfs                              595M   61M  535M  11% /run
/dev/mapper/ubuntu--vg-ubuntu--lv  8.4G  8.1G     0 100% /
tmpfs                              3.0G     0  3.0G   0% /dev/shm
tmpfs                              5.0M     0  5.0M   0% /run/lock

This is the interesting line:

Code:

/dev/mapper/ubuntu--vg-ubuntu--lv  8.4G  8.1G     0 100% /

it gives you the hint of which LV and VG the root drive is using.

you can list the logical volumes lvs

Code:

root@ubuntu:/# lvs
  LV        VG        Attr       LSize  Pool Origin Data%  Meta%  Move Log Cpy%Sync Convert
  ubuntu-lv ubuntu-vg -wi-ao---- <8.50g                                                

and physical volumes pvs

Code:

root@ubuntu:/# pvs
  PV         VG        Fmt  Attr PSize  PFree
  /dev/vda3  ubuntu-vg lvm2 a--  <8.50g    0

Now you can see that the ubuntu-lv LV is on the ubuntu-vg VG is on the PV /dev/vda3

(that's partition 3 of device vda)

Shutdown the VM. Edit the ZVOL to change the size. Restart the VM.

Once you get back, run parted with the device id, repair the GPT information and resize the partition, as per below.

launch parted on the disk parted /dev/vda

Code:

root@ubuntu:~# parted /dev/vda
GNU Parted 3.3
Using /dev/vda
Welcome to GNU Parted! Type 'help' to view a list of commands.

view the partitions

print

Code:

(parted) print                                                        
Warning: Not all of the space available to /dev/vda appears to be used, you can fix the GPT to use all of the space (an extra 188743680
blocks) or continue with the current setting?

Parted will offer to fix the GPT. Fix it. f

Code:

Fix/Ignore? f
Model: Virtio Block Device (virtblk)
Disk /dev/vda: 107GB
Sector size (logical/physical): 512B/16384B
Partition Table: gpt
Disk Flags:

Number  Start   End     Size    File system  Name  Flags
1      1049kB  538MB   537MB   fat32              boot, esp
2      538MB   1612MB  1074MB  ext4
3      1612MB  10.7GB  9125MB

The disk is resized, but the partition is not.

Resize partition 3 to 100%, resizepart 3 100%

Code:

(parted) resizepart 3 100%
(parted) print                                                        
Model: Virtio Block Device (virtblk)
Disk /dev/vda: 107GB
Sector size (logical/physical): 512B/16384B
Partition Table: gpt
Disk Flags:

Number  Start   End     Size    File system  Name  Flags
1      1049kB  538MB   537MB   fat32              boot, esp
2      538MB   1612MB  1074MB  ext4
3      1612MB  107GB   106GB

(parted)

And the partition is resized. You can exit parted with quit

now we need to resize the physical volume

pvresize /dev/vda3

Code:

root@ubuntu:~# pvresize /dev/vda3
  Physical volume "/dev/vda3" changed
  1 physical volume(s) resized or updated / 0 physical volume(s) not resized

You can check the result with pvdisplay

Code:

root@ubuntu:~# pvdisplay
 
***
Physical volume
***
  PV Name               /dev/vda3
  VG Name               ubuntu-vg
  PV Size               <98.50 GiB / not usable 1.98 MiB
  Allocatable           yes
  PE Size               4.00 MiB
  Total PE              25215
  Free PE               23040
  Allocated PE          2175
  PV UUID               IGdmTf-7Iql-V9UK-q3aD-BdNP-VfBo-VPx1Hs

Then you can use lvextend to resize the LV and resize the the filesystem, over the resized pv.

lvextend --resizefs ubuntu-vg/ubuntu-lv /dev/vda3

Code:

root@ubuntu:~# lvextend --resizefs ubuntu-vg/ubuntu-lv /dev/vda3
  Size of logical volume ubuntu-vg/ubuntu-lv changed from <8.50 GiB (2175 extents) to <98.50 GiB (25215 extents).
  Logical volume ubuntu-vg/ubuntu-lv successfully resized.
resize2fs 1.45.5 (07-Jan-2020)
Filesystem at /dev/mapper/ubuntu--vg-ubuntu--lv is mounted on /; on-line resizing required
old_desc_blocks = 2, new_desc_blocks = 13
The filesystem on /dev/mapper/ubuntu--vg-ubuntu--lv is now 25820160 (4k) blocks long.

root@ubuntu:~#

and finally... you can check the freespace again.

df -h

Code:

root@ubuntu:~# df -h
Filesystem                         Size  Used Avail Use% Mounted on
udev                               2.9G     0  2.9G   0% /dev
tmpfs                              595M  1.1M  594M   1% /run
/dev/mapper/ubuntu--vg-ubuntu--lv   97G  8.2G   85G   9% /

85G free instead of 0 much better.


CIDR to IPv4 Address Range Utility Tool | IPAddressGuide

CIDR is the short for Classless Inter-Domain Routing, an IP addressing scheme that replaces the older system based on classes A, B, and C. A single IP address can be used to designate many unique IP addresses with CIDR. A CIDR IP address looks like a normal IP address except that it ends with a slash followed by a number, called the IP network prefix. CIDR addresses reduce the size of routing tables and make more IP addresses available within organizations. Please try out our CIDR calculator below.

Add CIDR Widget To Your Website

You can easily add the CIDR widget on your website by copying the following HTML code and place it on your web page

<div style="text-align:center">
	<form action="https://www.ipaddressguide.com/cidr" method="post">
		<p style="background:#fff;border:1px solid #99A8AE;width:180px;padding:5px 5px 5px 5px;font-size:11px;font-family:'Trebuchet MS',Arial,Sans-serif;">
			<a href="https://www.ipaddressguide.com" target="_blank"><img src="https://www.ipaddressguide.com/images/ipaddressguide.png" alt="CIDR to IPv4 Address Range Utility Tool | IPAddressGuide" border="0" width="120" height="12" /></a><br />
			<b>CIDR to IPv4 Conversion</b><br /><br />
			<label>CIDR</label><br />
			<input type="text" name="cidr" value="" style="border:solid 1px #C0C0C0;font-size:9px;width:110px;" /><br />
			<input type="submit" value="Calculate" style="width:100px;font-size:10px;margin-top:3px;padding:2px 3px;color:#FFF;background:#8EB50C;border-width:1px;border-style:solid;">
		</p>
	</form>
</div>

Related Articles

What is CIDR

This guide explains about what is CIDR and its benefits.

READ MORE »

Convert IP2Location CSV data into IP ranges or CIDR

The article discusses about how to convert IP2Location CSV data into IP ranges or CIDR.

READ MORE »

Converting IP address ranges into CIDR format

The article demonstrates how to convert IP addresses ranges into CIDR format.

READ MORE »

Converting IP2Proxy data from IP number ranges to CIDR

This guide demonstrates how to convert the IP2Proxy data from IP number ranges to CIDR.

READ MORE »


Synchronizing folders with rsync

In this post I cover the basics of rsync, in preparation for a subsequent post that will cover backups and it's use in conjunction with cronjobs to automatize the backup process. From the copying and synchronization of local files and folders, to it's use for transfer information among computers. Its use as a daemon when SSH is unavailable was moved to it's own section.

Topics
The basics of rsync
Copying local files and folders
Dealing with whitespace and rare characters
Update the contents of a folder
Synchronizing two folders with rsync
Compressing the files while transferring them
Transferring files between two remote systems
Excluding files and directories
Running rsync as a daemon (moved to it's own section)
Some additional rsync parameters
Footnotes

The basics of rsync

rsync is a very versatile copying and backup tool that is included by default in almost every Linux distribution. It can be used as an advanced copying tool, allowing us to copy files both locally and remotely. It can also be used as a backup tool. It supports the creation of incremental backups.

rsync counts with a famous delta-transfer algorithm that allows us to transfer new files as well as recent changes to existent files, while ignoring unchanged files. Additionally to this, the behavior of rsync can be throughly customized, helping us to automatize backups, it can also be run as a daemon to turn the computer into a host and allow rsync clients connect to it.

Besides the copying of local files and folders, rsync allow us to copy over SSH (Secure Shell), RSH (Remote Shell) and it can be run as a daemon in a computer and allow other computers to connect to it, when rsync is run as a daemon it listens to the port TCP 873.

When we use rsync as a daemon or when we use RSH, the data that is send between computers travels unencrypted, so, if you are transferring files between two computers in the same local network, this is useful, but this shouldn't be used to transfer files over insecure networks, such as the Internet. For this purpose SSH is the way to go.

This is the main reason why I favor the use of SSH for my transfers, besides, since SSH is secure, many servers have the SSH daemon available. But the use of rsync as a daemon for transfers over fast connections, as is usually the case in a local network, is useful. I don't have the RSH daemon running in my computers so you may find me a bit biased about SSH in the examples. The examples covering the transfer of files between two computers use SSH as the medium of transport, but in a separate post I cover the use of rsync as a daemon.

Copying local files and folders

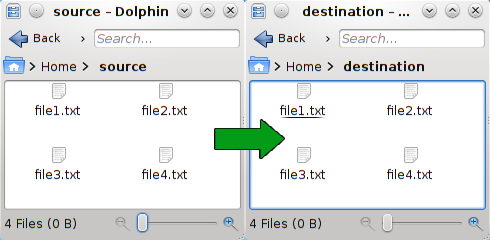
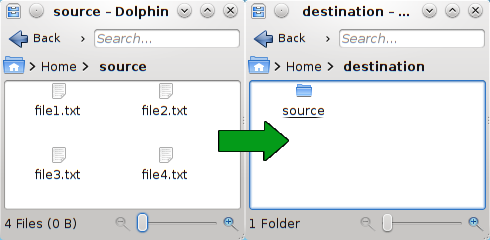
To copy the contents of one local folder into another, replacing the files in the destination folder, we use:

rsync -rtv source_folder/ destination_folder/

In the source_folder notice that I added a slash at the end, doing this prevents a new folder from being created, if we don't add the slash, a new folder named as the source folder will be created in the destination folder. So, if you want to copy the contents of a folder called Pictures into an existent folder which is also called Pictures but in a different location, you need to add the trailing slash, otherwise, a folder called Pictures is created inside the Pictures folder that we specify as destination.

rsync -rtv source/ destination/
A graphical representation of the results of rsync with a trailing slash in the source folder.

rsync -rtv source destination/
A graphical representation of the results of rsync without a trailing slash in the source folder.

The parameter -r means recursive, this is, it will copy the contents of the source folder, as well as the contents of every folder inside it.

The parameter -t makes rsync preserve the modification times of the files that it copies from the source folder.

The parameter -v means verbose, this parameter will print information about the execution of the command, such as the files that are successfully transferred, so we can use this as a way to keep track of the progress of rsync.

This are the parameters that I frequently use, as I am usually backing up personal files and this doesn't contain things such as symlinks, but another very useful parameter to use rsync with is the parameter -a.

rsync -av source/ destination/

The parameter -a also makes the copy recursive and preserve the modification times, but additionally it copies the symlinks that it encounters as symlinks, preserve the permissions, preserve the owner and group information, and preserve device and special files. This is useful if you are copying the entire home folder of a user, or if you are copying system folders somewhere else.

Dealing with whitespace and rare characters

We can escape spaces and rare characters just as in bash, by the use of \ before any whitespace and rare character. Additionally, we can use single quotes to enclose the string:

rsync -rtv so\{ur\ ce/ dest\ ina\{tion/ rsync -rtv 'so{ur ce/' 'dest ina{tion/'

Update the contents of a folder

In order to save bandwidth and time, we can avoid copying the files that we already have in the destination folder that have not been modified in the source folder. To do this, we can add the parameter -u to rsync, this will synchronize the destination folder with the source folder, this is where the delta-transfer algorithm enters. To synchronize two folders like this we use:

rsync -rtvu source_folder/ destination_folder/

By default, rsync will take into consideration the date of modification of the file and the size of the file to decide whether the file or part of it needs to be transferred or if the file can be left alone, but we can instead use a hash to decide whether the file is different or not. To do this we need to use the -c parameter, which will perform a checksum in the files to be transferred. This will skip any file where the checksum coincides.

rsync -rtvuc source_folder/ destination_folder/

Synchronizing two folders with rsync

To keep two folders in synchrony, not only do we need to add the new files in the source folder to the destination folder, as in the past topics, we also need to remove the files that are deleted in the source folder from the destination folder. rsync allow us to do this with the parameter --delete, this used in conjunction with the previously explained parameter -u that updates modified files allow us to keep two directories in synchrony while saving bandwidth.

rsync -rtvu --delete source_folder/ destination_folder/

The deletion process can take place in different moments of the transfer by adding some additional parameters:

  • rsync can look for missing files and delete them before it does the transfer process, this is the default behavior and can be set with --delete-before
  • rsync can look for missing files after the transfer is completed, with the parameter --delete-after
  • rsync can delete the files done during the transfer, when a file is found to be missing, it is deleted at that moment, we enable this behavior with --delete-during
  • rsync can do the transfer and find the missing files during this process, but instead of delete the files during this process, waits until it is finished and delete the files it found afterwards, this can be accomplished with --delete-delay

e.g.:

rsync -rtvu --delete-delay source_folder/ destination_folder/

Compressing the files while transferring them

To save some bandwidth, and usually it can save some time as well, we can compress the information being transfer, to accomplish this we need to add the parameter -z to rsync.

rsync -rtvz source_folder/ destination_folder/

Note, however, that if we are transferring a large number of small files over a fast connection, rsync may be slower with the parameter -z than without it, as it will take longer to compress every file before transfer it than just transferring over the files. Use this parameter if you have a a connection with limited speed between two computers, or if you need to save bandwidth.

Transferring files between two remote systems

rsync can copy files and synchronize a local folder with a remote folder in a system running the SSH daemon, the RSH daemon, or the rsync daemon. The examples here use SSH for the file transfers, but the same principles apply if you want to do this with rsync as a daemon in the host computer, read Running rsync as a daemon when ssh is not available further below for more information about this.

To transfer files between the local computer and a remote computer, we need to specify the address of the remote system, it may be a domain name, an IP address, or a the name of a server that we have already saved in our SSH config file (information about how to do this can be found in Defining SSH servers), followed by a colon, and the folder we want to use for the transfer. Note that rsync can not transfer files between two remote systems, only a local folder or a remote folder can be used in conjunction with a local folder. To do this we use:

Local folder to remote folder, using a domain, an IP address and a server defined in the SSH configuration file:
rsync -rtvz source_folder/ user@domain:/path/to/destination_folder/ rsync -rtvz source_folder/ [email protected]:/path/to/destination_folder/ rsync -rtvz source_folder/ server_name:/path/to/destination_folder/

Remote folder to local folder, using a domain, an IP address and a server defined in the SSH configuration file:
rsync -rtvz user@domain:/path/to/source_folder/ destination_folder/ rsync -rtvz [email protected]:/path/to/source_folder/ destination_folder/ rsync -rtvz server_name:/path/to/source_folder/ destination_folder/

Excluding files and directories

There are many cases in which we need to exclude certain files and directories from rsync, a common case is when we synchronize a local project with a remote repository or even with the live site, in this case we may want to exclude some development directories and some hidden files from being transfered over to the live site. Excluding files can be done with --exclude followed by the directory or the file that we want to exclude. The source folder or the destination folder can be a local folder or a remote folder as explained in the previous section.

rsync -rtv --exclude 'directory' source_folder/ destination_folder/ rsync -rtv --exclude 'file.txt' source_folder/ destination_folder/ rsync -rtv --exclude 'path/to/directory' source_folder/ destination_folder/ rsync -rtv --exclude 'path/to/file.txt' source_folder/ destination_folder/

The paths are relative to the folder from which we are calling rsync unless it starts with a slash, in which case the path would be absolute.

Another way to do this is to create a file with the list of both files and directories to exclude from rsync, as well as patterns (all files that would match the pattern would be excluded, *.txt would exclude any file with that extension), one per line, and call this file with --exclude-from followed by the file that we want to use for the exclusion of files. First, we create and edit this file in our favorite text editor, in this example I use gedit, but you may use kate, Vim, nano, or any other text editor:

touch excluded.txt gedit excluded.txt

In this file we can add the following:

directory relative/path/to/directory file.txt relative/path/to/file.txt /home/juan/directory /home/juan/file.txt *.swp

And then we call rsync:

rsync -rvz --exclude-from 'excluded.txt' source_folder/ destination_folder/

In addition to delete files that have been removed from the source folder, as explained in Synchronizing two folders with rsync, rsync can delete files that are excluded from the transfer, we do this with the parameter --delete-excluded, e.g.:

rsync -rtv --exclude-from 'excluded.txt' --delete-excluded source/ destination/

This command would make rsync recursive, preserve the modification times from the source folder, increase verbosity, exclude all the files that match the patterns in the file excluded.txt, and delete all of this files that match the patternif they exist in the destination folder.

Running rsync as a daemon when ssh is not available

This was moved to it's own section, Running rsync as a daemon.

Some additional rsync parameters

-t Preserves the modification times of the files that are being transferred.
-q Suppress any non-error message, this is the contrary to -v which increases the verbosity.
-d Transfer a directory without recursing, this is, only the files that are in the folder are transferred.
-l Copy the symlinks as symlinks.
-L Copy the file that a symlink is pointing to whenever it finds a symlink.
-W Copy whole files. When we are using the delta-transfer algorithm we only copy the part of the archive that was updated, sometimes this is not desired.
--progress Shows the progress of the files that are being transferred.
-h Shows the information that rsync provides us in a human readable format, the amounts are given in K's, M's, G's and so on.

Footnotes

The amount of options that rsync provide us is immense, we can define exactly which files we want to transfer, what specific files we want to compress, what files we want to delete in the destination folder if this files exists, and we can deal with system files as well, for more information we can use man rsync and man rsyncd.conf

I leave the information concerning backups out of this post, as this will be covered, together with the automation of the backups, in an incoming post.

It is possible to run rsync on Windows with the use of cygwin, however I don't have a Windows box available at the moment (nor do I plan to aquire one in the foreseeable future), so even thought I have done it I can't post about this. If you run rsync as a service in Windows tho, you need to add the line "strict mode = false" in rsyncd.conf under the modules area, this will prevent rsync from checking the permissions in the secrets file and thus failing because they are not properly set (as they don't work the same as in Linux).

This post may be updated if there is something to correct or to add a little more information if I see it necessary.


source


Understanding the TrueNAS SCALE "hostPathValidation" setting | TrueNAS Community

What is the “hostPathValidation” setting?

With the recent release of TrueNAS SCALE "Bluefin" 22.12.1, there have been a number of reports of issues with the Kubernetes "hostPathValidation" configuration setting, and requests for clarification regarding this security measure.

The “hostPathValidation” check is designed to prevent the simultaneous sharing of a dataset over a file-level protocol (SMB/NFS) while also being presented as hostPath storage to Kubernetes. This safety check prevents a container application from having the ability to accidentally perform a change in permissions or ownership to existing data in place on a ZFS dataset, or overwrite existing extended attribute (xattr) data, such as photo metadata on MacOS.

What’s the risk?

Disabling the hostPathValidation checkbox under Apps -> Settings -> Advanced Settings allows for this “shared access” to be possible, and opens up a small possibility for data loss or corruption when used incorrectly.

For example, an application that transcodes media files might, through misconfiguration or a bug within the application itself, accidentally delete an “original-quality” copy of a file and retain the lower-resolution transcoded version. Even with snapshots in place for data protection, if the problem is not detected prior to snapshot lifetime expiry, the original file could be lost forever.

Users with complex ACL schemes or who make use of extended attributes should take caution before disabling this functionality. The same risk applies to users running CORE with Jails or Plugins accessing data directly.

A change of this manner could result in data becoming unavailable to connected clients; and unless the permissions were very simplistic (single owner/group, recursive) reverting a large-scale change would require reverting to a previous ZFS snapshot. If no such snapshot exists, recovery would not be possible without manually correcting ownership and permissions.

When was this setting implemented?

In the initial SCALE release, Angelfish 22.02, there was no hostPathValidation check. As of Bluefin 22.12.0, the hostPathValidation setting was added and enabled by default. A bypass was discovered shortly thereafter, which allowed users to present a subdirectory or nested dataset of a shared dataset as a hostPath without needing to uncheck the hostPathValidation setting - thus exposing the potential for data loss. Another bypass was to stop SMB/NFS, start the application, and then start the sharing service again.

Both of these bypass methods were unintended, as they exposed a risk of data loss while the “hostPathValidation” setting was still set. These bugs were corrected in Bluefin 22.12.1, and as such, TrueNAS SCALE Apps that were dependent on these bugs being present in order to function will no longer deploy or start unless the hostPathValidation check is removed.

What’s the future plan for this setting?

We have received significant feedback that these changes and the validation itself have caused challenges. In a future release of TrueNAS SCALE, we will be moving away from a system-wide hostPathValidation checkbox, and instead providing a warning dialog that will appear during the configuration of the hostPath storage for any TrueNAS Apps that conflict with existing SMB/NFS shares.

Users can make the decision to proceed with the hostPath configuration at that time, or cancel the change and set up access to the folder through another method.

If data must be shared between SMB and hostPath, how can these risks be mitigated?

Some applications allow for connections to SMB or NFS resources within the app container itself. This may require additional network configuration, such as a network bridge interface as described in the TrueNAS docs “Accessing NAS from a VM” as well as creating and using a user account specific to the application.

https://www.truenas.com/docs/scale/scaletutorials/virtualization/accessingnasfromvm/

Users who enable third-party catalogs, such as TrueCharts, can additionally use different container path mount methods such as connecting to an NFS export. Filesystem permissions will need to be assigned to the data for the apps user in this case.


source


by Dismal-Jellyfish

Federal Reserve Alert! Federal Reserve Board announces a consent order and a $268.5 million fine with UBS Group AG, of Zurich, Switzerland, for misconduct by Credit Suisse. The misconduct involved Credit Suisse's unsafe and unsound counterparty credit risk management practices with Archegos. https://www.federalreserve.gov/newsevents/pressreleases/files/enf20230724a1.pdf

The Federal Reserve Board on Monday announced a consent order and a $268.5 million fine with UBS Group AG, of Zurich, Switzerland, for misconduct by Credit Suisse, which UBS subsequently acquired in June 2023. The misconduct involved Credit Suisse's unsafe and unsound counterparty credit risk management practices with its former counterparty, Archegos Capital Management LP.

In 2021, Credit Suisse suffered approximately $5.5 billion in losses because of the default of Archegos, an investment fund. During Credit Suisse's relationship with Archegos, Credit Suisse failed to adequately manage the risk posed by Archegos despite repeated warnings. The Board is requiring Credit Suisse to improve counterparty credit risk management practices and to address additional longstanding deficiencies in other risk management programs at Credit Suisse's U.S. operations.

The Board's action is being taken in conjunction with actions by the Swiss Financial Market Supervisory Authority and the Bank of England's Prudential Regulation Authority. The penalties announced by the Board and the Prudential Regulation Authority total approximately $387 million.

Wut mean?:

  • The Federal Reserve Bank of New York found various deficiencies in the Credit Suisse's' risk management processes.
  • Credit Suisse had a prime services business that operated across the US, UK, Europe, and Asia, mainly catering to hedge funds and institutional investors.
  • The Prime Services Risk department handled daily risk management tasks, including setting margin rates.
  • The Credit Risk Management department was an independent entity within Credit Suisse that assessed credit risks posed by counterparties.
  • Credit Suisse had a client relationship with Archegos Capital Management LP since 2012 (and its predecessor since 2003). Their relationship was managed by Credit Suisse’s New York-based Prime Services and Credit Risk Management teams.
  • Archegos focused on a long-short equity strategy, predominantly in tech and media, and used total return swaps with counterparties, including Credit Suisse. Their portfolio at Credit Suisse became increasingly concentrated from mid-2020 to early 2021, consistently breaching Credit Suisse's internal risk limits.
  • The risks posed by Archegos' portfolio were known, but Credit Suisse took no effective action to mitigate them.
  • Credit Suisse had various management and governance failures, including inadequate reputational risk review, lack of clear accountability, not obtaining enough margin from Archegos, and not effectively managing data quality for risk metrics.
  • In March 2021, Archegos defaulted on Credit Suisse’s margin calls, leading Credit Suisse to liquidate its positions and suffer losses of approximately $5.5 billion.
  • In June 2023, UBS Group AG acquired Credit Suisse Group AG. UBS became the successor of Credit Suisse and the Federal Reserve oversees UBS's operations in the U.S.
  • UBS and the Federal Reserve want U.S. Operations to function safely and in compliance with laws. UBS has started fixing the weaknesses at Credit Suisse.
  • UBS, Credit Suisse, and the Federal Reserve agreed to a consent Cease and Desist Order because of the above issues. This order involves penalties for the identified unsafe practices.
  • The boards of directors of bocontinue
 

source


by catbulliesdog

The Crash this Fall is Now a Mathematical Certainty, but First, Market Goes Up Author's Note: I started writing this a couple weeks ago when SPY was in the 430s. A fair bit of the "up" predicted in the title has already happened. That said I think we at least test the Morgan Collar at 4620 SPX before we top, and the gigantic IB trader's long put position is acting as resistance at 4500 SPX. There's a small chance we either match or exceed ATH before the end. There's still around $1.7 Trillion left in ONRRP to exhaust, and so far, REITs and other large property holders are adding unsecured debt to cover investor withdrawals and prop up values. This delays the boom, but means it'll boom harder when it happens.

TLDR: The convergence of bond value reduction due to rate hikes combined with CMBS notes going to zero will cause a deflationary bust with multiple bank failures, in turn tanking the market and leading to more "printer go brrr" yielding an inflationary death spiral last seen during the Wiemar Republic in 1923.

Hi, I'm u/catbulliesdog you may know me from such previous DD's as: The 2022 Real Estate Crash is going to be worse than the 2008 One, and Nobody Knows about it Yet , This is How the (Financial) World Ends, Housing is a Big Bubbly Pile of Bullshit, and The 2023 Real Estate Crash Started 5 Months Ago, and It Just took Down it's First Banks (some of the links are to my profile, the relevant DD is in the pinned posts or just under "posts", can't link 'cause all the finance subs be fite each other). Plus a bunch of DD I've written various places about China and Evergrande and how nothing was ever fixed there and its going to take down the whole country. (bonus, hidden $81 Billion loss revealed today!)

I've been saying for a couple of years now that we had three potential outcomes to the current mess:

a 2008 style crash - this was the best case scenario, and it's window is long gone 1. a 1929 style deflationary bust - this is, as the title indicates, a mathematical certainty at this point, the problem is what follows 1. a 1923 Weimar republic style hyperinflation - yeah, this is the one we're gonna get when the Fed tries to print its way out of number 2. I picked 1923 and Weimar over a long list of 3rd world countries that experienced hyperinflation because of the political consequences that followed.

Bonds

I'm going to end up talking a lot about Bonds in this post, so, lets go over what a bond actually is, and how they work, because I know you lot of smooth brained virgin baboons have gained basically all of your so-called knowledge from a Chappelle's Show Wu-Tang Financial skit. A Bond is at heart a financial instrument representing debt that can be traded back and forth like a stock or other commodity. Bonds are described in four ways: Face Value, Coupon Rate, Yield and Price. Face Value is the total amount the bond is worth at maturation (the date it expires). Coupon Rate is the interest rate the bond pays. Yield is the effective interest rate when accounting for Price and time to maturation. Price is how much you can buy and sell a bond for today. So say you've got a $100 (face value) bond that pays 4% interest over 10 years (coupon rate). Mike buys this bond for $71.50 (price). You bought it from Mikey the Moron for $25 (price) because he really wanted to go get a pizza and six pack tonight. Mike made this deal because while the bond is worth more, the money is inaccessible for 10 years, its illiquid, and he really wants to impress his lady friend tonight, so he needs the money now. You're making 300%, which is 30%/year (yield), but you have to wait 10 years to get it. This is basically what happened to regional banks in March, they bought an absolute fuckload of bonds at very low rates, and now that rates have risen along with inflation, the yield on those bonds has collapsed, crushing the price. But, they needed access to money before the 10 years was up, so they had to unload their bonds at a big loss to get cash now, just like Mikey.

The Fed stopped this bleeding with stuff like the BTFD program, but just like what China did by making banks post fake deposit numbers, it's not actually a solution, and the problem will just continue to grow behind the scenes until it busts out like the Kool Aid Man during one of his frequent substance abuse relapses.

Now, there's lots of complex bullshit that gets piled on top of this, so that people can pretend they're super duper smart and too cool for school, but at the end of the day, that's the gist of it, you're buying and selling pieces of loans.

CMBS

This is basically the exact same story as 2008, except with commercial properties instead of residential ones. The valuations are fake and backed up by bogus revenue estimates. This is being blamed on the pandemic and work from home, but the truth is its been going on since 2008. When nobody went to jail, they all just moved over to commercial real estate and restarted the same fraudulent machine.

Don't believe me? Think it's too crazy to be true? Here, from the company's website, is the corporate blurb about Brian Harris, founder of Ladder Capital. Brian Harris is a founder and the Chief Executive Officer of Ladder Capital. Before forming Ladder Capital in October 2008, Mr. Harris served as a Head of Global Commercial Real Estate at Dillon Read Capital Management, a wholly owned subsidiary of UBS. Before joining Dillon Read, Mr. Harris served as Head of Global Commercial Real Estate at UBS, managing UBS’ proprietary commercial real estate activities globally. Mr. Harris also served as a Member of the Board of Directors of UBS Investment Bank. Prior to joining UBS, Mr. Harris served as Head of Commercial Mortgage Trading at Credit Suisse and previously worked in the real estate groups at Lehman Brothers, Salomon Brothers, Smith Barney and Daiwa Securities. Mr. Harris received a B.S. and an M.B.A. from The State University of New York at Albany.

I mean, jesus, look at that company list, Lehman, Soloman, Smith Barney, UBS, Credit Suisse, its like a fucking directory of shady bullshit. And the year founded? Dude waited less than a month to realize he could do the same shit he was pulling with MBS if he just added the letter "C" to the front of it. If white collar crime enforcement existed in America, this Fredo-Wannabe would have been squeezed like one of the Killer Tomatoes for enough convictions to get six dozen people Epstein'd. Honestly, I'm just kind of in awe of how much fraud and crime this guy has been part of.

Ladder Capital is heavily involved in the massive fraud that is Dollar General's real estate empire - one of the scummiest companies out there that has routinely put employees at risk and has gone so far in search of illegal profits I think they might have actually invented some new crimes.

MBS

Next we've got regular MBS - this is fucked in two separate ways. First, housing supply. The following is from a DD I wrote in 2021 showing that there wasn't and isn't a shortage of physical housing:

In 2004 (roughly the peak of US homeownership rates) the US homeownership rate was a bit over 69%. In 2021 it's at 65%. In 2004 there were 122 million housing units in the US. In 2021 it's 141 million. US population in 2004 was 292 million. In 2021 it's 331 million. Throw all these numbers into a blender and you get:

A 13% increase in population, a 4% decrease in homeownership rate, and a 15% increase in housing supply. Yes, that's right, the housing supply has increased faster than the population, and the homeownership rate during that time has dropped.

Now let's update that to 2023: Population - 334 million. Homeownership Rate - 66%. Housing Units - 144 million. Over the last two years we've added 3 million people, and 3 million housing units. Most people don't live alone - children, couples, roommates, etc. So, to be clear, between 2004 and 2021, we went from 41.7 housing units per 100 people to 42.6 housing units per 100 people, and in 2023 we're at 43.1/100. That's 43.1 housing units for every 100 people in America. In the last two years we've added half a housing unit/per 100 people, which as nearly as I can tell is the fastest rate in the history of America, and during that period of time, the price of the average house in America went up by 26%, from $346,900, to $436,800. (all numbers taken from the same data series at FRED to keep things normalized)

I'll say it again, over the last two years housing supply has increased at the fastest rate in American history, and prices jumped 26%.

Everything I can find indicates that this "excess housing" is currently tied up in ABNB/short term rental/illegal hotels, REITs, and vacant "investment" properties that are being used as tax dodgescontinue


source


This is an automated archive made by the Lemmit Bot.

The original was posted on /r/Superstonk by /u/pigUw on 2023-07-17 20:37:32.


image

image

Now that SEC bulletin confirms that shares need to be Book to be fully yours, not Plan.

  • Purchases made through the issuer (or its transfer agent) of securities you intend to hold in DRS are usually executed under the guidelines of an issuer’s stock purchase plan, which uses a broker-dealer to execute the orders. Thus, to hold in DRS once the securities are acquired, you would need to instruct the transfer agent to move the securities from the issuer plan to DRS.


source


by jhs0108

So has anyone talked about Citadel Securities massive increase in the Notional Amount of their Derivatives over the last few years yet? Cause I just found out about it and holy cow this could be big.

Preface:

So there's some knowledge to get across about derivatives and accounting. I either just learned about this or learned about it in my college's accounting 1 class.

-In accounting, an asset is either a liability or part of owners capital or owners equity. The basic formula that was drilled into my head was

Assets = Liabiliites + Owners Equity.

-Notional value vs Fair Value. Notional value is a term in derivative trading used to describe the value of assets underlying a derivatives contract while fair value is the cost of that contract. An ELI5 is fair value is like the finances of a town government while notional value is the value of all assets within the town. They're linked but not necessarily.

With that out of the way let's get down to business.

Citadel's had a very busy 5 years in derivatives world:

So I spend my Saturday nights as any young adult male in the US does. Look at financial statements of massive companies. This past weekend's theme was Citadel Securities LLC (the market maker). Now, I went through the usual suspects that have been covered to death like assets sold not yet purchased, their definition of fair value being the most ridiculous thing on the planet, etc. Then a came across this section of their notes (where the real juicy stuff is) in 2018.

That's a lot.

So that's a notional value of 243 BILLION USD in equity securities which for context is a lot. Below is the context.

Sauce: OCC Quarterly Report on Bank Trading and Derivatives Activities Q1 23

So this only shows the big 4 banks but it's not like Citadel is anywhere close to that. Especially given that all bank derivatives haven't really grown or shrank in the last few years.

Same OCC report. Generally stable from 2018-2022.

Right?

RIGHT?

Source: Citadel Securities financial statements 2018 last page.

It shrank. No biggie.

Citadel don't be so hard on yourself. I know a lot of people who gained a lot during 2020 it's fine as long as you pick yourself up from it.

Citadel. I'm concerned for your health.

Go on a diet.

So to wrap up,

2018=242 billion

2019=219 billion

2020=309 billion

2021=442 billion

2022=560 billion.

But hey, if all market makers just happen to have as much Notional value of their Equity Derivatives as all banks combined except for the top 4, that's not a big deal.

Virtu has been less busy than Citadel:

All these charts are from their 10ks

In Conclusion:

Citadel now has over 500 BILLION USD in equity derivatives while GOLDMAN FLIPPIN SACHS ONLY HAS 385 BILLION and has more in equity derivatives than EVERY COMMERCIAL BANK that isn't JPMORGAN, GOLDMAN, CITI, and Bank of America COMBINED?

I'm Back :)

Oh...And One More Thing.

I've been hiding something from all the Citadel charts. They all have this but I'll just show the 2022 one.

So if Citadel dies BAML dies like Archegos did to Debit Suisse.

AS ALWAYS. BUY. HODL. DRS. ZEN.

Read more

view more: ‹ prev next ›