ErgoMechKeyboards

6082 readers
1 users here now

Ergonomic, split and other weird keyboards

Rules

Keep it ergo

Posts must be of/about keyboards that have a clear delineation between the left and right halves of the keyboard, column stagger, or both. This includes one-handed (one half doesn't exist, what clearer delineation is that!?)

i.e. no regular non-split¹ row-stagger and no non-split¹ ortholinear²

¹ split meaning a separation of the halves, whether fixed in place or entirely separate, both are fine.
² ortholinear meaning keys layed out in a grid

No Spam

No excessive posting/"shilling" for commercial purposes. Vendors are permitted to promote their products/services but keep it to a minimum and use the [vendor] flair. Posts that appear to be marketing without being transparent about it will be removed.

No Buy/Sell/Trade

This subreddit is not a marketplace, please post on r/mechmarket or other relevant marketplace.

Some useful links

founded 2 years ago
MODERATORS
351
12
Good mouse for big hands (self.ergomechkeyboards)
submitted 2 years ago by Operatingcan to c/ergomechkeyboards


TL;DR:

  • Large mouse for a large hand
  • Open to vertical and traditional suggestions
  • 2+ thumb buttons preferred

I realize this is only tangential to the topic but I'm sure I'll get good recommendations from you folks :) TIA

I use a zsa moonlander at the moment and it's wonderful but when I do need to mouse around, I want a mouse that feels good to grab. Like, what I really want is my hand to stay in "typing" position, and just reposition my wrist.

I guess i must have large hands because the entire side of my hand drags with the logitech MX vertical mouse. I just bought a corsair dark core SE as it was recommended for big hands and has the guards on each side for extra fingers, but it still feels too small to comfortably palm... which makes mousing around feel unpleasant in general. It's like i want that mouse, but a couple inches longer and an ich taller, basically. Oh, and I want at least 2 thumb buttons on the mouse, ideally 4 (not 10-15 like some of the gamer mouses...)

I also trackpad about half the time, which is fine, but I want a mouse for mousey things.

Any mouse recommendations? Vertical or horizontal is fine. I did get annoyed with supinating/pronating my right hand constantly with a vertical mouse, but maybe if I tent the moonlander more that would be solved.___

352


Just wanted to write this quick guide (besides getting practice with my new Lily58) to ease the troubleshooting of at least one other soul who may find themselves where I was with building my board.

For those with blok microcontrollers, in case, like me, you do not see the microcontroller show up as a detected device in the qmk toolbox, fret not! It's a little buried in the docs, but this is the solution I found and tweaked to make things as painless as possible.

  • Set your config in the online configuration tool and save the json format file
  • Open QMK MSYS and cd to the directory with the json file
  • Put the controller in boot mode now if you haven't already (hold the boot button while plugging it in or hit the reset button twice)
  • Run this command

qmk flash <my-map.json> -e CONVERT_TO=blok

And bam!

Just do this for both boards if it's a split board like the Lily58, and you're all set! Hope this helps.

353


I felt the Piantor needed a foot pedal, a glidepoint, some rgbs, and a little baby macro pad. So here we are.

I created an 8% tent solution and supporting wrist rests.

Then added a glide point to eliminate the need for mouse.

For meeting mode, I added this little macropad to handle all the volume and video sharing controls.

Then thought it'd be interesting to see how a foot pedal could be incorporated into the daily driver and possibly minimize keystrokes.

So far, a fun build, the glide point is a little tricking to get into scroll mode and for mouse clicks. Still reviewing those settings. The jury is still out on the foot pedel, I've never used one before so it feels a bit unorthodox. Thought I'd share.

354
7
5 way nav switch in handwired case? (self.ergomechkeyboards)
submitted 2 years ago by Incblob to c/ergomechkeyboards


Hi there, I was wondering what size hole you need for a 5 way nav switch. For hand soldering that is. NOT for a pcb.

It doesn't seem to have a lip, and the official docs have it at 10*10mm, but that would just fall through.

Do I have to have individual holes for the contacts? Is it even possible to use outside of a pcb? Anyone have any ideas?

Thanks for the help.

355
20
submitted 2 years ago* (last edited 2 years ago) by luckybipedal to c/ergomechkeyboards


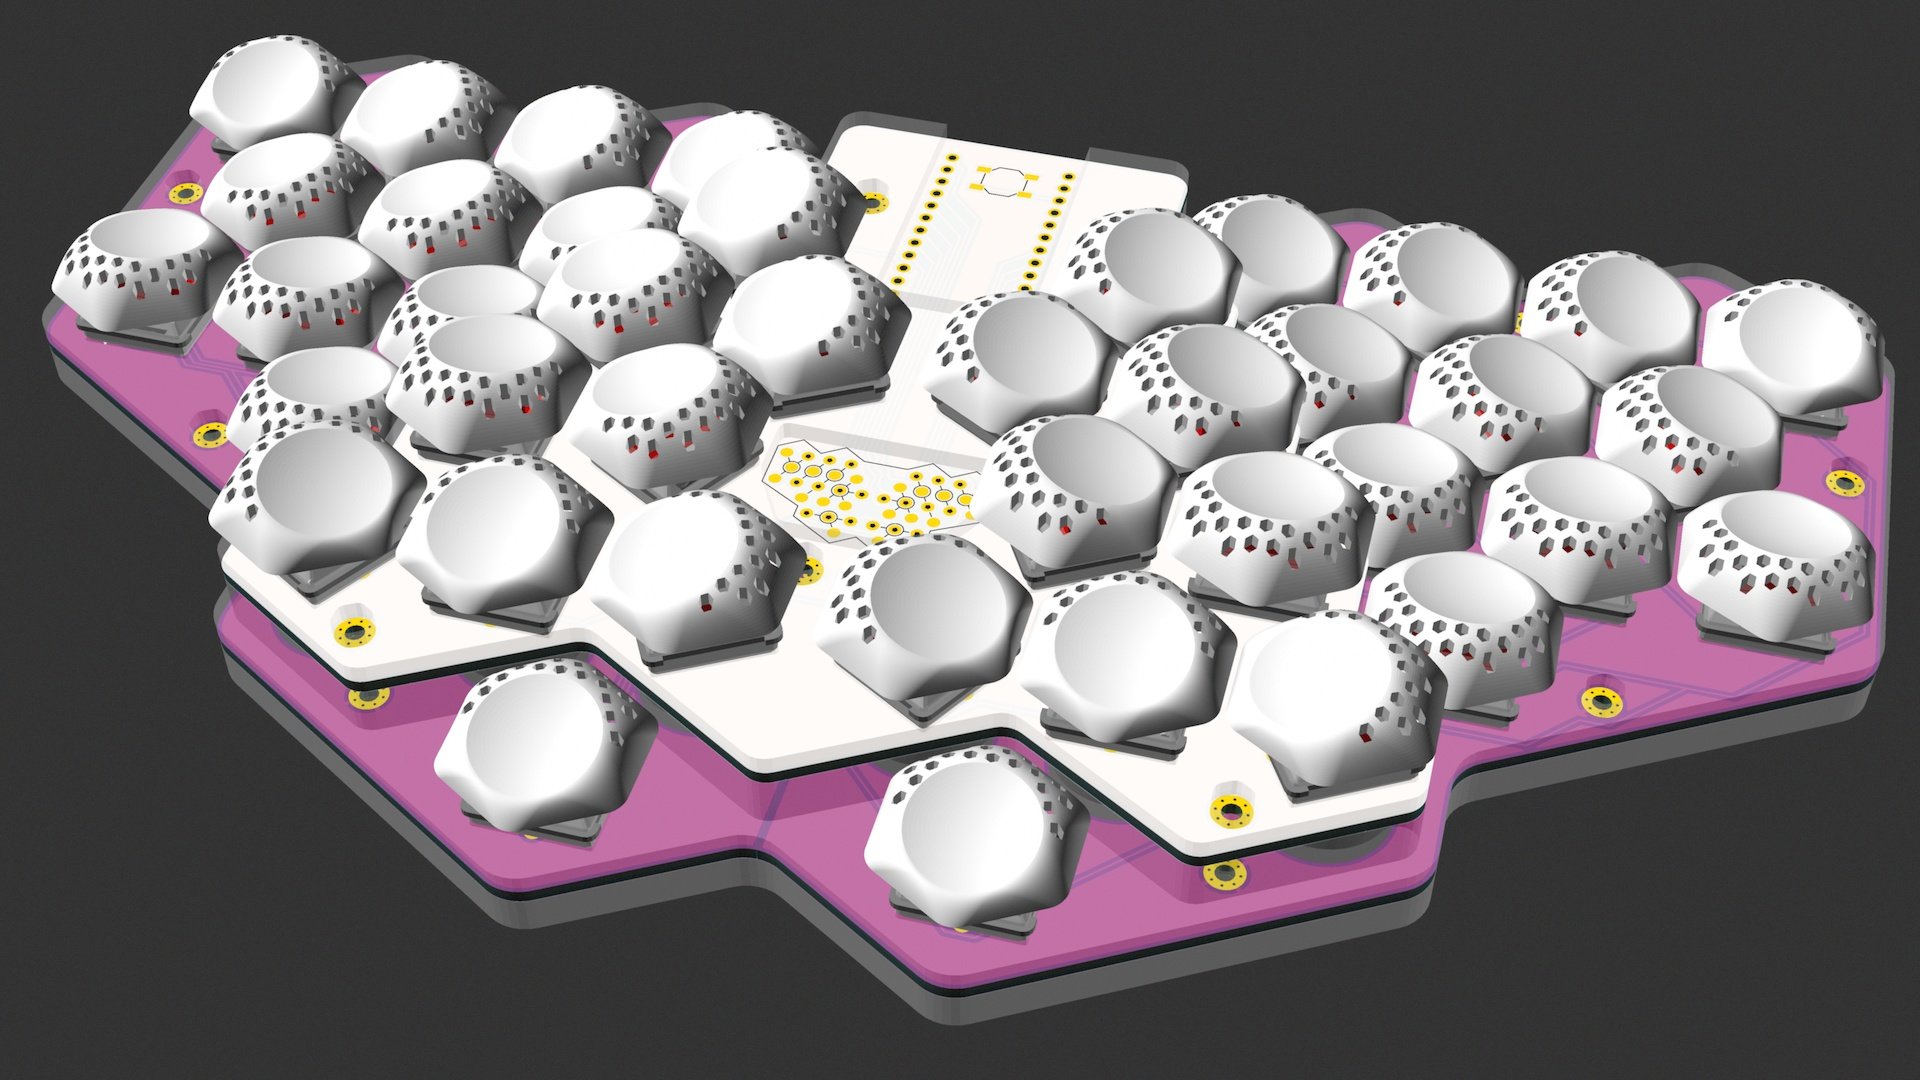
I'm excited to use my first post on Lemmy to share an update about the design and some renders of the next version of my Mantis keyboard. I ordered the PCBs, plates and 3D-printed key caps this week. I'm hoping to assemble the first prototype within the next two weeks.

Lots of firsts for me: 3D printing, laser cutting, RGB LEDs. I'm really hoping that I didn't make some big mistake that can't be fixed with a drill and some bodge wires ...

[edit: picture to save you a click and a length read]

356
38
submitted 2 years ago* (last edited 2 years ago) by hannadryad to c/ergomechkeyboards


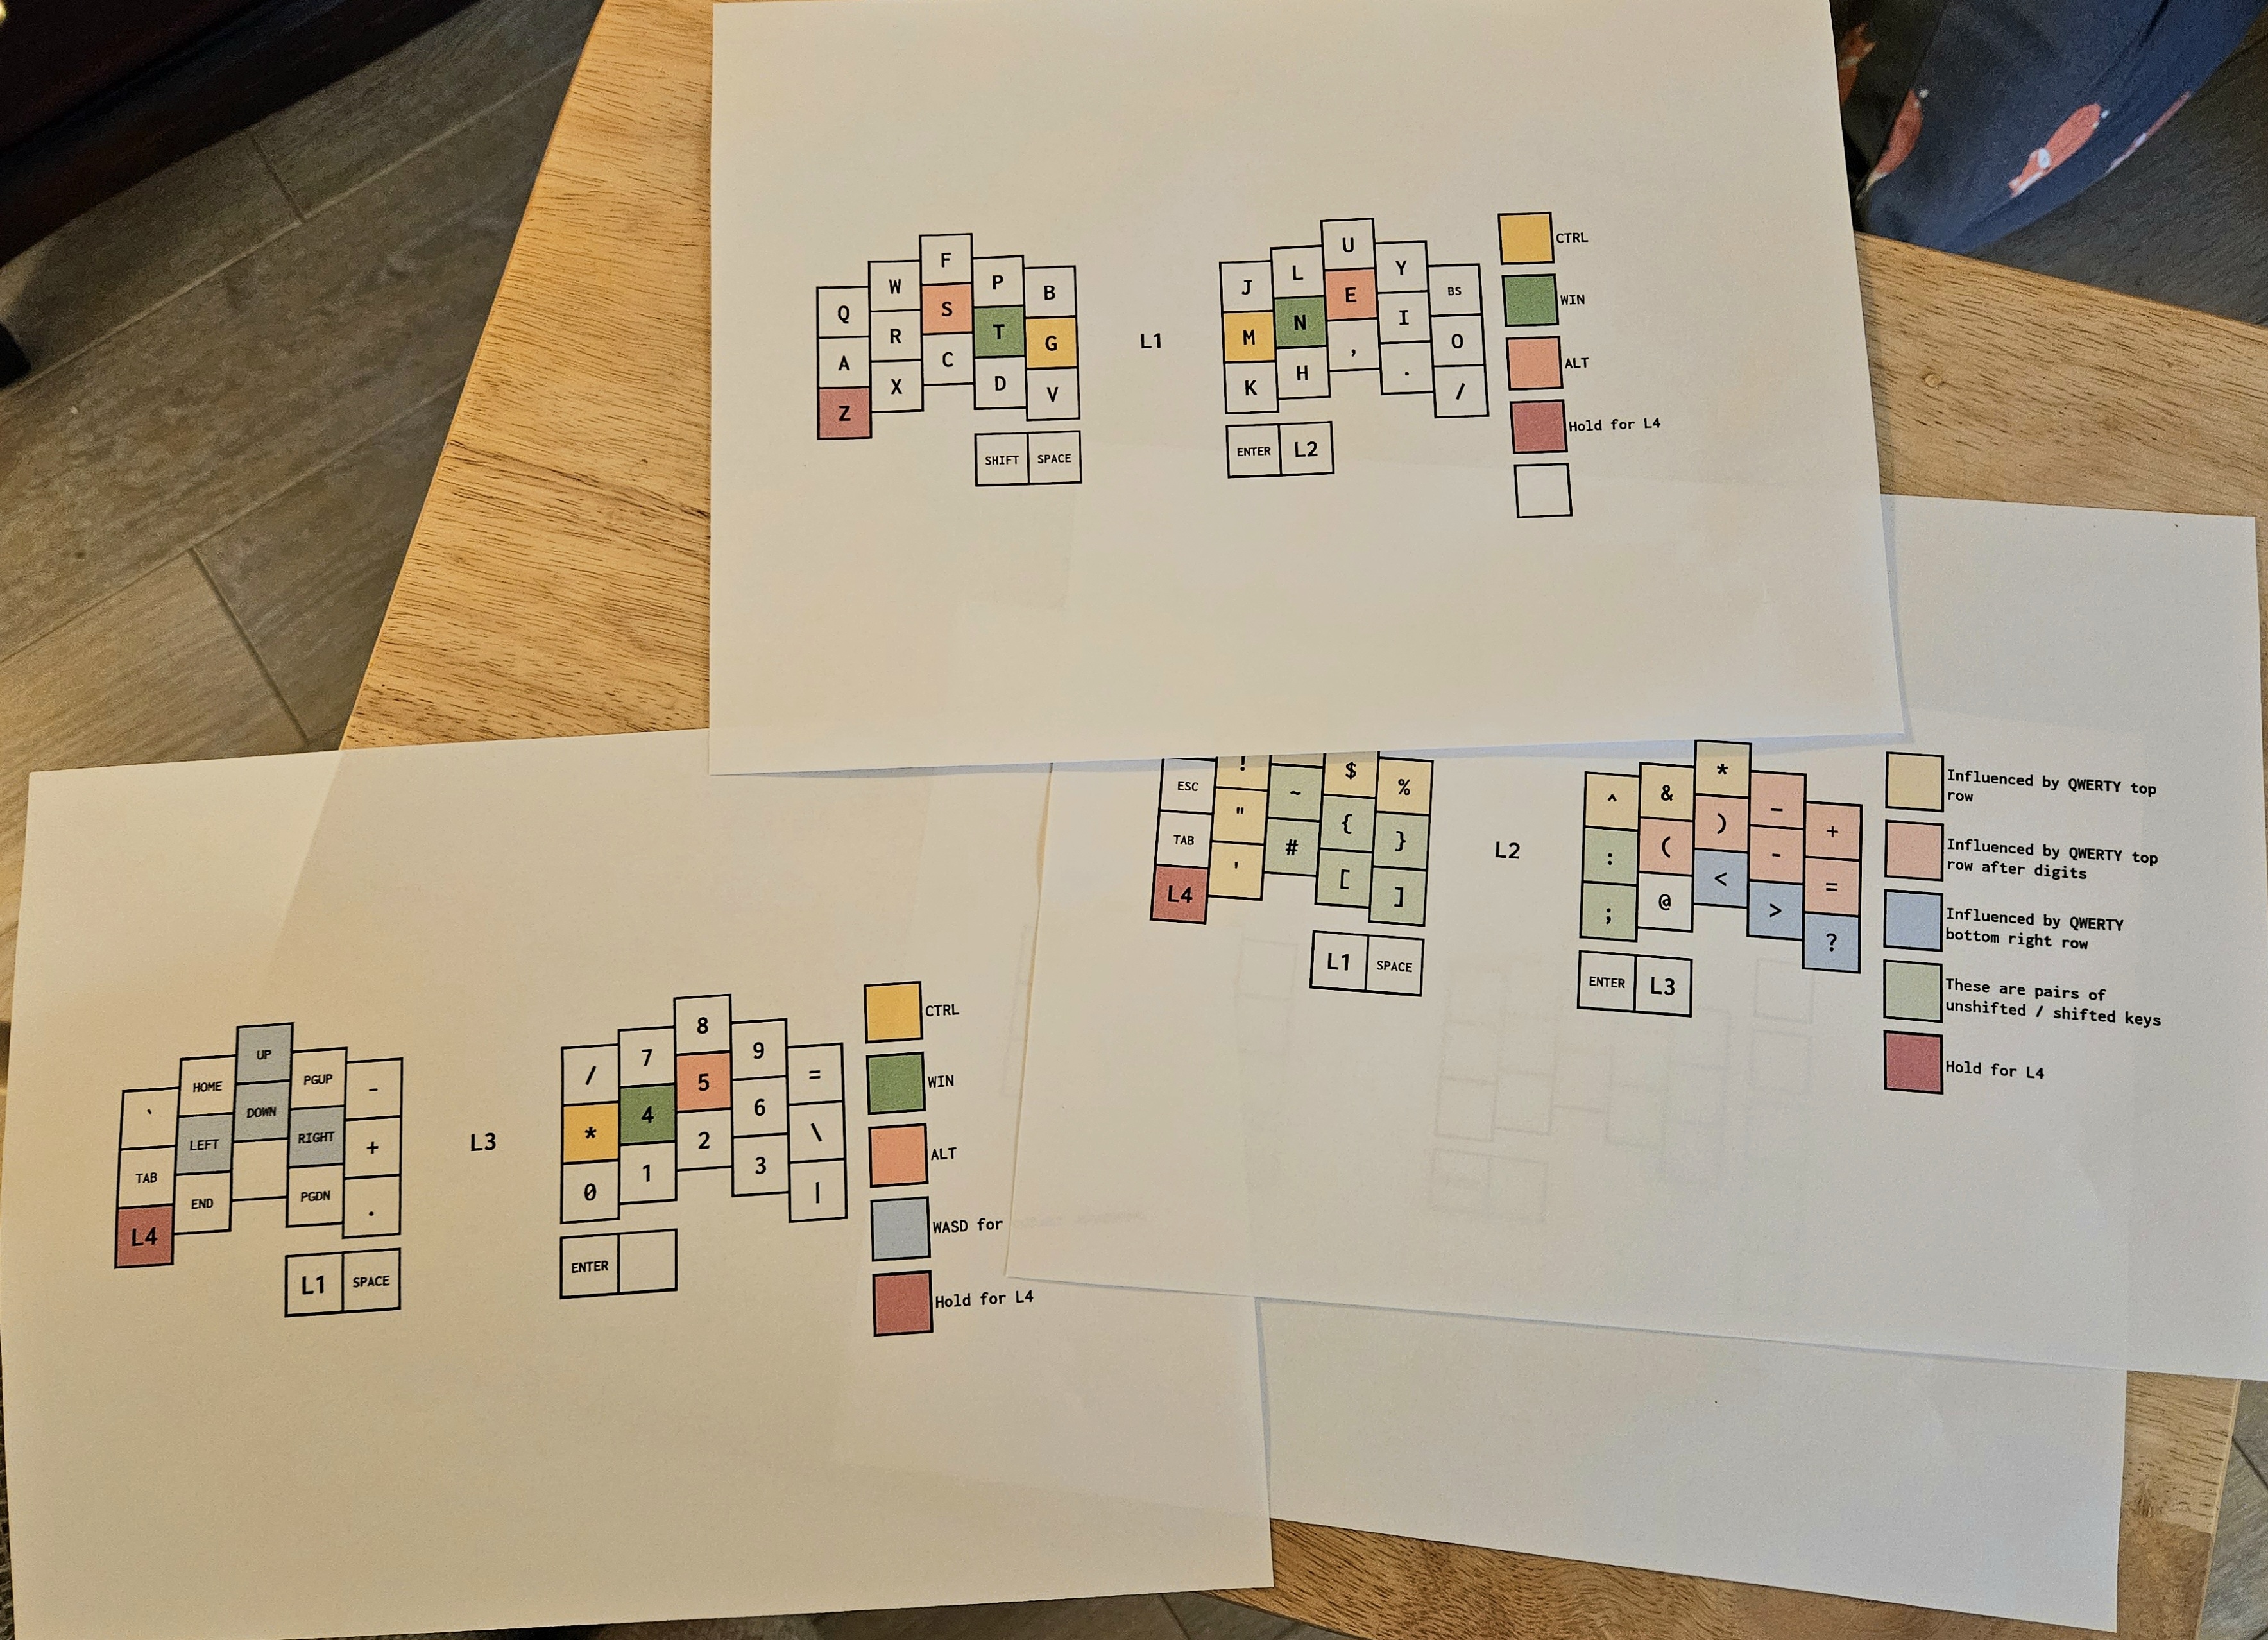
So I should be getting a ~~Piantor~~Ferris Sweep* from Beekeeb in a number of weeks and I thought I would get a head start and plan my layout - or at least one version of it, influenced heavily by Ben Vallack's video about avoiding press-and-hold mechanics.

Still plenty of fiddling to do. I want to move the WASD-style cursor keys in L3 onto my first three fingers for sure. In fact I've already changed it and made room for insert and added shift as a home key mod on the right. God this is addictive.

*ETA: I am, of course, talking about a Ferris Sweep with two thumb keys as depicted in the drawings not a Piantor, which I was also considering. I guess I was swayed by the alliteration.

357


Many of you likely know me as “The Handwiring Guy” but this is my first PCB keyboard of my own design. The Scotto34 (PCB Edition) is a low-profile 34-key split monoblock ortholinear keyboard that uses 18x17mm spaced Choc switches, hotswap capabilities, and an exposed controller in the middle. I have a video coming out today at 12PM (EST) on my channel talking about the board and how to build it. It will have some really nice close-up macro shots that I can’t wait for people to see!

In addition, this board is my announcement that I’m working on a series of videos covering mechanical keyboard PCB design from start to finish. I’m estimating it will be 6 episodes in total and cover the entire process from the core concepts up to ordering the final PCBs. The plan is to release the entire series at once and each video will be 2-10 minutes long, depending on the topic.

Anyway, when I share my boards, I like to share a few things:

  1. I make videos on these boards.
  2. All the handwired boards I design are released completely for free. The PCB boards are available for sale on my website: scottokeebs.com.
  3. You can keep up to date on the project or support me at scottokeebs.com.
  4. I have a Discord server that is super helpful for all things related to keebs.

If you have any questions, feel free to ask!

358
24
submitted 2 years ago* (last edited 2 years ago) by [email protected] to c/ergomechkeyboards


I was using some laptop stands/risers to test out whether I was interested in tenting my board or not and really really liked it so I went ahead with the magfrotto approach. I replaced the manfrotto tripods with these z-stands for the more possible angles and also because they're wayyy cheaper (20$ a piece).

Thanks to the person who came up with this idea. It's super solid, the keyboard doesn't move at all with the magsafe stickers. Highly recommended.

E: after many attempts I have successfully embedded image in post lol

359


hi, i finally want to have a split ergo keyboard - it's time. i have no nerves for soldering or searching the parts together piece by piece, i am more the buyer than the builder. the zsa moonlander seemed to fit my wishes very well so far - but the shop based in us/taiwan is quite a problem. not only the customs and what if i really want to return it (not planned, but you never know) - but only getting additional parts like the platforms would rise the final price higher than my budget probably.

are there alternatives shipping from europe? props to zsa team, still, i really like the spirit...

360
361


how come it would cost me less to buy a bottle of resin and a Elegoo mars than it would cost to get a full set of kalih choc switches and keycaps. Are there better cheaper options anywhere?

362


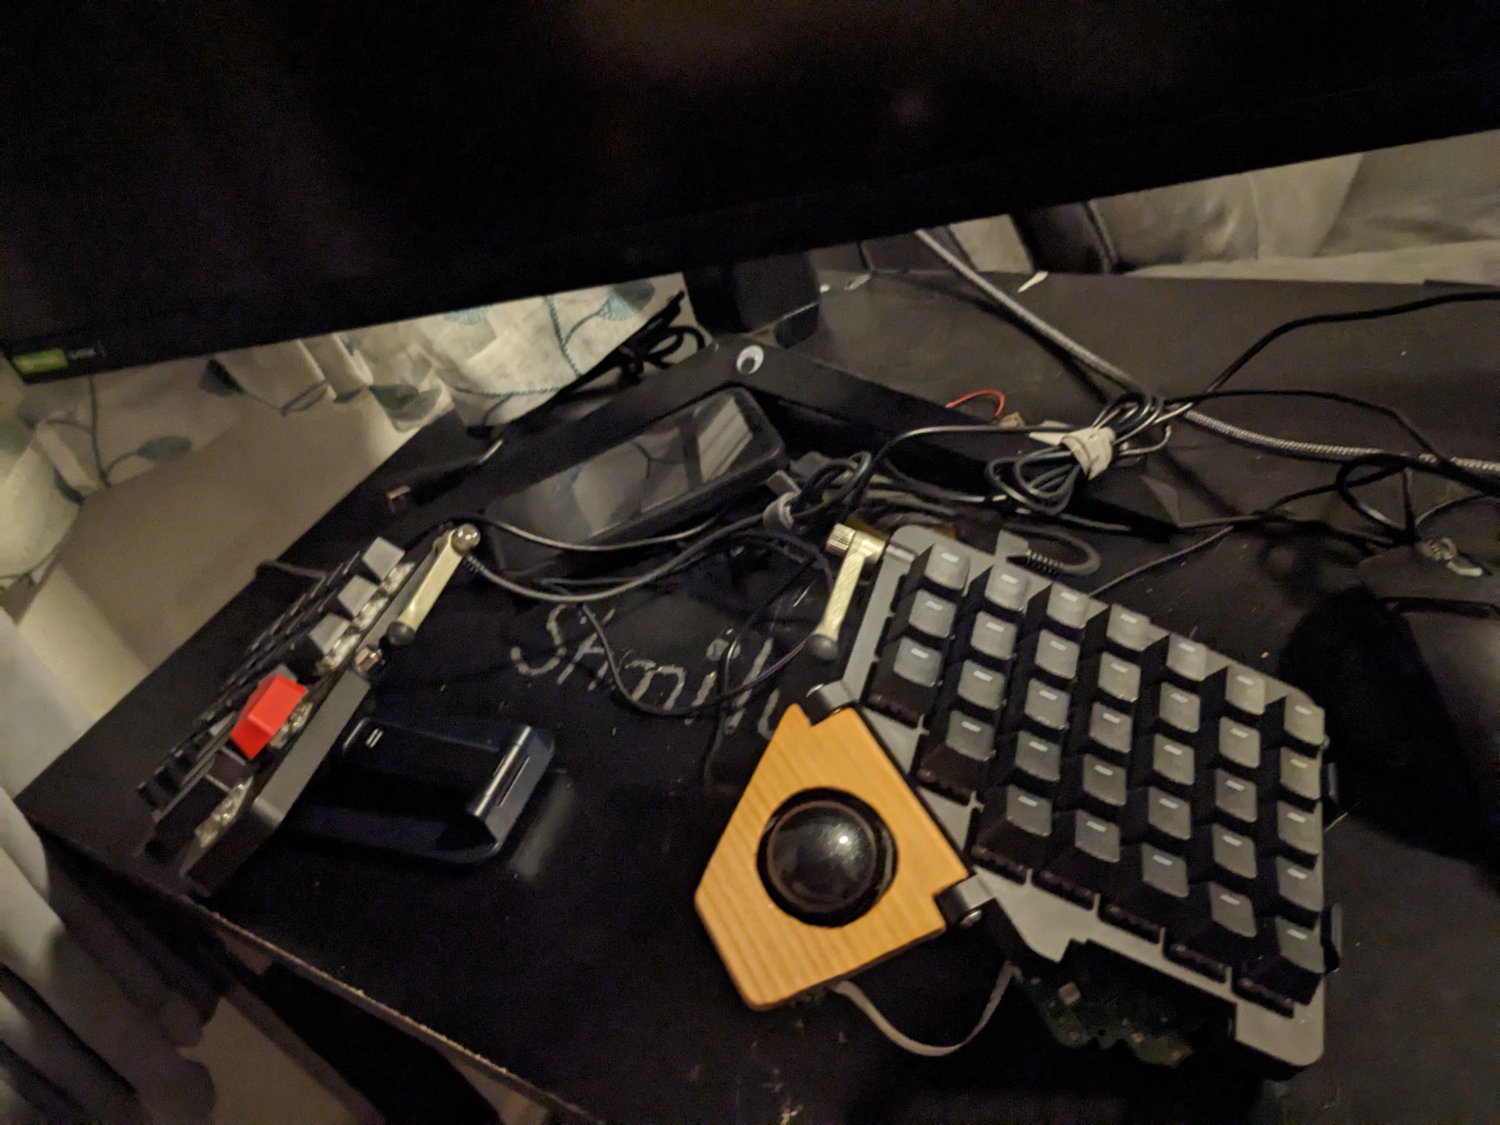
Been seeing allot of trackball thumb mods but I don't have a 3D printer. Decided to just trace the thumb cluster and scroll saw it out 8).

Im trying to learn how to attack the PMW3320 to the thumb cluster ribbon cable so I don't have to tuck the board that I ripped out of the mouse under my tent. It's a bit of a learning curve so it may not work but giving it a try 8)

363


I've decided to jump back into learning a new layout, specifically semimak JQ, from Dvorak. I've heard that as long as I practice both I should be able to maintain Dvorak while I learn semimak.

I was wondering if people here had any experience learning new layouts could share some insight for that?

Any other tips would be very appreciated. I'm sitting at somewhere around 26wpm on semimak atm, and 130-140 on Dvorak

364
38
submitted 2 years ago* (last edited 2 years ago) by Rilton to c/ergomechkeyboards


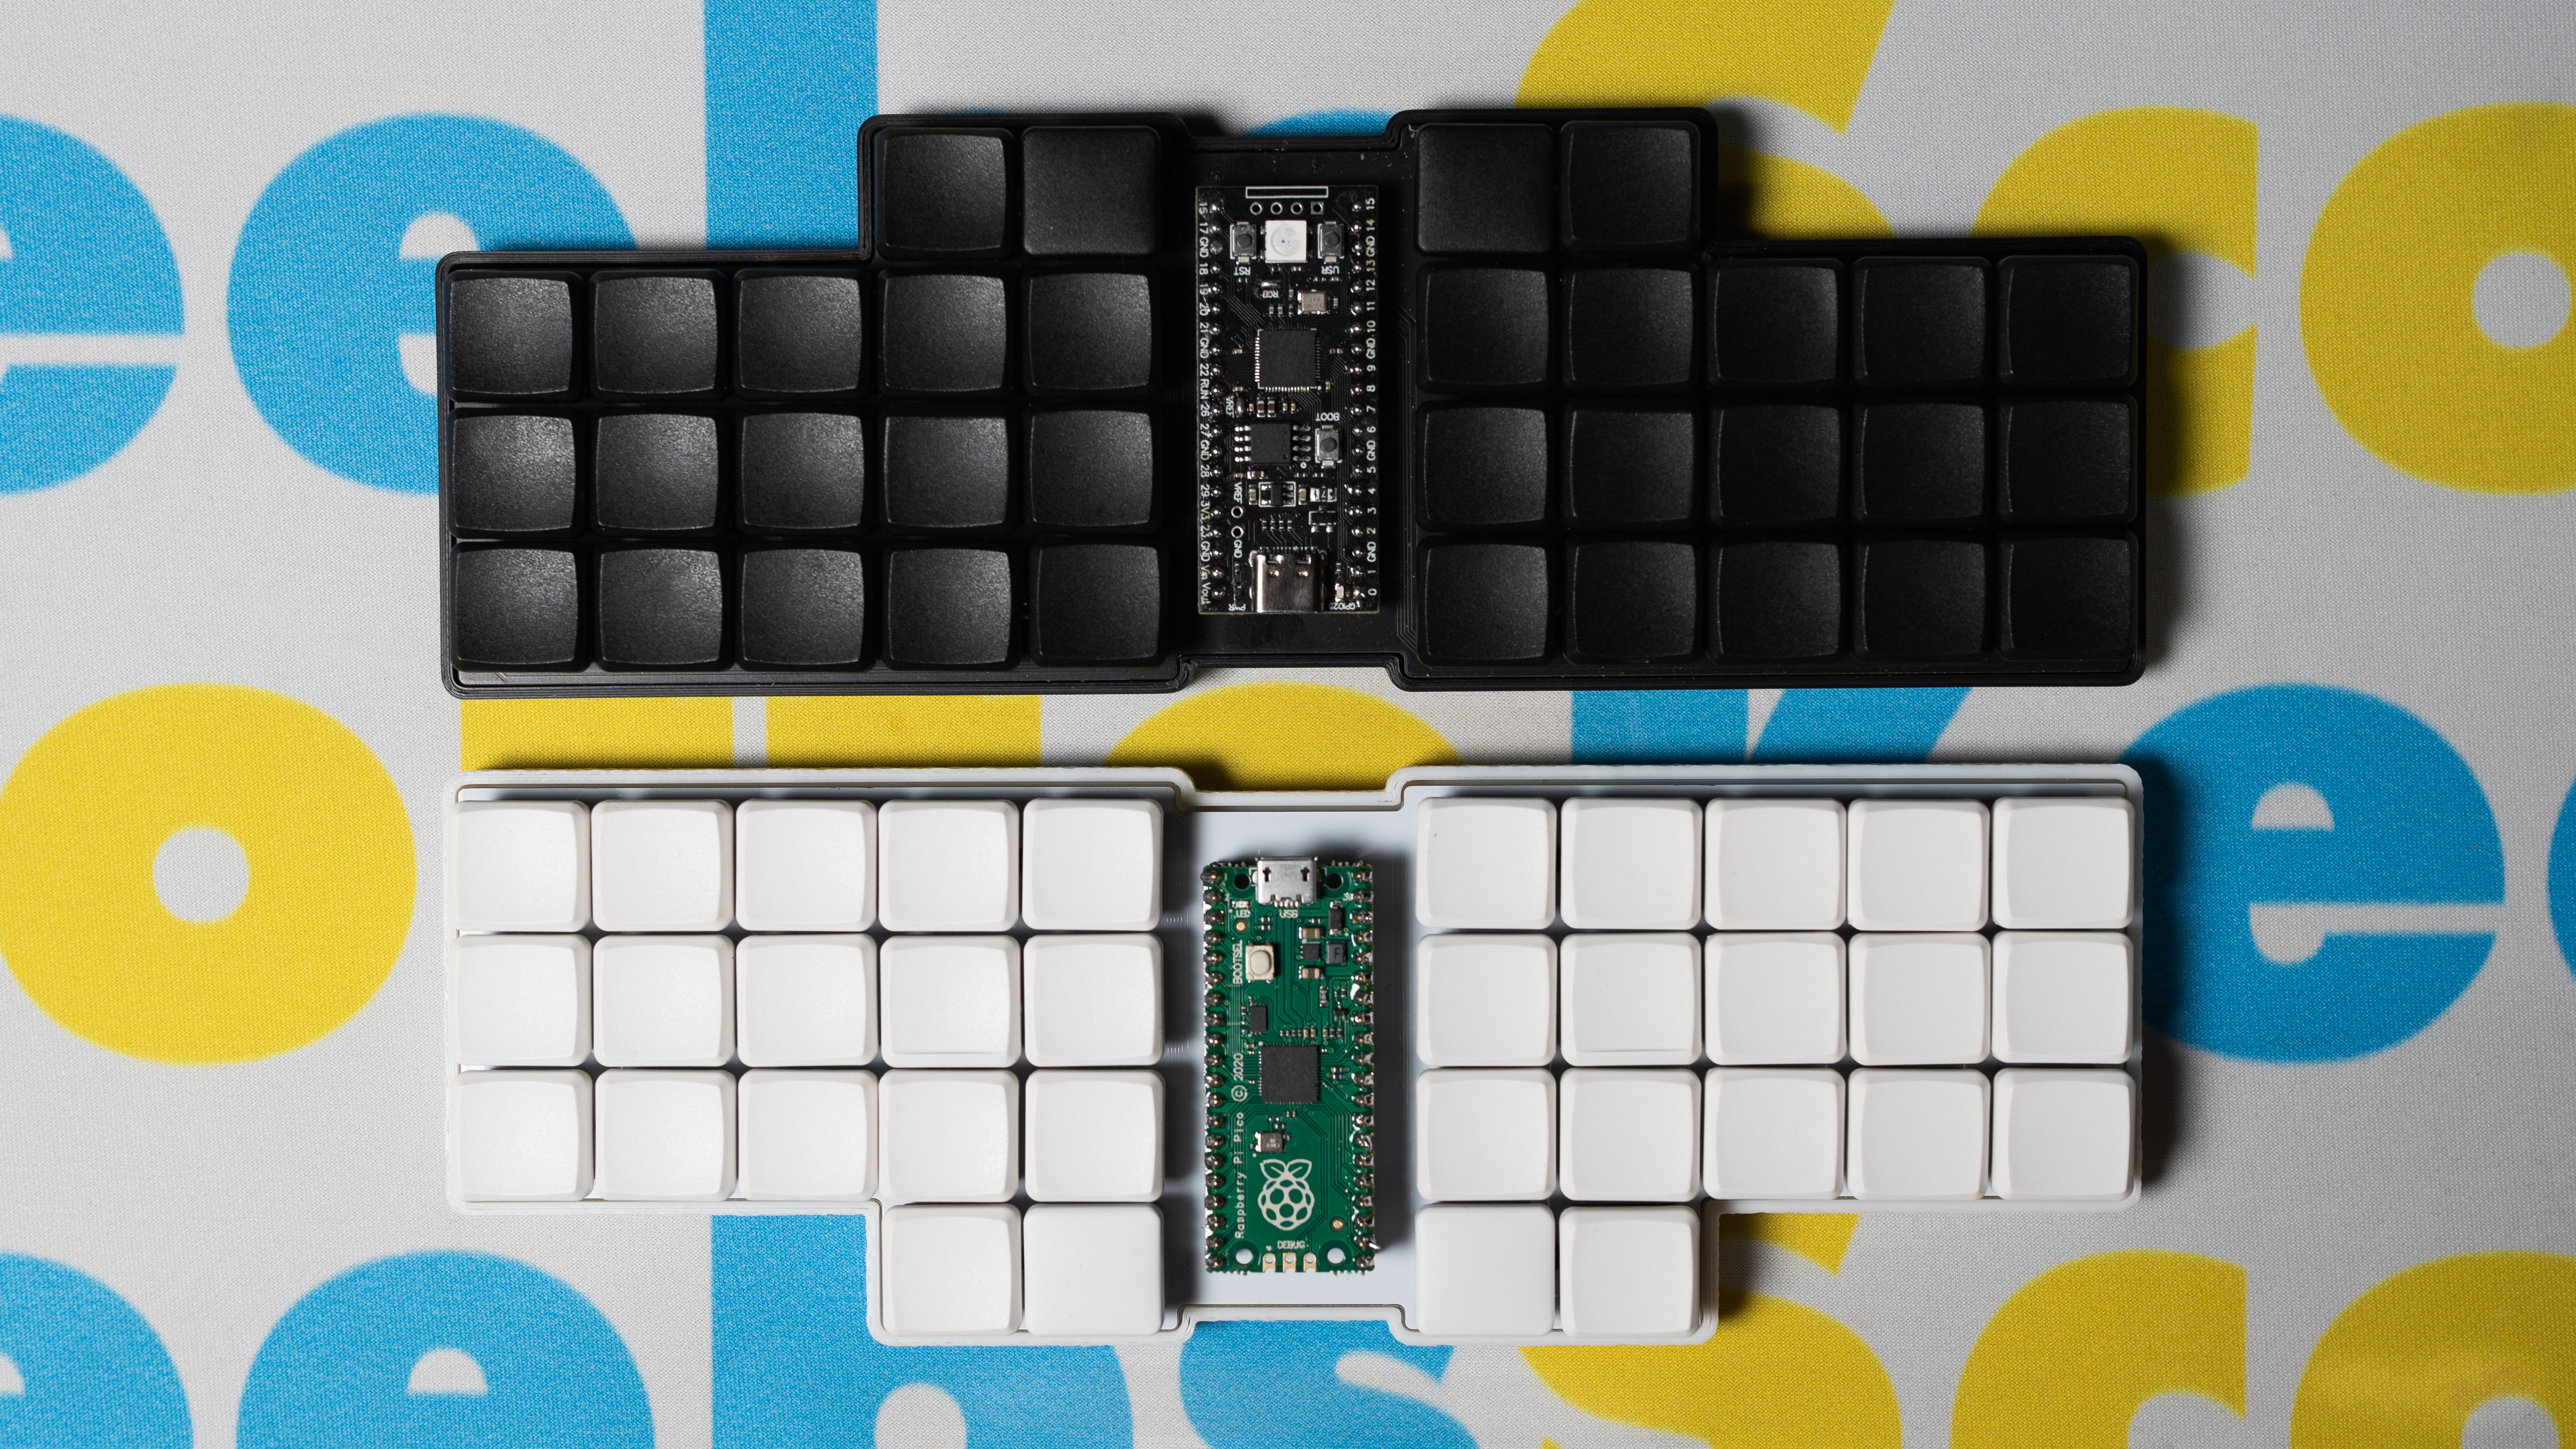
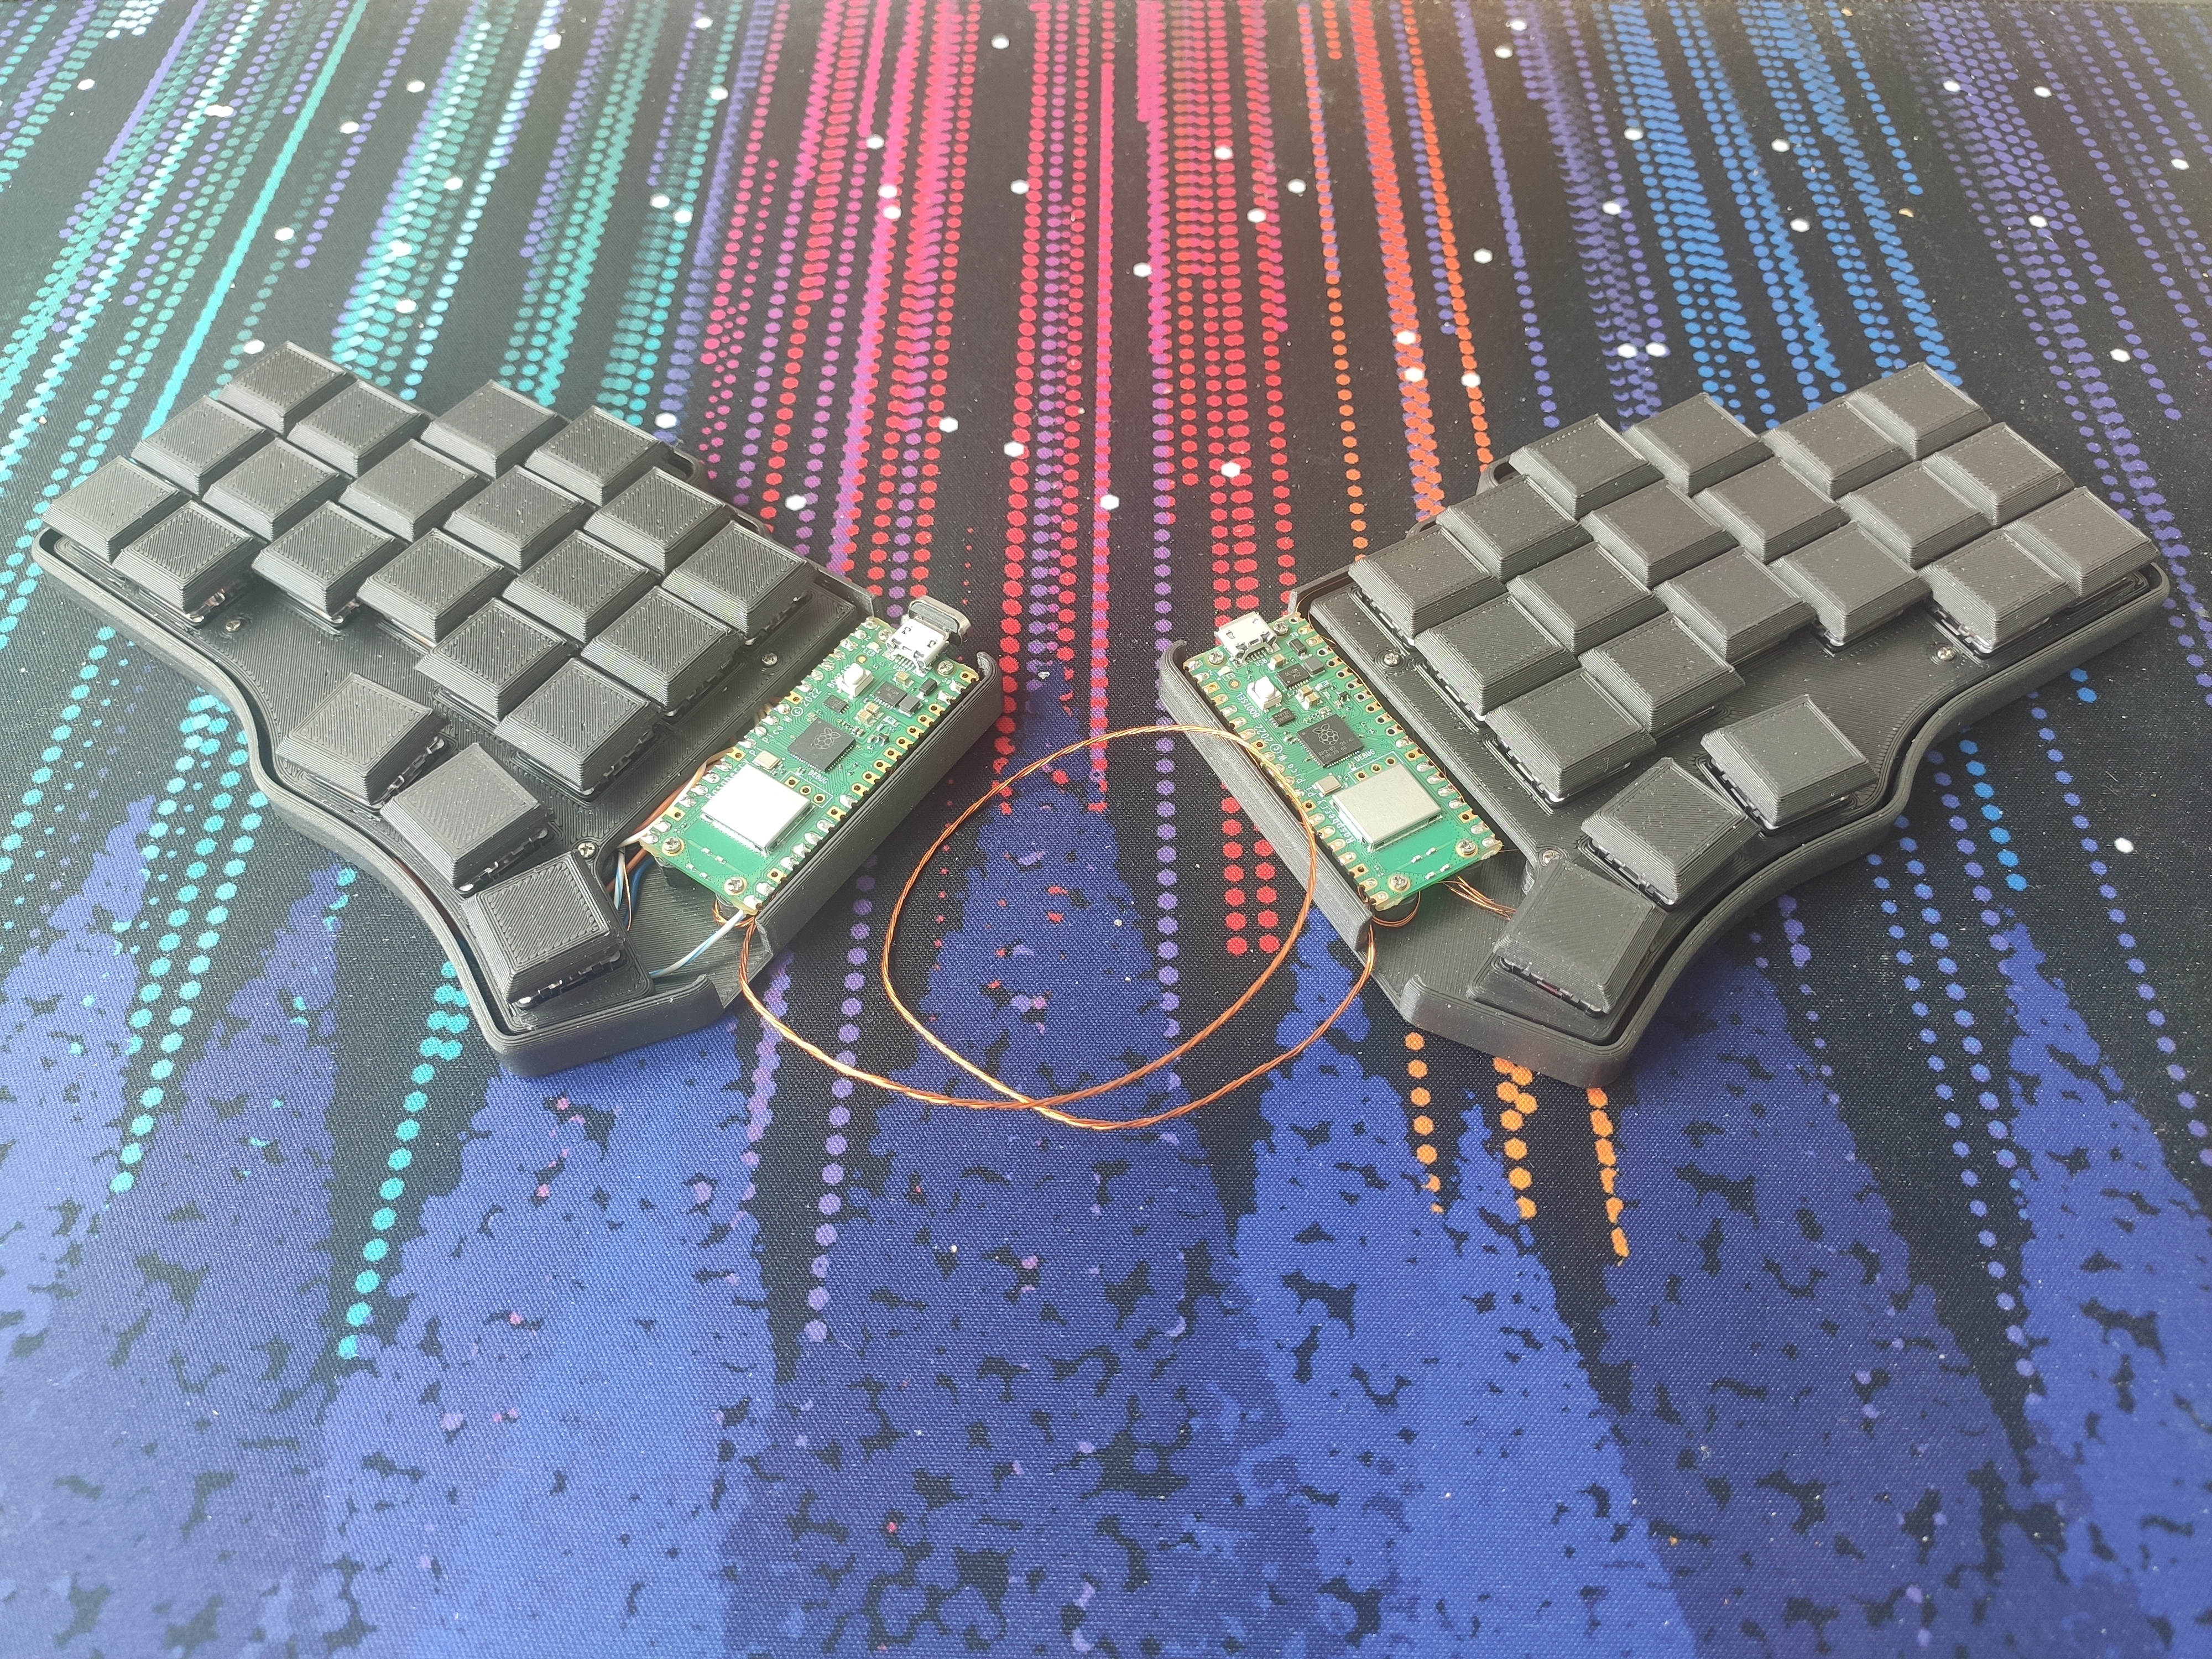
This was my first dab at creating a custom split mechanical keyboard, or any keyboard as a matter of fact. I wanted to go the budget way to see if I'll even like the keyboard or not so I decided to create one myself. I'm a fan of the pi pico as well as micropython/circuitpython and after some github scrolling I found the piantor. I have big hands so the aggressive stagger seemed to be a good fit for me.
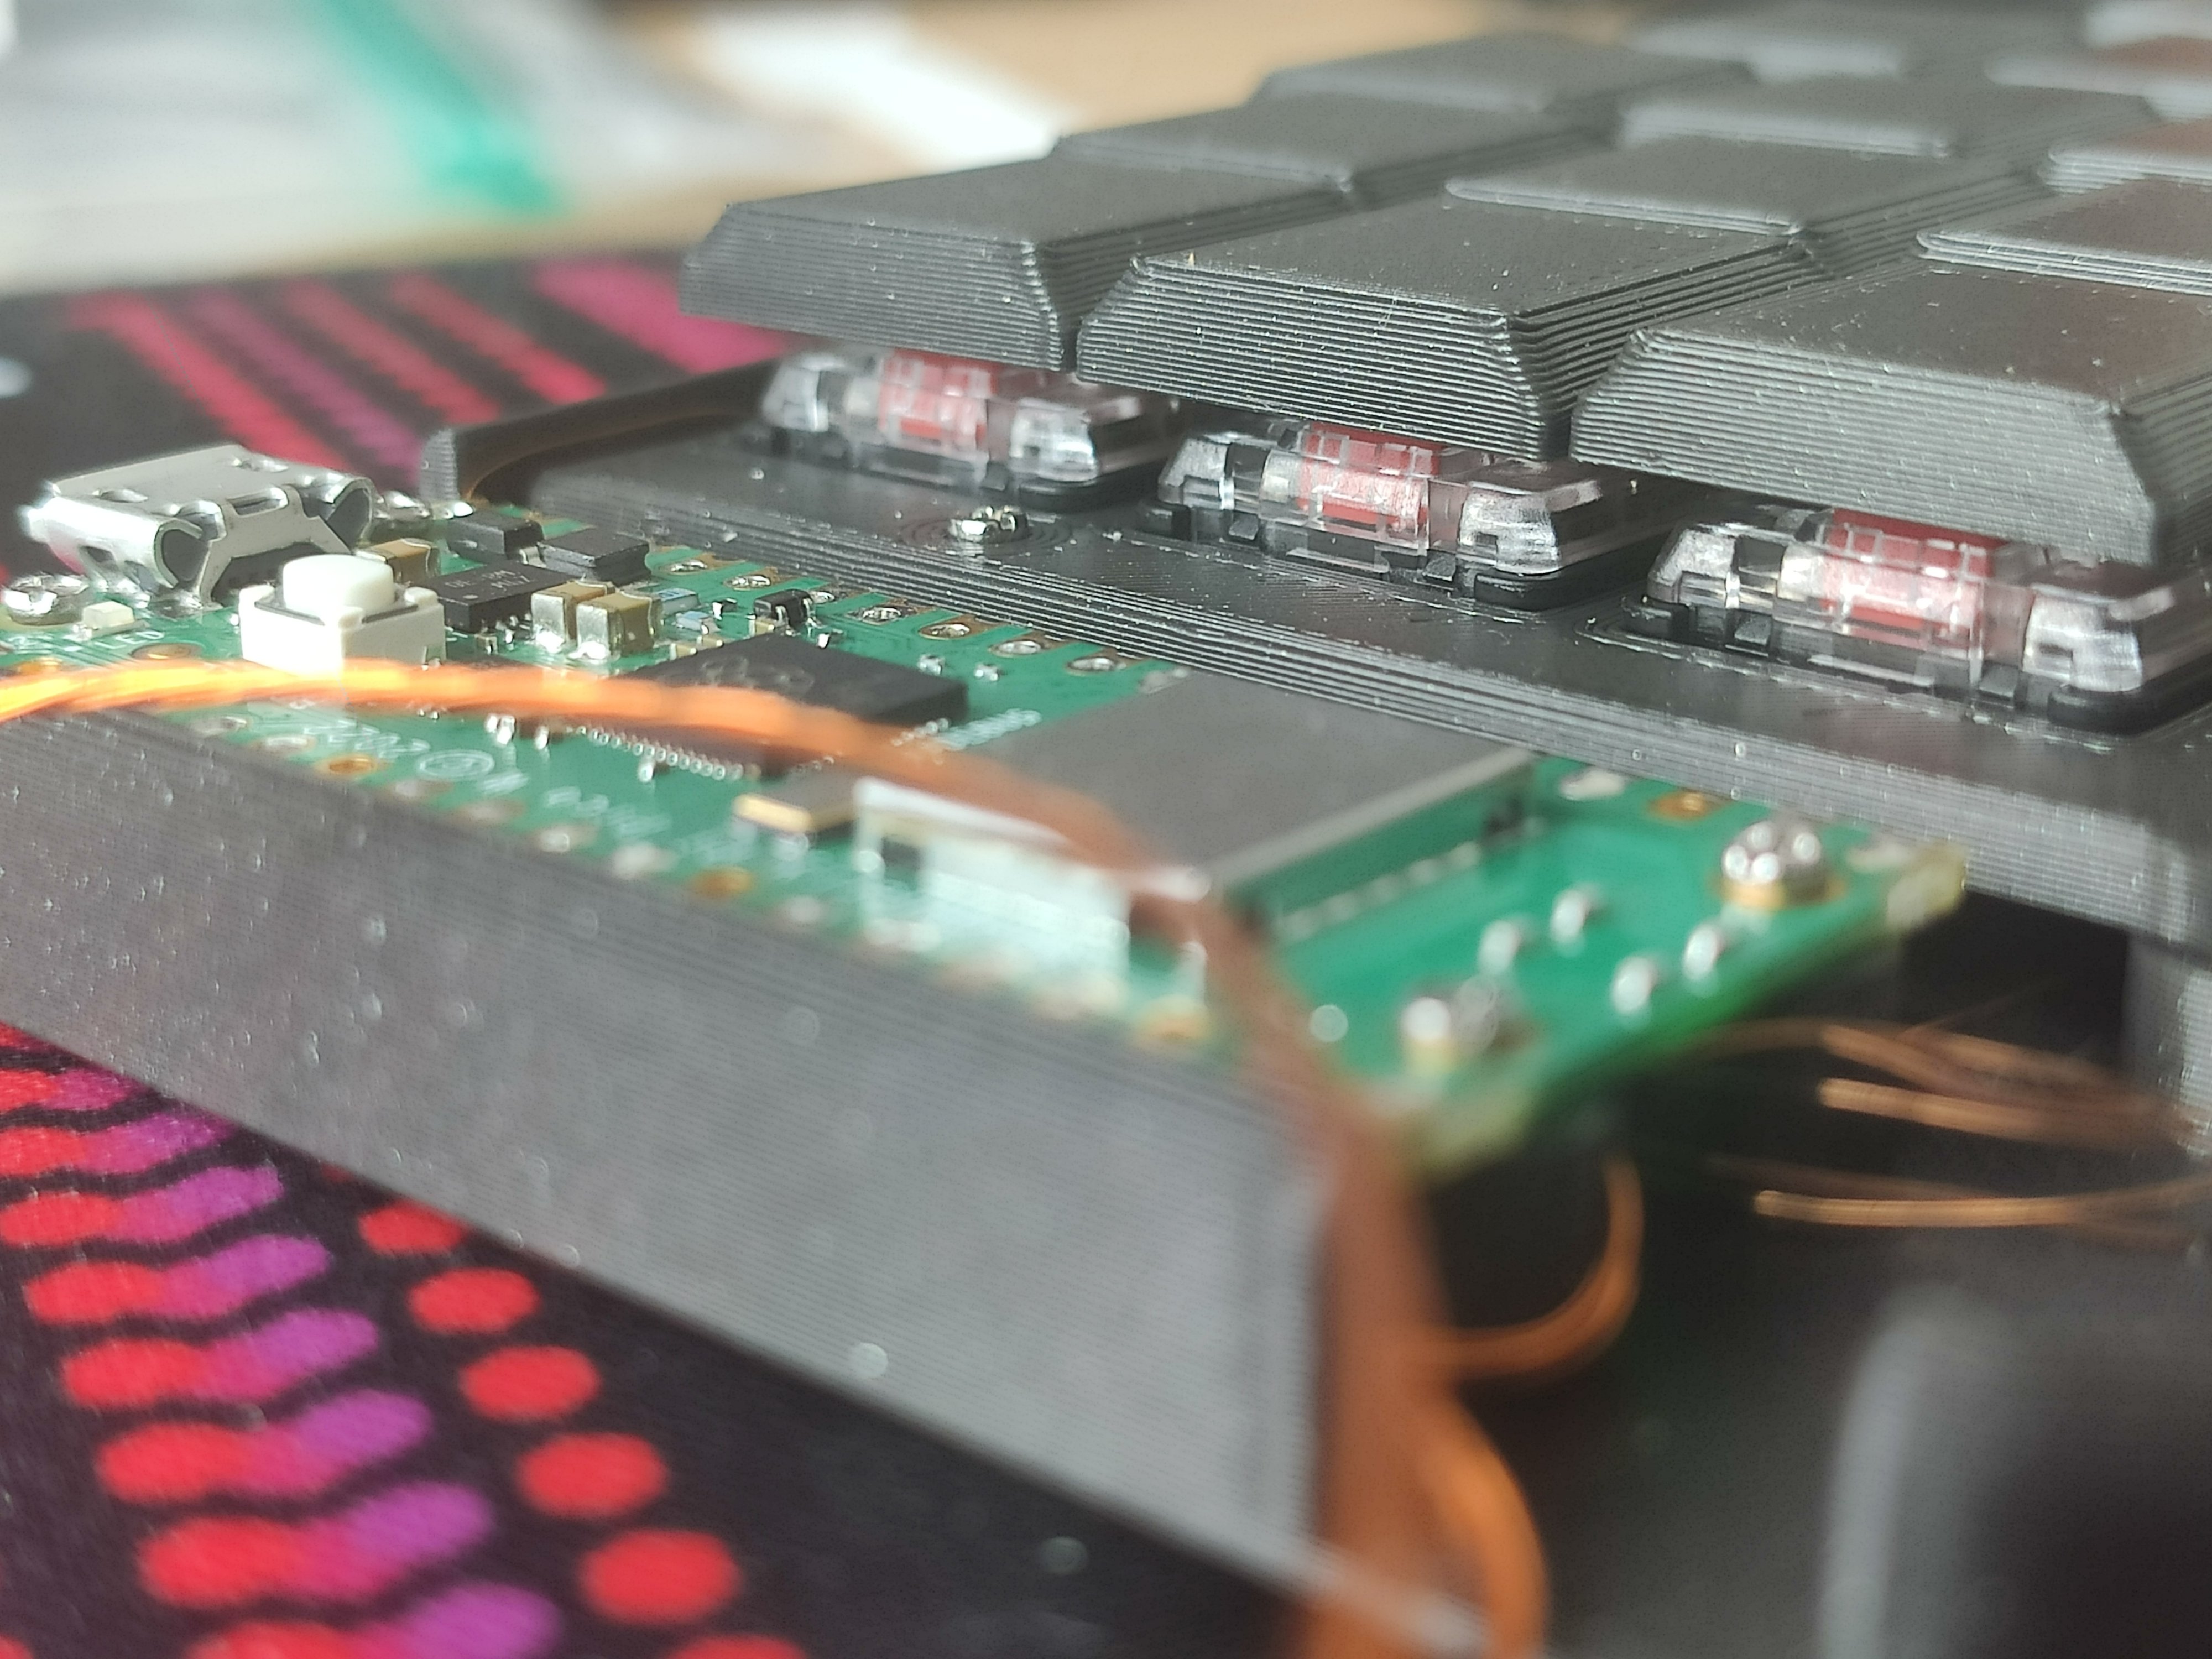
 Side view

The build:

Beekeeb offered the design files for the switchplate and the base cover that I worked off off. The initial sizing of the switchplate was a bit too loose for the keys so after some iterations I got a version that's a snug fit, and that the keys don't move around too much. Since I wasn't using a pcb, I had to adjust the standoffs, as well as adding standoffs for the pico controller. I made a mistake of using old split CAT5 Ethernet wire for the wiring of the left half and I should've stuck with enameled wire like I did for the right half. I also added a bit of glue to each underside of the key switches to eliminate any rattle. Each key is wired separately, there is no matrix.

Left hand

Right hand

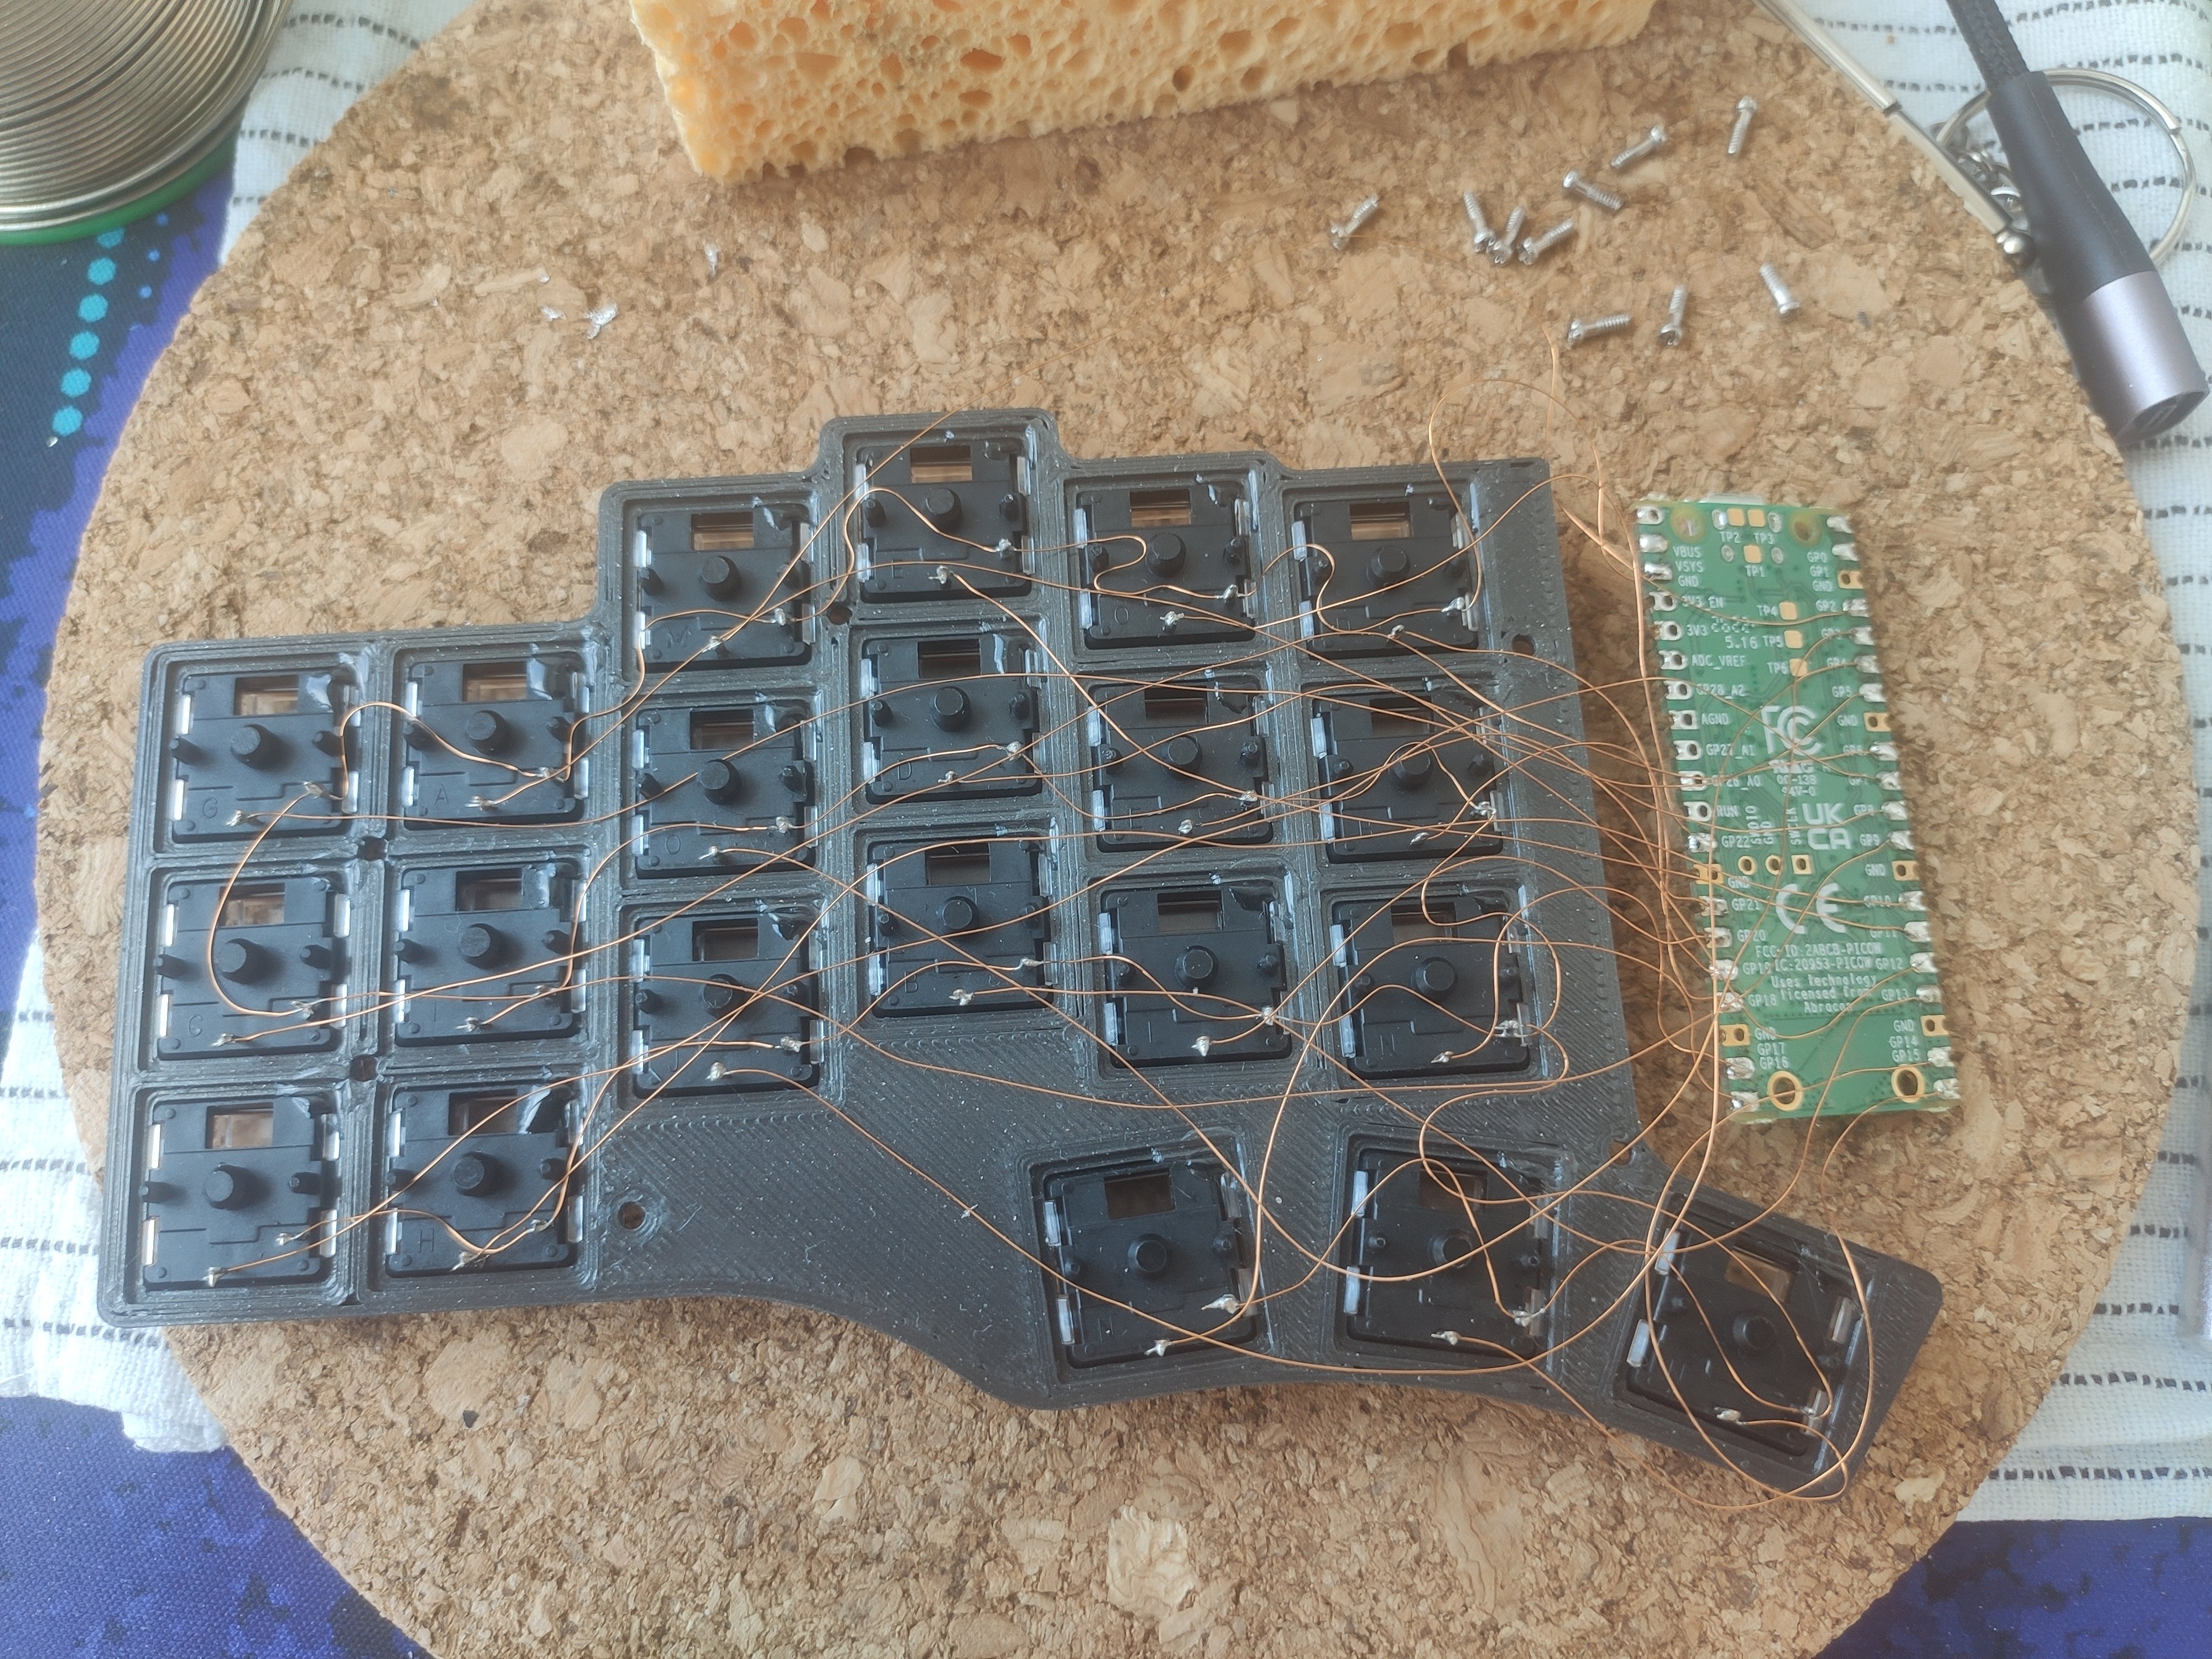
They Keycaps were also 3d printed and found them in Printables. They came out alright, but I'm a bit worried that I might break the little legs if I try to replace them again.

3D prints breakdown:

Total weight was about 100g of filament used, in my case it was 150g beacuse I was iterating a bit and a misalignment at one point. In total the print time took about 8 hours and with no supports.

My cost breakdown:

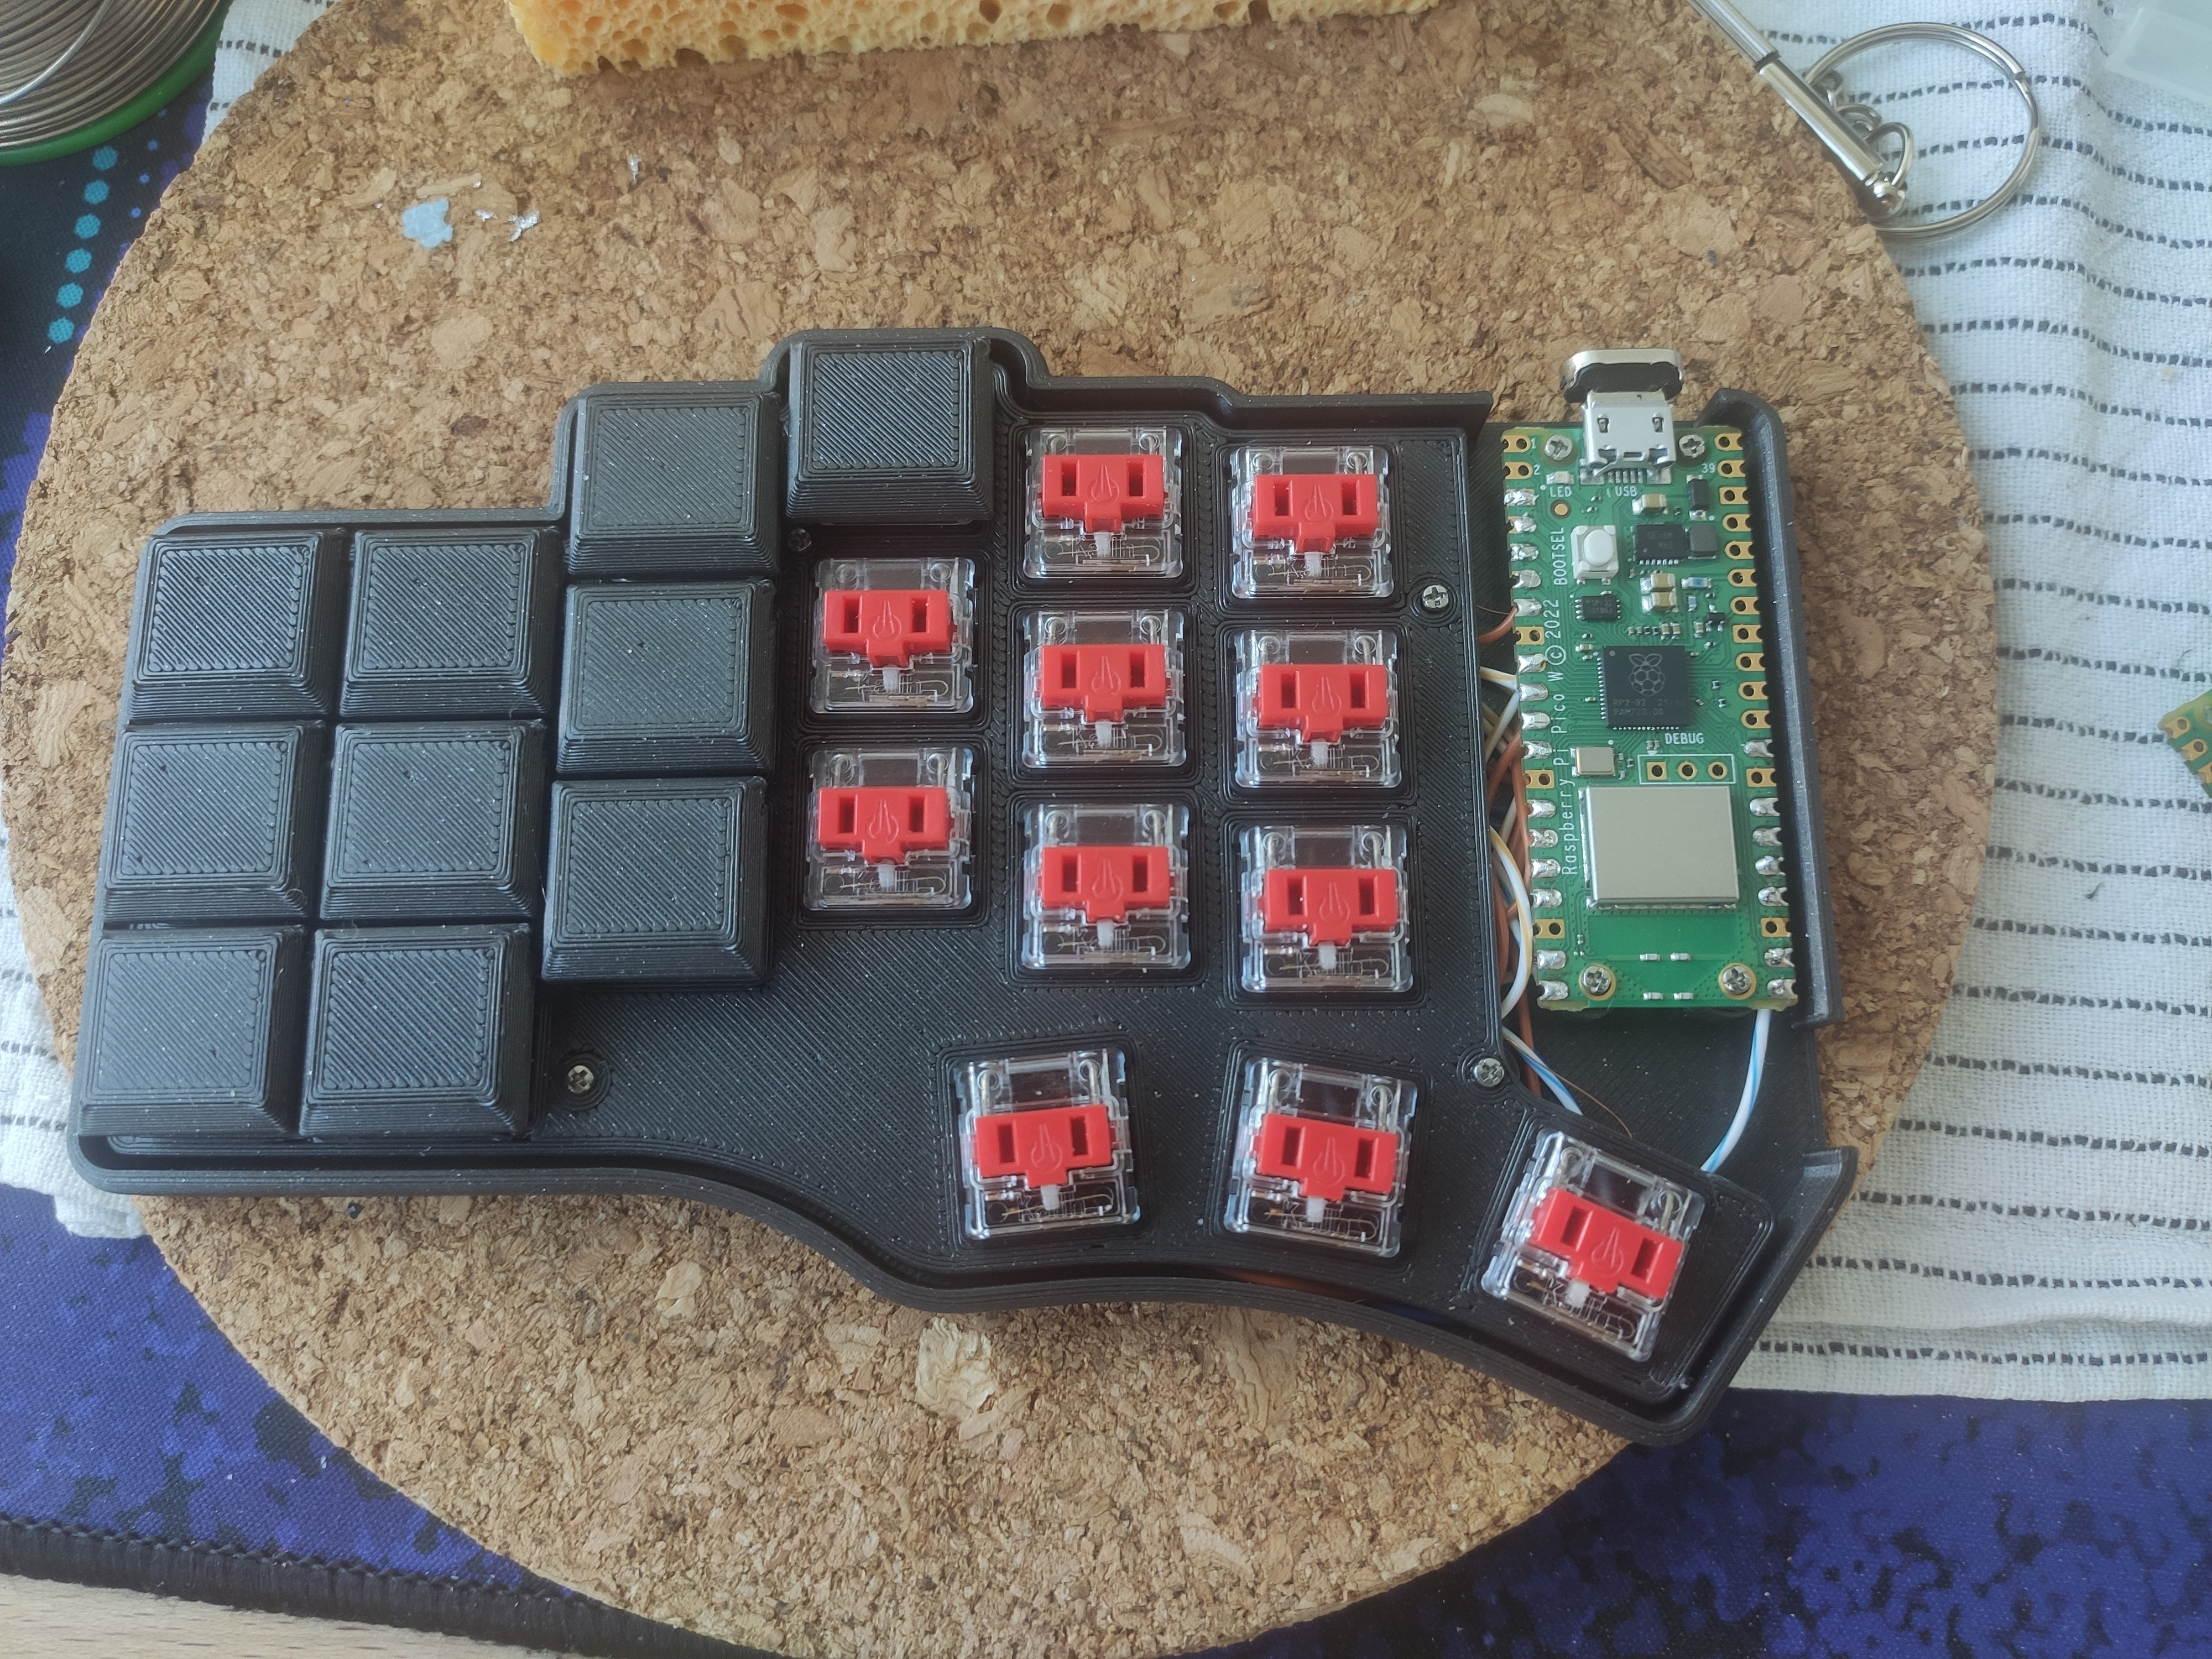
  • 50x Kailh Choc Reds = € 27,95 (Used only 42, but came in bundle of 50)
  • 2x Pi pico w = € 7,95 (Normal pico would work, but I had these on hand)
  • 150g PLA fillament = € 4,50 (on average 1kg is € 30)
  • old CAT5 and broken transformer enameled wire = priceless
  • my time = priceless

Total = ~€ 48 + € 30(shipping) = ~€ 78

Now I have to actually learn how to use this thing. I currently have it set up with KMK and using the example from github kmk and board wiring adapted from the following. I'll ask BeeKeeb if I can post my adapted designs on Printables so that if you're interested you can make one yourself.

Edit: If the pico-w ever gets a bluetooth library for circuit python, there's currently one in development for C++, I might be able to convert it to a battery powered Bluetooth keyboard in the future since I ended up using pico w's. It can currently do wifi, but I haven't figured out a use case for that. A display would be nice for starters to know what layer I'm on. I've still got 3 GPIO's left that I can use.

365


I am someone who has not used mechanical keyboards before, but I am curious about them since I read everywhere that they are great. The issue I have is that I obviously don't know which things I will like or not. For example the switches, there are a lot of brands, and they produce different switches. When I read about them, I see the familiar terms: "clicky", "tactile", but I have no idea what that actually means.

However, just starting to buy stuff to test it out will become very expensive, very quickly.

How do you start with this without spending hundreds and hundreds of Euro's at the start (and without knowing if you like it or not)

366


What's a good and cheap tenting solution for split keyboards? I currently use rubber stands but I can't get the angle high enough for my liking.

367


Reposting this on what is probablty the correct community, which I didn't know actually existed on Lemmy until five minutes ago .....

I’m humming and hawing over which split 36-key or thereabouts keyboard to get, either pre-soldered or as a kit to do the soldering myself (which would be an adventure because it has been a minute).

I’m pretty sure I want five columns not six, because I don’t see the point of giving my pinky extra work. I’m not sure about giving my thumb two or three keys for layers. Three keys would probably give me more options but I don’t want to get all layered out, you know?

Any thoughts on that? I know there is huge potential for going down the rabbithole here but assuming I get one keyboard, would I be better getting more rather than less - six columns - to play with layouts and layers? Or just go with my gut and get 5x3+2 right at the start?

PS: Does anybody know if Beekeebs 36-key Piantor case fit the 36-key PCB snugly? Or is it just the 42-key case with a big gap where the extra PCB has been broken off?

368


I call this one Daisy ;) This set went to a user in Alabama. Units also shipped to Poland and Eureka CA. So hype for more feedback from early users! Current build queue is a couple weeks long, feel free to jump in if you want one!

Svalboard is my Datahand style small-volume production keyboard -- I build every one by hand here in Pacifica, CA.

Learn more at [www.svalboard.com] and come check out the Datahand/Svalboard/lalboard discord https://discord.gg/kqNhKjxca where we geek out about this stuff!

369
64
submitted 2 years ago* (last edited 2 years ago) by [email protected] to c/ergomechkeyboards


Technically not an ergo board, but in it's current setup I'm using it as a one handed gamepad. That makes it ergo, right?

After a year off from gaming, I've been itching to play. While designing some sort of gamepad, I realized I had basically already designed what I was wanting - Chaz.

After tossing ZMK and an adjusted keymap on it, I think it'll work well enough while I think about what I really want in a gamepad. If, for some godawful reason, you want one of these - I've got a few kits up on my site or if you think you want five of this abomination, it's Open Source.

370
4
submitted 2 years ago* (last edited 2 years ago) by asteroid to c/ergomechkeyboards


Hi all,

New to Lemmy, and new to ergo keyboards. I have been working (programming, writing reports, i.e. typing up to 10hrs a day) on an 13" mac over the last 8 months and I realised that was a bad idea...

I do have a great second monitor and a decent chair but I need to rebuild my workspace, potentially get a moveable desk, and most importantly I'm in the market for an ergonomic keyboard. Where do I start? I would like to go try some out in a shop but I live in Portugal and it doesn't seem a big thing here, the big tech shops just seem to have some basic models. I have already ordered one of those wrist pads.

Hope this is OK to post here, I found this forum via the deprecated ErgoMechBoards reddit. Tips and advice would be greatly appreciated!

Cheers :)

371


I designed these bumpers for Choc keycaps, they do the same thing as o-rings on an MX switch (quiet the sound and cushion the bottom-out) but can be made from much thinner material.

I've laser cut several sets from silicone placemats (0.7mm thick) which I've daily driven on MBK, LDSA, and CFX caps, they sound and feel good! You could also use 0.5mm Poron or EVA like are used in switch pads, EPDM, neoprene, whatever.

They do not alter your switch travel but they do raise your keycaps by the thickness of whatever material you make them from.

372


The Arkenswoop is a Lord of the Rings themed revision of the swoop by jimmerricks (which is a revision of the sweep by David Barr, which is a revision of the Ferris by Pierre Chevalier (yes I found that chain of revisions funny so I included it in its entirety)).

Don't worry it isn't just a themed put on it, I added hotswap support, keeping the reversible design and wireless support. I also removed the LEDs, having no use for them ; they are also a huge power draw when in wireless. Encoder was moved a bit to the bottom because it was interfering with the nearest keycap (and the key became stuck upon pressing it, I found it funny at first).

Alas I also screwed up: the switch plate holes are a bit too big (longer than wider) ; easy fix for now was to put some tape and voilà, every holds as the holes are tighter. I might print another plate with smaller holes but for now this is more than fine.

https://github.com/SuperFola/arkenswoop

373


I'm quite tall and have rather long arms. As a consequence, I rarely find myself sitting at the desk with the elbows bent at a proper angle while typing. I figured out it would be more comfortable for me to work with the keyboard sitting on my lap, tented if possible, but I couldn't find a stable configuration with my split 34-keys board. Is there anybody that came up with a smart solution to this?

I'm also considering building a small unibody like the hummingbird, but I guess it may be too small to comfortably sit on the lap.

374


tldr: 1 half of my split keyboard types certain characters on its own without any input, the same characters don't work on actual key press after I bridged the oled jumper terminals with solder.

My split Lily58 keyboard was working great until recently i decided to add oled displays to it. When I was building the keyboard initially I didn't bridge the oled jumper terminals on the 2 pcbs so I had to do it now. I applied generous amount of liquid flux(Griffon S-39) to the terminals and bridged them with solder.

When I plug in the keyboard now, the left half works perfectly fine. While the right half has issues. Some keys (h, n,m in qwerty layout) don't work at all. Pressing other keys(j) results in multiple (unpressed)characters being typed along with the pressed key. Sometimes a character from the dysfunctional(h,n,m) set of keys will be typed over and over again without any input from me. I didn't do any soldering on the rest of the pcb.

Things I tried so far:

  • Cleaning the surface around the jumper terminals thoroughly with water and cotton swabs to get rid of any excessive flux that could be causing shorts. The oled jumpers are right next to the microcontrolelr pins on the pcb (see here: https://user-images.githubusercontent.com/6285554/53293031-d45c6280-380f-11e9-8f1c-1c167b27cfd3.jpg) .

  • Leaving the dysfunctional half dry for 2 days in case there was some water causing the issues.
- Blow air through the dysfunctional switches and the pcb holes to clean the dust

  • Desoldering the bridges on the dysfunctional half of the keyboard in order to revert to the initial state and remove any potential shorts caused by bridging

  • Tried the dysfunctional half with a different microcontroller with no effect

  • Tried replacing the switches
- Tried triggering the dysfunctional keys with a metal strip on the pcb directly with no effect

375


Now I just need to solder it up and work out how to make use of my 2” TFT screen

view more: ‹ prev next ›