How to configure Samba Server share on Ubuntu 22.04 Jammy Jellyfish Linux - Linux Tutorials - Learn Linux Configuration
File servers often need to accommodate a variety of different client systems. Running Samba on Ubuntu 22.04 Jammy Jellyfish allows Windows systems to connect and access files, as well as other Linux systems and MacOS. An alternative solution would be to run an FTP/SFTP server on Ubuntu 22.04, which can also support the connections from many systems.
The objective of this tutorial is to configure a basic Samba server on Ubuntu 22.04 Jammy Jellyfish to share user home directories as well as provide read-write anonymous access to selected directory.
There are myriads of possible other Samba configurations, however the aim of this guide is to get you started with some basics which can be later expanded to implement more features to suit your needs. You will also learn how to access the Ubuntu 22.04 Samba server from a Windows system.
In this tutorial you will learn:
- How to install Samba server
- How to configure basic Samba share
- How to share user home directories and public anonymous directory
- How to mount Samba share on MS Windows 10

How to configure Samba Server share on Ubuntu 22.04 Jammy Jellyfish Linux
Software Requirements and Linux Command Line Conventions
- Category: System
- Requirements, Conventions or Software Version Used: Ubuntu 22.04 Jammy Jellyfish
- Category: Software
- Requirements, Conventions or Software Version Used: Samba
- Category: Other
- Requirements, Conventions or Software Version Used: Privileged access to your Linux system as root or via the sudo command.
- Category: Conventions
- Requirements, Conventions or Software Version Used: # – requires given linux commands to be executed with root privileges either directly as a root user or by use of sudo command$ – requires given linux commands to be executed as a regular non-privileged user
How to configure Samba Server share on Ubuntu 22.04 step by step instructions
- Let’s begin by installation of the Samba server. This is a rather trivial task. First, open a command line terminal and install the
taskselcommand if it is not available yet on your Ubuntu 22.04 system. Once ready, usetaskselto install the Samba server.
    $ sudo apt update
    $ sudo apt install tasksel
    $ sudo tasksel install samba-server
- We will be starting with a fresh clean configuration file, while we also keep the default config file as a backup for reference purposes. Execute the following Linux commands to make a copy of the existing configuration file and create a new
/etc/samba/smb.confconfiguration file:
$ sudo cp /etc/samba/smb.conf /etc/samba/smb.conf_backup
$ sudo bash -c 'grep -v -E "^#|^;" /etc/samba/smb.conf_backup | grep . > /etc/samba/smb.conf'
- Samba has its own user management system. However, any user existing on the samba user list must also exist within the
/etc/passwdfile. If your system user does not exist yet, hence cannot be located within/etc/passwdfile, first create a new user using theuseraddcommand before creating any new Samba user. Once your new system user eg.linuxconfigexits, use thesmbpasswdcommand to create a new Samba user:
$ sudo smbpasswd -a linuxconfig
New SMB password:
Retype new SMB password:
Added user linuxconfig.
- Next step is to add the home directory share. Use your favourite text editor, ex. atom, sublime, to edit our new
/etc/samba/smb.confAamba configuration file and add the following lines to the end of the file:
[homes]
   comment = Home Directories
   browseable = yes
   read only = no
   create mask = 0700
   directory mask = 0700
   valid users = %S
- Optionally, add a new publicly available read-write Samba share accessible by anonymous/guest users. First, create a directory you wish to share and change its access permission:
$ sudo mkdir /var/samba
$ sudo chmod 777 /var/samba/
- Once ready, once again open the
/etc/samba/smb.confsamba configuration file and add the following lines to the end of the file:
[public]
  comment = public anonymous access
  path = /var/samba/
  browsable =yes
  create mask = 0660
  directory mask = 0771
  writable = yes
  guest ok = yes
- Check your current configuration. Your
/etc/samba/smb.confsamba configuration file should at this stage look similar to the one below:
[global]
   workgroup = WORKGROUP
   server string = %h server (Samba, Ubuntu)
   log file = /var/log/samba/log.%m
   max log size = 1000
   logging = file
   panic action = /usr/share/samba/panic-action %d
   server role = standalone server
   obey pam restrictions = yes
   unix password sync = yes
   passwd program = /usr/bin/passwd %u
   passwd chat = *Enter\snew\s*\spassword:* %n\n *Retype\snew\s*\spassword:* %n\n *password\supdated\ssuccessfully* .
   pam password change = yes
   map to guest = bad user
   usershare allow guests = yes
[printers]
   comment = All Printers
   browseable = no
   path = /var/spool/samba
   printable = yes
   guest ok = no
   read only = yes
   create mask = 0700
[print$]
   comment = Printer Drivers
   path = /var/lib/samba/printers
   browseable = yes
   read only = yes
   guest ok = no
[homes]
   comment = Home Directories
   browseable = yes
   read only = no
   create mask = 0700
   directory mask = 0700
   valid users = %S
[public]
  comment = public anonymous access
  path = /var/samba/
  browsable =yes
  create mask = 0660
  directory mask = 0771
  writable = yes
  guest ok = yes
- Our basic Samba server configuration is done. Remember to always restart your samba server, after any change has been done to
/etc/samba/smb.confconfiguration file:
$ sudo systemctl restart smbd
- (optional) Let’s create some test files. Once we successfully mount our Samba shares, the below files should be available to our disposal:
$ touch /var/samba/public-share
$ touch /home/linuxconfig/home-share
Access Ubuntu 22.04 Samba share from MS Windows
-
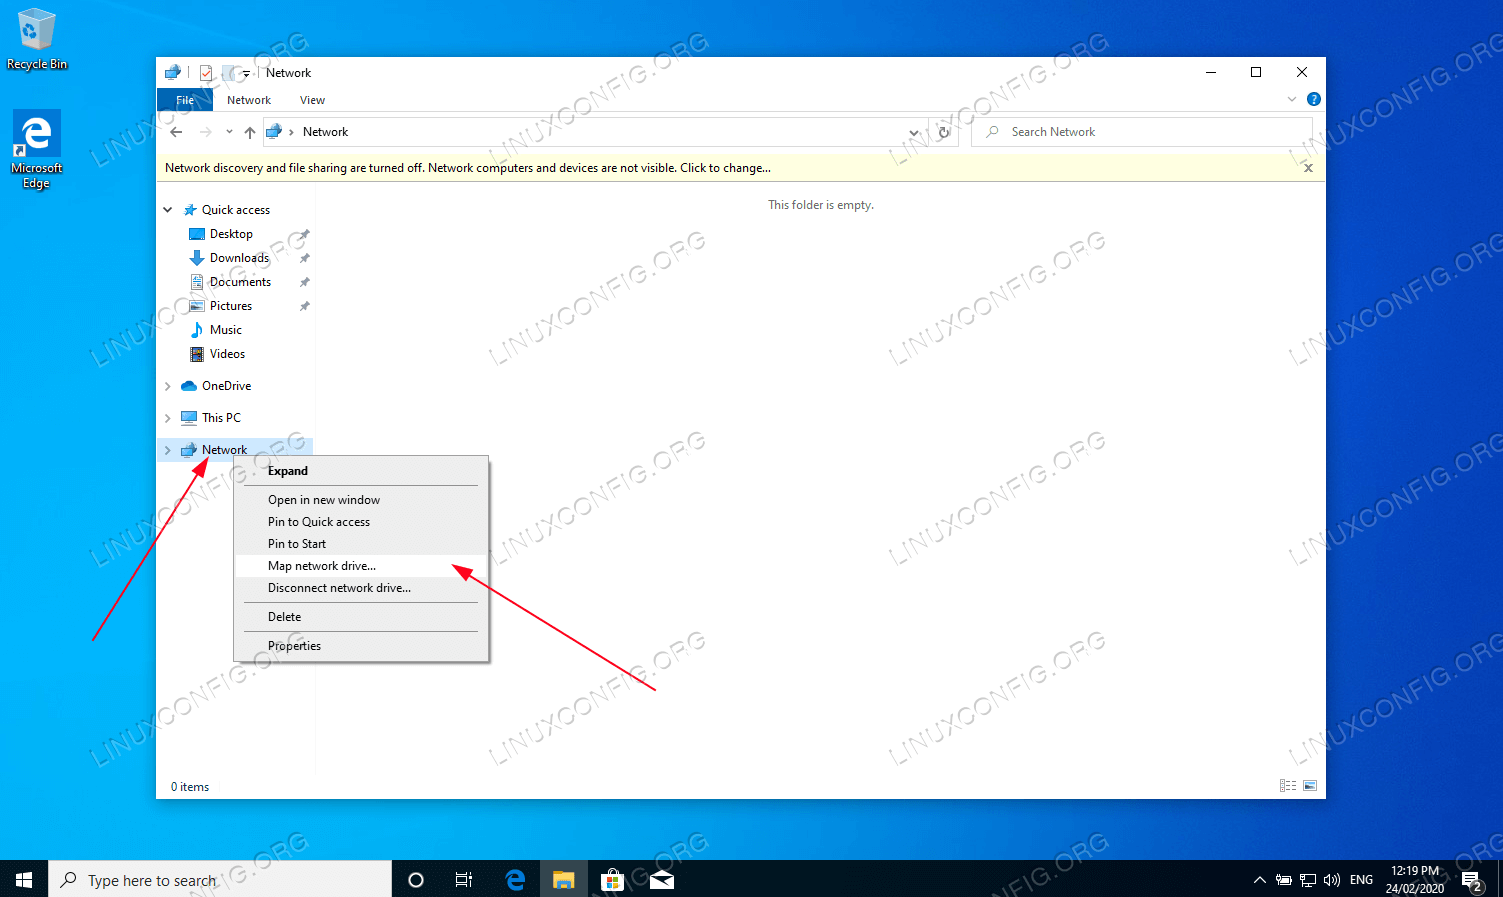
At this stage we are ready to turn our attention to MS Windows. Mounting network drive directories might be slightly different for each MS Windows version. This guide uses MS Windows 10 in a role of a Samba client. To start, open up your
Windows Explorerthen right click onNetworkand click onMap network drive...tab.
Map network drive option on MS Windows
-
Next, select the drive letter and type Samba share location which is your Samba server IP address or hostname followed by the name of the user’s home directory. Make sure you tick
Connect using different credentialsif your username and password is different from Samba one created with thesmbpasswdcommand on Ubuntu 22.04.Select network folder configuration options and click Next
-
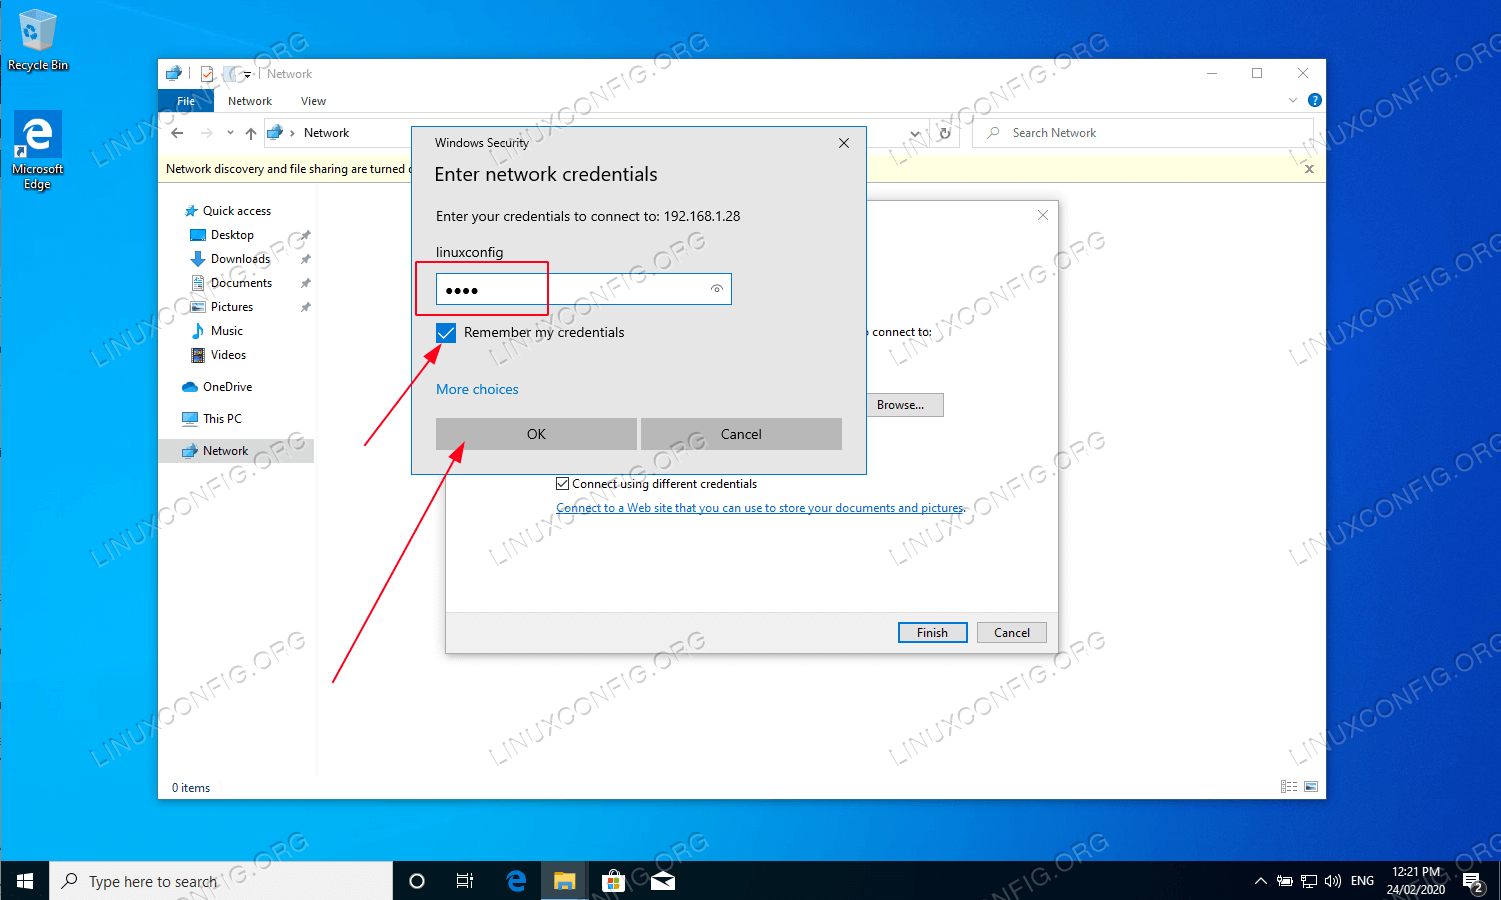
Enter Samba user’s password as created earlier on Ubuntu 22.04.

Enter Samba password
-
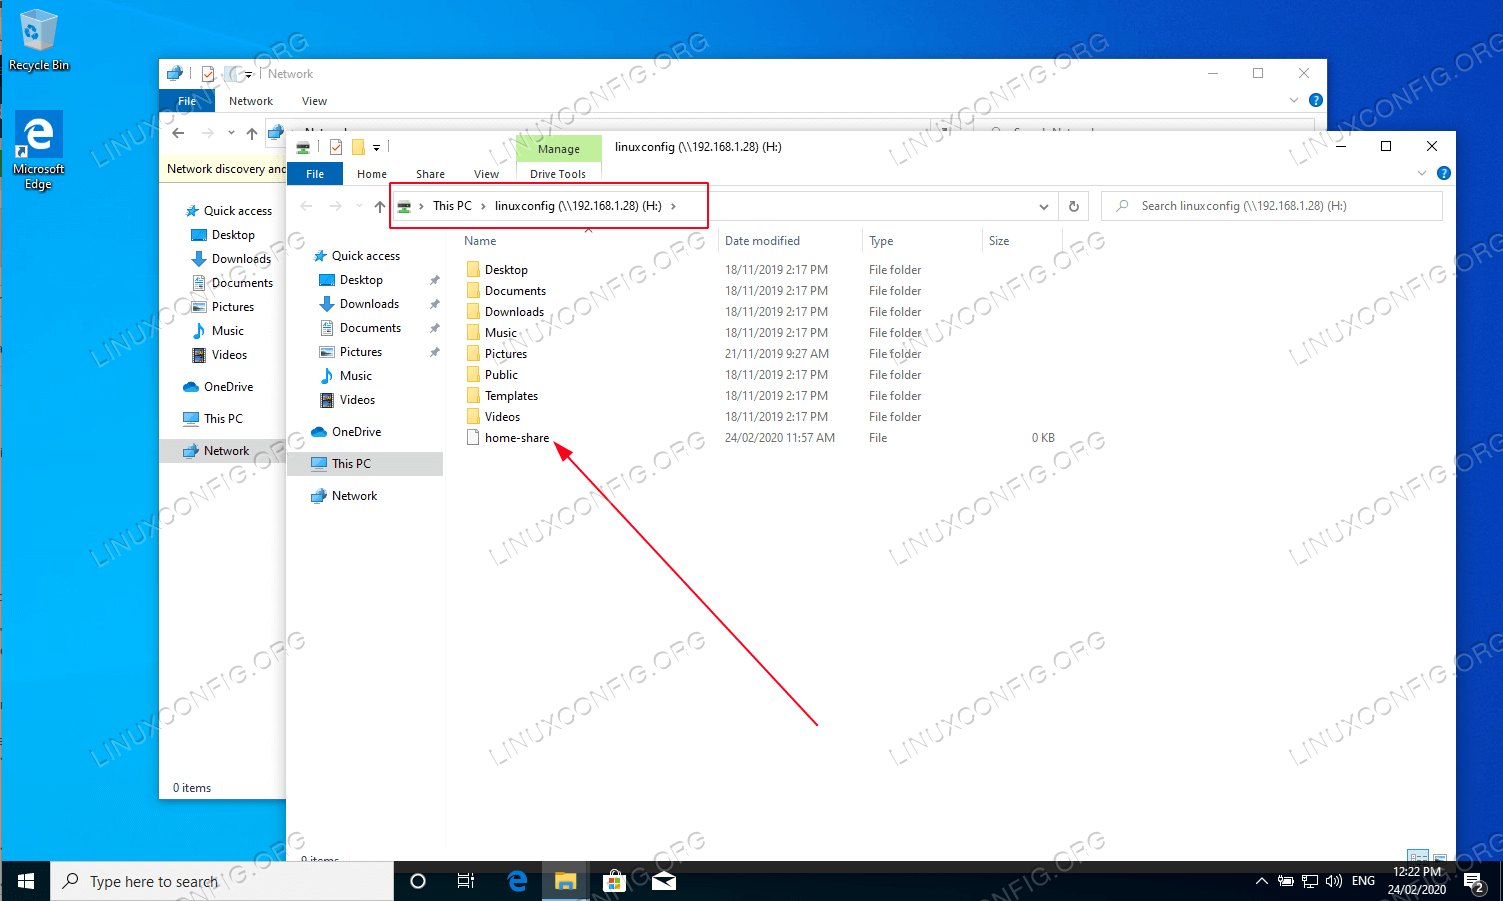
Browse user’s home directory. You should be able to see the previously created test file. As well as you should be able to create new directories and files.

The home directory is browsable, with read and write permissions
-
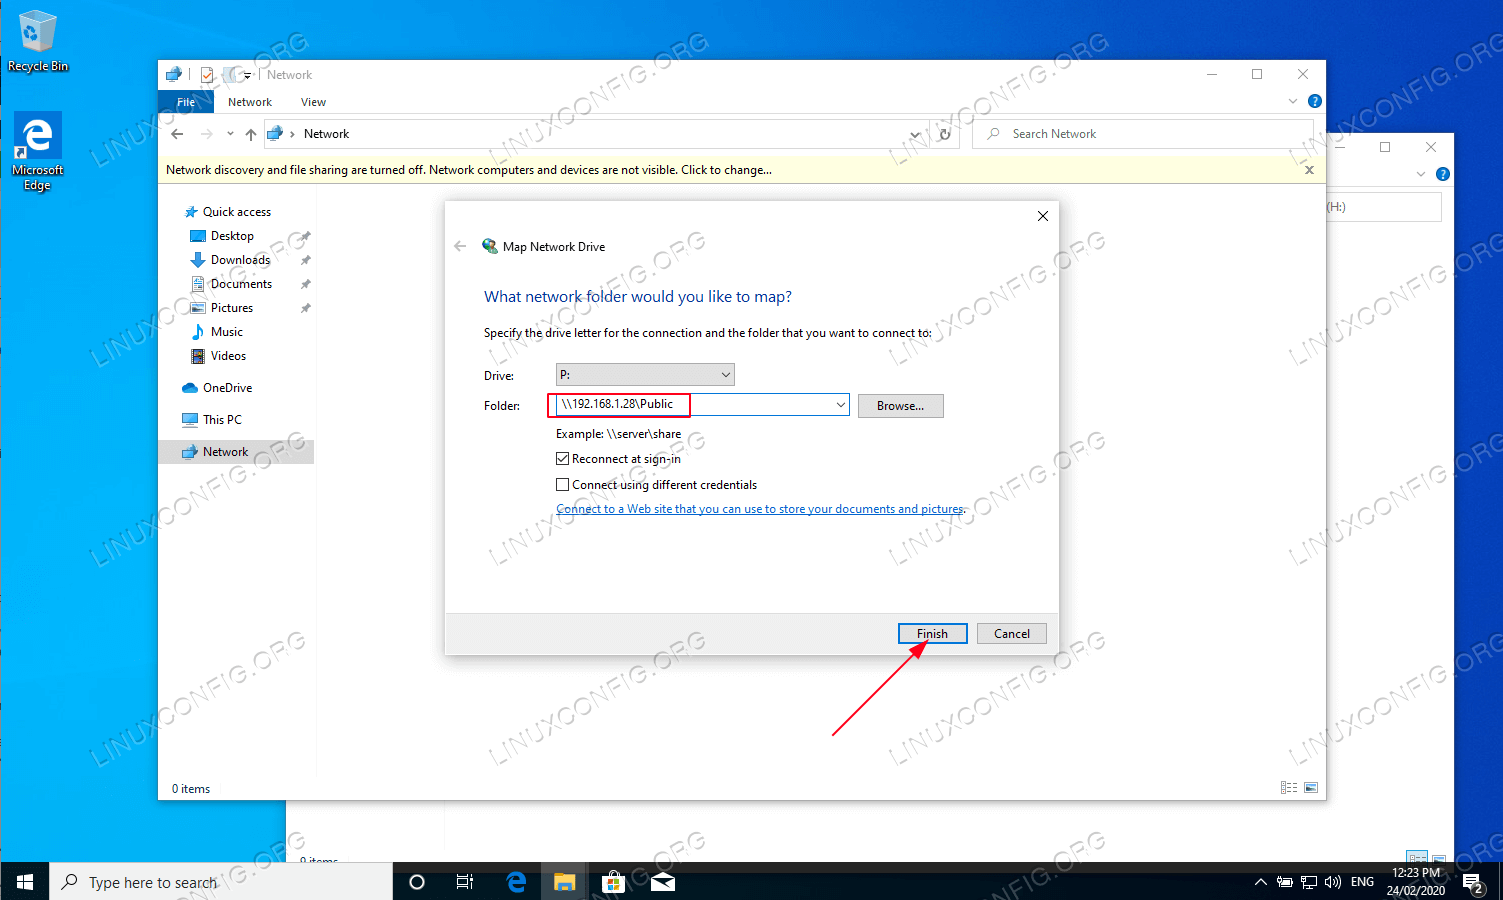
Repeat the mounting steps also for the publicly anonymous samba directory share.

Mount the public Samba directory to a different drive letter in Windows
-
Confirm that you can access the Public samba share directory.

Connected to the public Samba share and the test file is viewable
All done. Now feel free to add more features to your Samba share server configuration.
Closing Thoughts
In this tutorial, we learned how to install Samba on Ubuntu 22.04 Jammy Jellyfish Linux. We also saw how to create a Samba share, a Samba user, and configure read and write access. Then, we went over the steps to connect to our Samba server from a client machine running MS Windows. Using this guide should allow you to create a file server that can host connections from various operating systems.
