Music Production

510 readers
4 users here now

This is Music Production. A place to share anything and everything you want about your music making journey! Learning is the goal, so discussion is encouraged!

RIP Waveform.

Rules are as follows:

  1. Don't share other people's music without commentary, analysis or questions. This is not a music discovery community.
  2. No elitism or bigotry towards other people's music tastes. Be polite in disagreement.

I will update rules as necessary, but I promise we'll stay light on them and only add new ones after discussion!

Here are some useful examples of what a great post would be about:

(in no particular order)

  1. Stuff you made/are making. Get valuable feedback and criticism!
  2. Learning resources - videos, articles, posts on any topic concerning a production process, be it composition, sound design, sampling, mixing, mastering, DAW workflow or any other.
  3. Free plugins, presets and samplepacks. Giveaways and self-made stuff included!
  4. News about production software, releases and personalities.
  5. Questions and general advice about music production.
  6. Essays on your favorite productions. Inspirations and insights!
  7. Your physical analog gear! Let us know how it performs!

Good to know: As a general word of caution, avoid posting complete compositions, mixes and tracks on the internet before backing them up on a remote and reputable server. Even small snippets or watermarked tracks should be posted AFTER backing it up to cloud. Timestamps from cloud services will help you in case of theft. And, as a public resource, lemmy is not a safe place to post your unpublished work, so please make sure your work is protected.

founded 1 year ago
MODERATORS
26


This one might be obvious to you folk who have worked on pro recordings. Compressing vocals and compressing instruments require different mindsets. Different in the way that you shouldn't be afraid to compress your vocals to -10 and -20db, while your instruments are at a subtle -2 to -5 (and I don't even limit myself there, because I love distorting my drums).

This video will show you every trick you did before: eq, automation, reverb, etc. and compare it to compression in the context of a rock track.

27


This is a great video overview on just the neccessary bits and nuances of making Drum'n'Bass. What I like about this specific video is that it helps you understand what is possible within the genre and doesn't restrict you like an instruction manual.

It will help you to familiarize yourself with the core concepts of DnB and give you some pointers on how to give your tracks a cohesive structure within it! Highly recommend.

28


Understanding how to manage rhythmic patterns is a must-know for any producer. Unfortunately, not everyone has a formal music education, so if you're like me, this video will help you bridge that gap and help you on your music making journey!

EDMProd gives us some insights into the process of finding your rhythm with examples from house music and you can apply these concepts with relative ease to any other genre!

29
30


Compression feels esoteric to anyone who's starting out in the world of music production. Even when we start to understand how it works technically, we just slam on the gain and work that ratio until we can hear the difference as the sound explodes from distortion. But compression isn't just a tool to make your loudness more consistent, it's a tool that can help you shape the texture of individual samples or synths the way you want them to be.

In this video, Gregory Scott, audio hardware and software designer tells us how to listen for compression (in drums, more specifically). Go check it out, and I hope it helps you on your journey!

31


A big part of creating unique tracks is getting your synths to sound unique and distinct from each other as well as from other producers. If you've been used to working with presets and know how it feels to be trying to find that one sound, why not start learning how to make it yourself?

This video will get you started.

As daunting as it may seem at first, making simple patches is really fast from the get-go, so don't feel like you won't be able to immediately put that knowledge to work.

This video also goes into some technical details between different types of synthesis to avoid problems that you might encounter later in the mixing stage.

If you need a free alternative to Serum, consider Vital from a previous post! Although, you should be able to follow it with any other synthesizer!

I hope this video helps you guys on your journey!

32


Download: https://vital.audio/#getvital

Video guide by In The Mix: https://www.youtube.com/watch?v=7qQX6YGBQEA

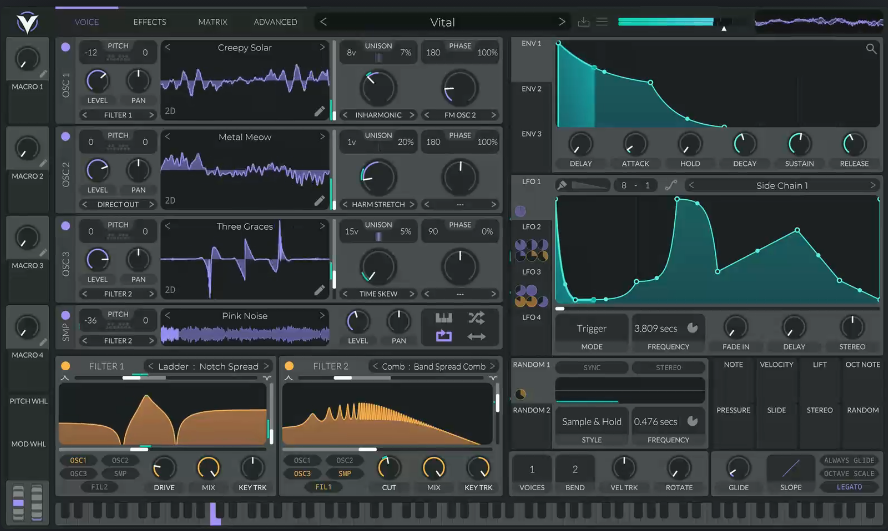
I don't think there is any modern producer who hasn't heard of Vital, and probably even less who haven't heard of Serum. Those are the options when it comes to wavetable synths with great visual interface to give you better insight into your sound design. And from my limited experience with Serum, I think Vital might just be better in more than just visuals and price (Serum is so damn expensive!)

Vital comes feature complete with its free version. The only thing you get for paying is more wavetables and presets as well as exclusive perks from the developers. It's a great boon to hobbyist producers, and these guys have great confidence that you'll donate to support the effort. And I think that confidence is well placed, they deliver.

Vital is not one of those free alternatives that comes just as a way to do something a popular program does, but quicker, dirtier and worse. It's a feature-complete, well-polished product designed for professional use and comes with all bells and whistles you need to get amazing sounds out of it. And even some extras that you won't find in every other popular synth.

If I go over every feature of Vital, we'll be here all day, so I'll highlight some of my favorites and let you decide if you want to give it a chance:

Stereo LFOs allow you to stereoize your patches by desynchronizing your effect modulations. In layman's terms, you can use one control to do two different things to your left and right ears and get some clean (or trippy) stereo!

Random oscillators with tons of customization for all of your modulation needs. They can help your patch sound more organic and fresh throughout your track, or create some whacky, glitchy and/or chaotic sounds. It comes with a stereo feature too!

Great options for keyboard/note tracking, allowing you to keep your effects consistent (or warp them) on different pitches. You got a keyboard track option built into your filters as well as note and note relative to octave controls that give you total freedom over how your instrument behaves on different pitches!

I've been using Vital in my own productions for a while now and it's been a breeze to make the kind of sound I want with it. I hope this little overview helps you take the plunge and play around with it to see if you like it! Good luck!

Edit: I'm still trying to figure out how to format post better for Lemmy, so I had to re-add the link to download after realizing it got replaced by the image. Whoops!

33


This is a great video tutorial for stereo imaging bass-heavy instruments that you want to stay consistent on the low end, such as a bass guitar or distorted bass synth. Using stereo imaging plugins might be problematic and not produce the same results, so check the video out if this is something new to you!

If video is not your style, here's a short summary of "the trick":

The problem with using most stereo enhancing plugins is that they don't actually create side content, they just push your mid content to the side and create a really jarring wobble effect that you can hear most clearly on the low end, and your mids might not sound quite as wide as a result.

Reverbs smooth out the sound that passes through them, and with that they create unique frequencies that can be used for your stereo mix. This process fills the gaps in your frequency range and makes them distinct from your mono content, creating a wide stereo image and preserving clarity. Since we don't want to wash out the original sound we keep that reverb very short.

First, route your instrument's signal to a channel you'll use for the reverb. Then, high pass reverb channel around 160 hz so that you don't feed your bass into it. Add a convolution reverb plugin to that chain. Remove the dry signal from reverb channel so that you can have proper control over the mix. Set an extremely short decay (~0.2-0.05 seconds) on the reverb, use a small room IR or preset. Then you just max out witdh/stereo separation so all of that sound gets sent to the side channels.

If you did everything correctly, you now have your dry instrument channel and your reverb channel both sending signal to a bus or the master. Congrats!

I've personally found that convolution reverbs are not necessary to achieve the same effect, but a unique room signature will certainly give the sound more flavor.

Hope this little trick helps you on your journey!

34


I present to you VSCO Community Edition, one of the most high quality orchestral libraries that are available out there for free! They've got wind, strings, percussion and brass with articulations to boot! If you want to practice making some big orchestral pieces or to spice up your regular production without throwing out cash on a huge library you may not use, this. is. the. thing!

For a quick overview of what this library can do, let me go over some of the cool features here. They got samples with different articulations for different instruments, all of your staccatos, mutes, attacks, tremolos, vibratos, soft, hard or medium, where applicable. All of it comes packaged in a ton of different variants, .sfz for orchestral samplers (like free sforzando and sfiz), free Ochestools VST3, two different Kontakt libraries, .XRNI for Renoise, and original .wav files if you want to work it into your specific sampler! As a bonus there's a bunch of Omnisphere patches by Man Makes Noise that features movie-trailer and hybrid sounds made from this library!

But if you're trying to pick something for your first time, I suggest going with the .sfz paired with sforzando (Windows and MacOs) or sfiz (Linux). Sfz is a non-proprietary preset format that maps your .wav library to an orchestral sampler. It allows for Key Switch which is a feature for instruments with complex articulation that lets you play different articulations straight from piano roll, no tinkering required! All presets with key-switches built-in are marked with letters "KS", and if you wish to go deeper with it, you can make your own too!

A video-tutorial from Versilian Studios themselves will show you how to set up your .sfz instruments and explain some details related to the format: https://www.youtube.com/watch?v=VomafctByTs

Orchestools is more fit for advanced users that are willing to work with midi mapping, velocity mapping, envelope and LFO modulation to perfect the sound. Mind that you'll have to map every articulation separately so you can use them, as I'm not really aware if there is a Key Switch feature built-in. Also I haven't figured out a good way to work with percussion in it, so it might just not be fit for that use.

All samples are provided with Creative Commons 0 license, which means you can use it for anything you want, commercial production included!

35


This is a great and (relatively) concise video explaining what saturation means, different types of saturation and their relation to harmonics. Some really big insights there that will clear the process up for you. Big recommend.

36


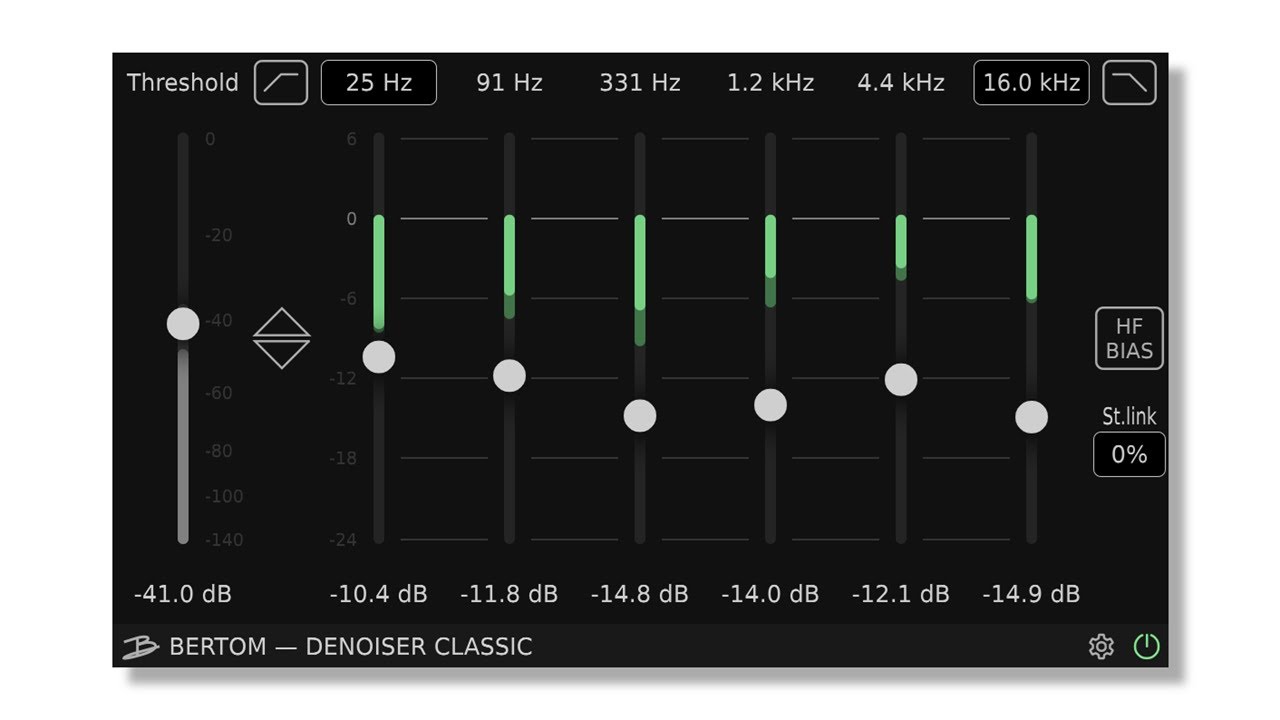
I've been using Bertrom Denoiser for a while now in all of my vocal chains to clean up the recording from an occasional noise and background hiss. It basically works as a multiband noise gate, which allows it to have almost no latency and accurately target random sounds you might get in a home production setting. Set a treshold, set the frequency range, get cleaner sound. Simple. You can manipulate the strength of the noise gate at every frequency and preserve clean areas without hiss or random noise. The plugin's use isn't limited to vocals either, it can work well with any instrument recording.

They've got two versions of this plugin: Classic (Free) and Pro (25$ at the time of writing)

The main difference between them is that you can only set one gating treshold for all frequencies in classic, whereas Pro allows to tweak a treshold for each frequency. I've found that using two classics for low-to-mid and mid-to-high frequencies is sufficient for a difficult recording, but most of the time one is all you need. That said, I bet you can really do some good clean up with Pro.

Comes with versions for Windows, MacOS and Linux as VST3, AU or AAX, as well as for arm64 and apple silicon processors.

Bertrom Denoiser Classic (Free): https://www.bertomaudio.com/denoiser-classic.html Bertrom Denoiser Pro (25$): https://www.bertomaudio.com/denoiser-pro.html